In the same sense that an expensive camera doesn’t guarantee good photos, an expensive camera rig doesn’t guarantee quality. That being said, investing in a stable, reliable, and flexible setup that saves you time and headaches can definitely be worth the cost. The camera rig showed here is my current setup and is probably the tenth iteration I’ve created over the past few years. I’ll cover the details behind my setup, how it helps with my photography, and lessons I’ve learned along the way.
Equipment
The below is a list of equipment for my camera and for the vertical focus stacking rig. Not all equipment is used for every shot, e.g. some lighting gear I will only use in specific cases.
Camera & Lighting
- Sony A7R III
- Laowa 100mm f/2.8 2x Ultra Macro APO lens
- Godox X1S wireless transmitter
- Godox TT350S flash
- Godox SL-60W LED video light
- Laowa Front LED Ring Light
- Keyence DRW-8M LED light
- Lilliput A7s 4k HDMI monitor
Vertical Focus Stacking Rig
- THK KR26 linear actuator
- NEMA 23 stepper motor
- Custom-built automated focus stacking controller
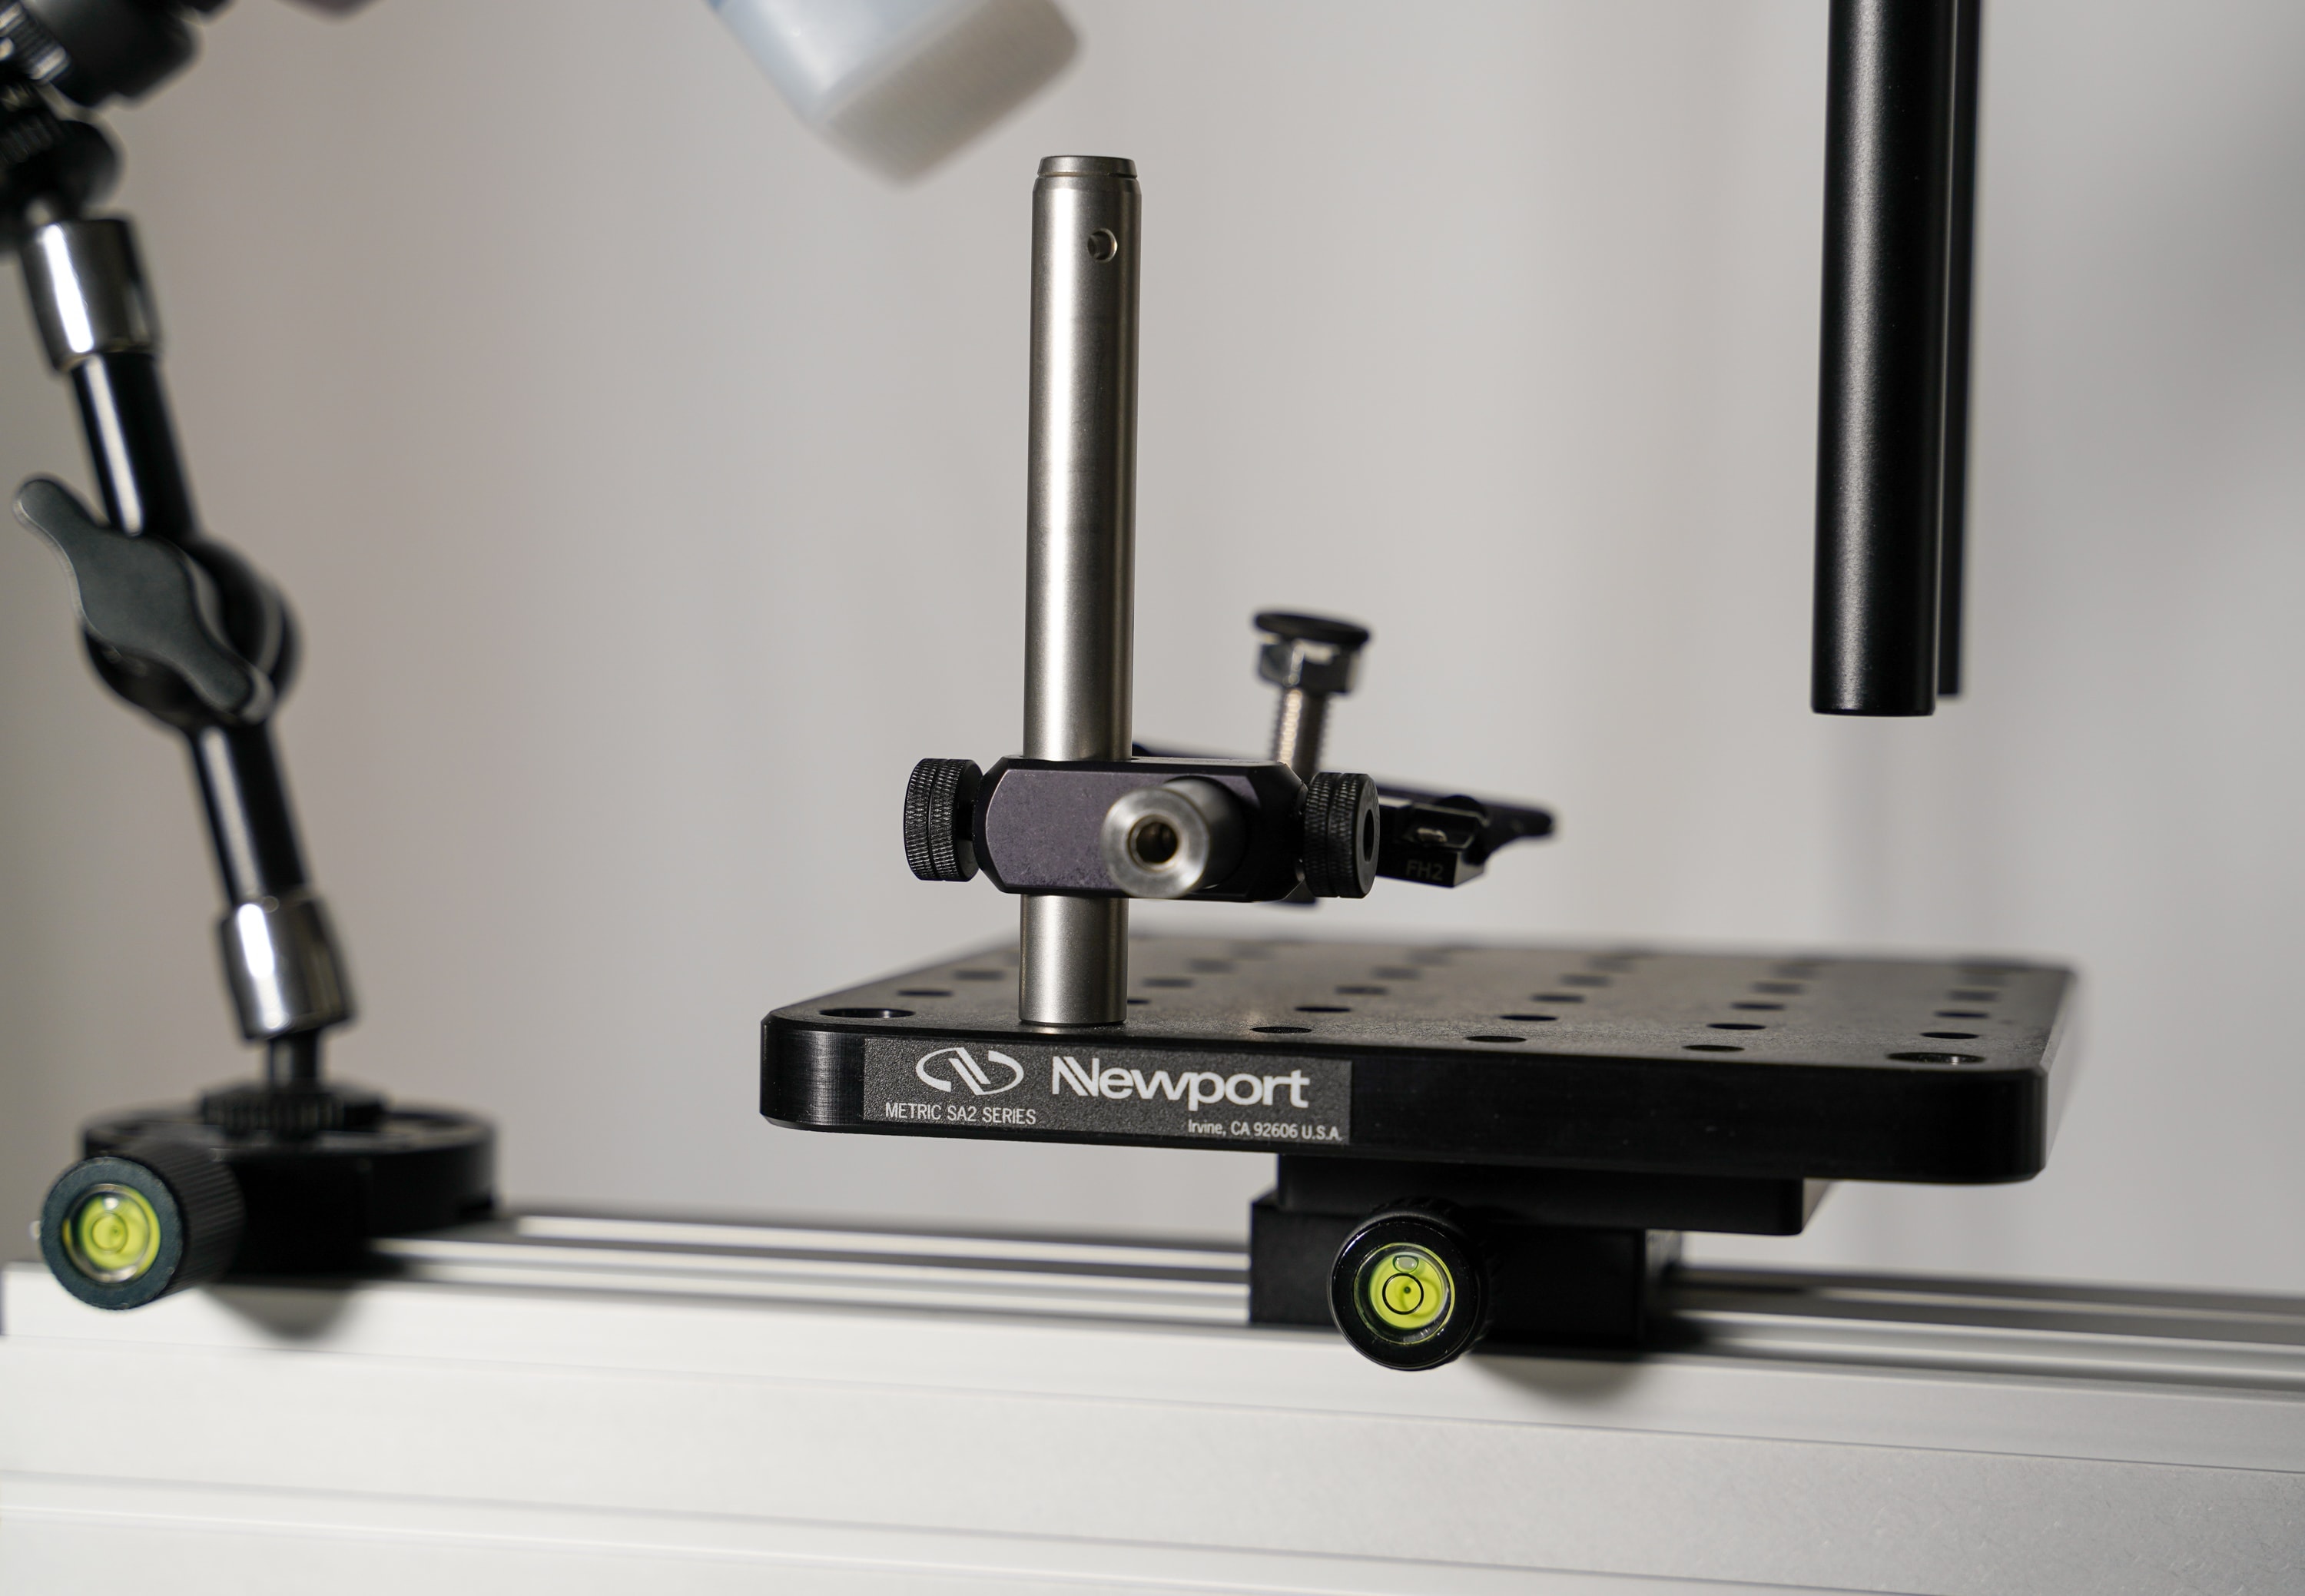
- Newport 600mm x 150mm optical breadboard
- Newport 150mm x 150mm optical breadboard
- Thorlabs XT66 66mm optical construction rail x 2
- Thorlabs XT66P2/M rail carriage
- Thorlabs XT66P3 horizontal mounting plate x 2
- Thorlabs XT66RA1 right angle clamp
- Multiple ARCA camera plates to adapt between the 66mm rail and camera equipment
Making a Focus Stacking Rig
There are many ways to skin this cat and I would recommend not copying just one person’s design but rather to borrow from multiple and design something that suits your needs. Over the last few years I’ve gone from using a cheap tripod, to a Sunwayfoto macro rail, a Proxxon KT-70 XY table with a camera mounted on top, and finally industrial linear actuators. All of these can be used successfully for focus stacking but can be slower, less consistent, less precise, and a pain to setup.
I designed my latest focus stacking rig with a few fundamentals in mind:
- Stability
- Precision and Reliability
- Flexibility
- Size
- Adaptability
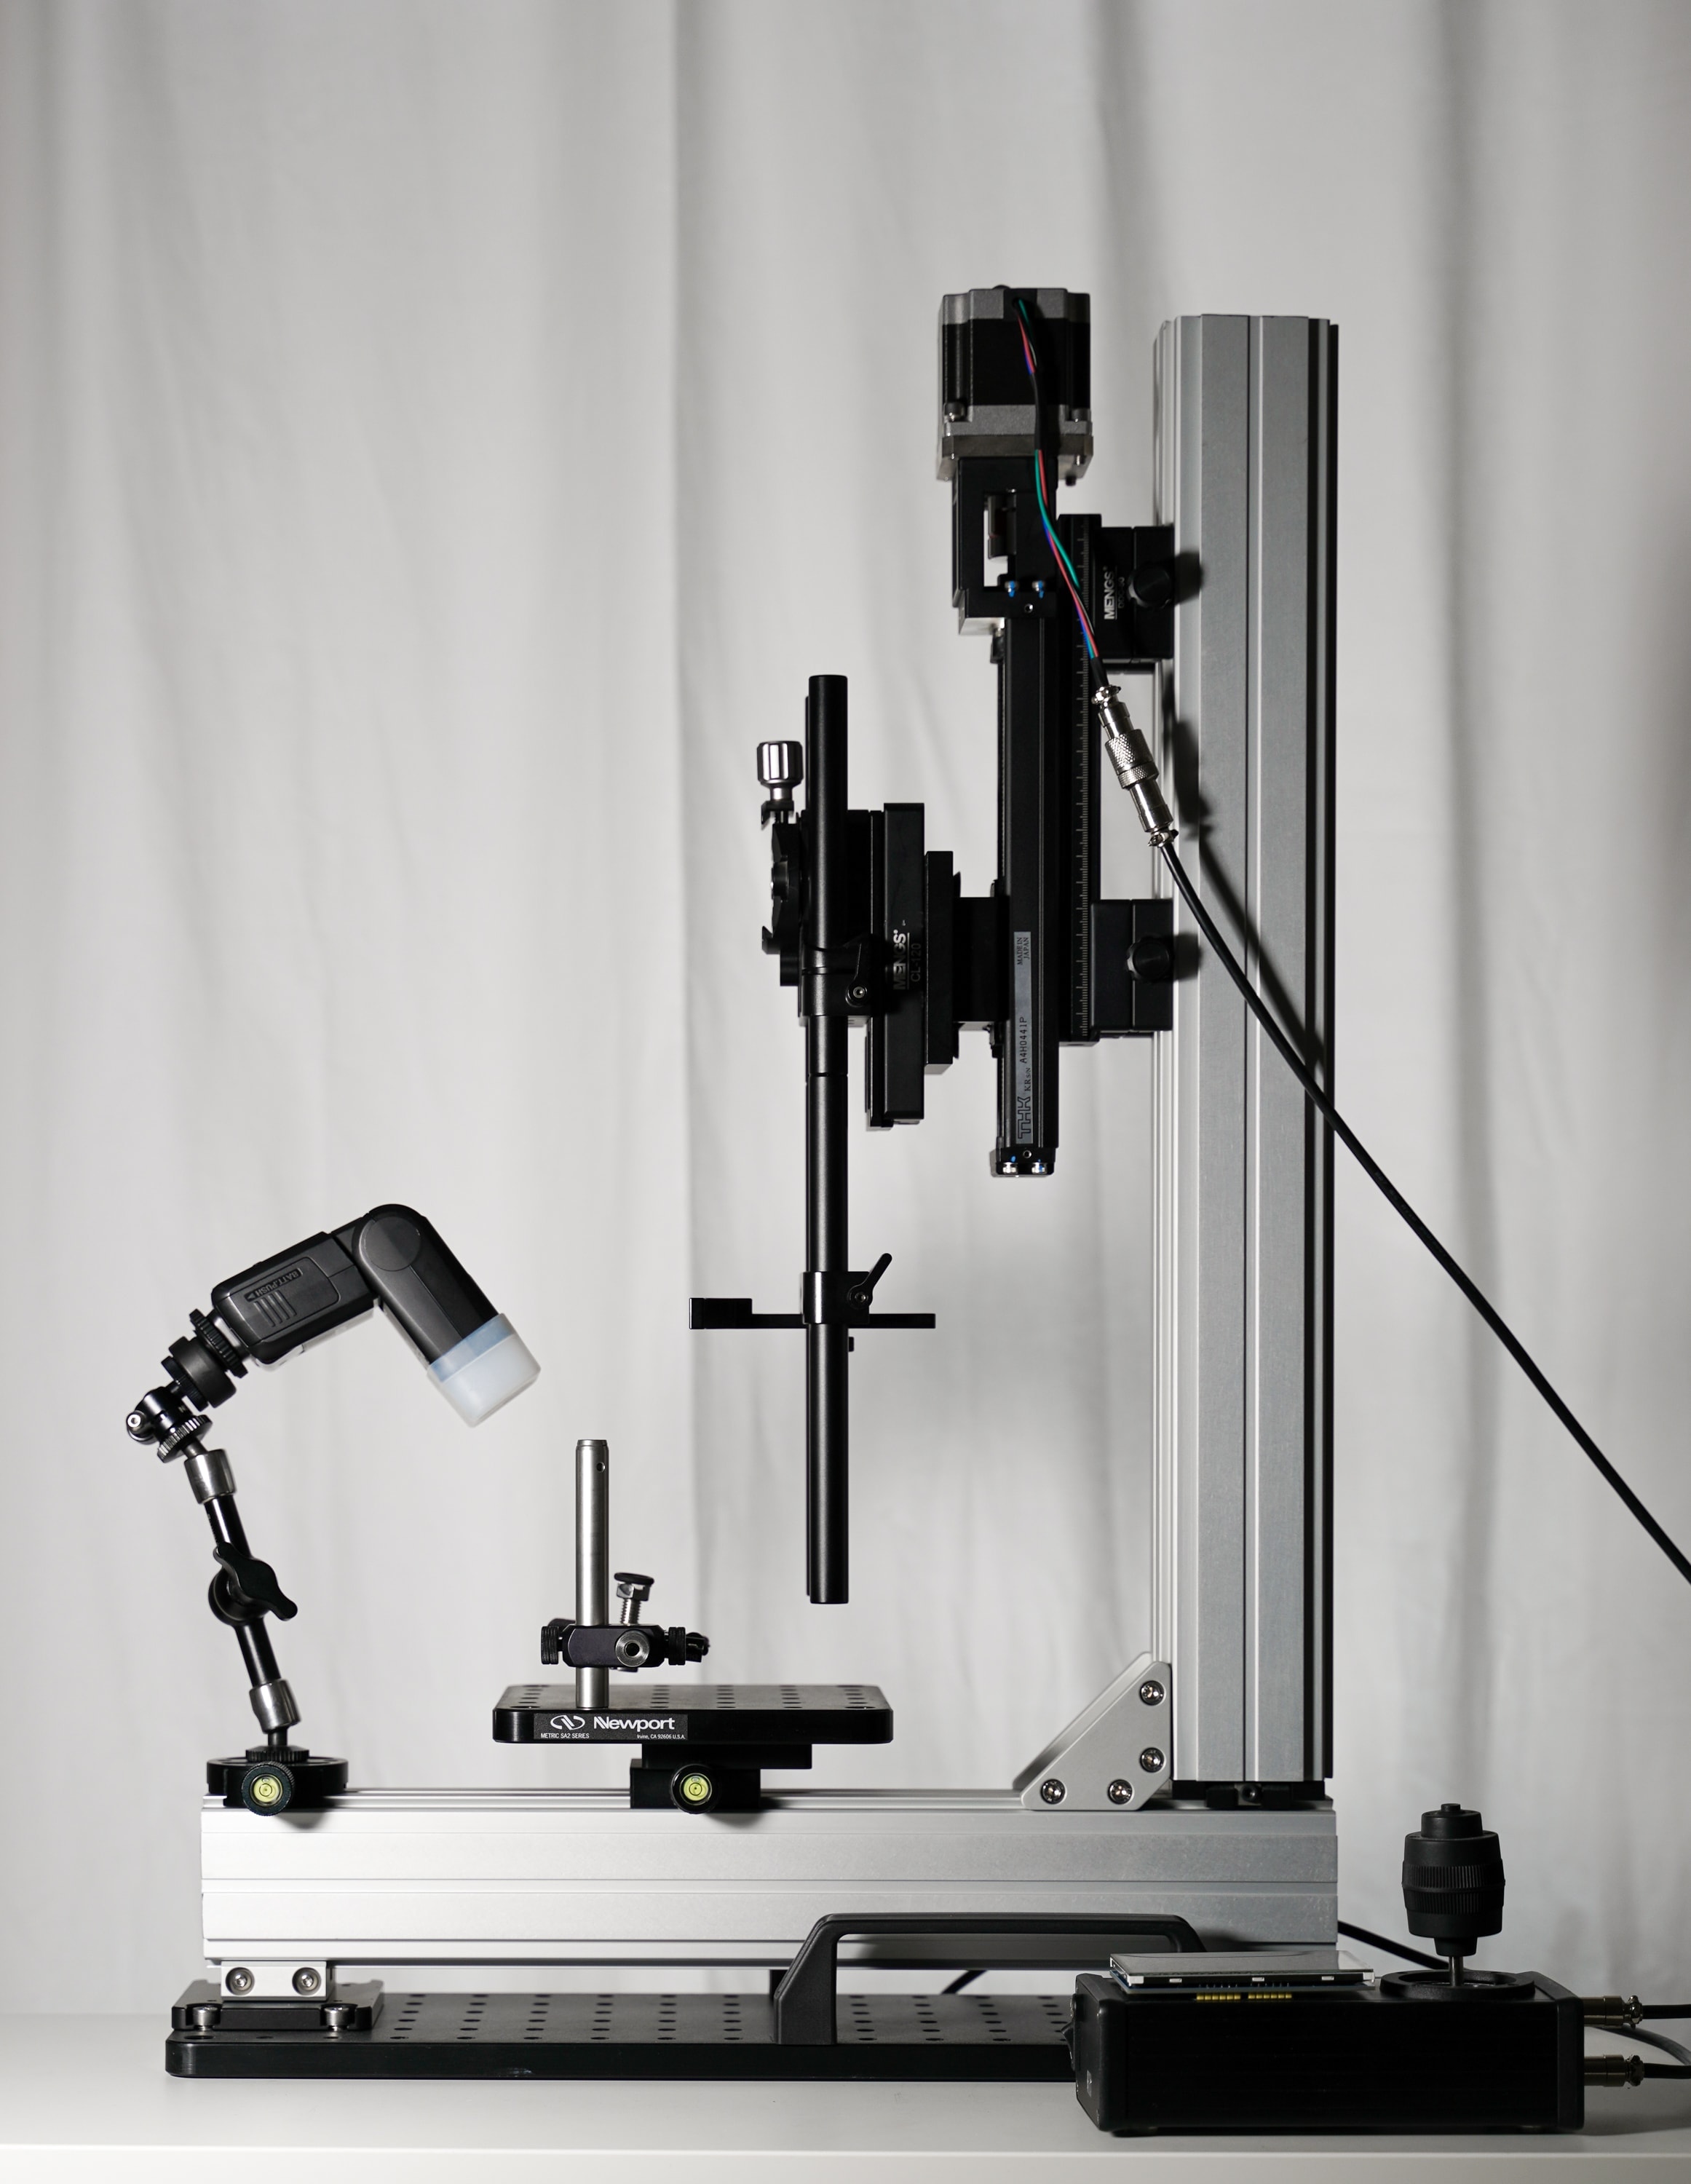
Stability – A focus stacking rig needs to be stable. This extends to the object stage (which holds the coin), the camera mount, as well as the system as a whole. If there is a vibration in the camera (e.g. when the shutter closes), you want that vibration to dissipate quickly and with minimal effect on the camera’s alignment with the object. Likewise for the object stage. You also want to ensure that vibrations external to the rig, such as a car driving by, someone walking around in your apartment, or a fridge with an old compressor, are also dissipated quickly across the rig. In an optimal setup, the object stage and camera mount are physically linked so that any vibration in one effects the other to an equal degree, resulting in both the camera and object moving in sync.
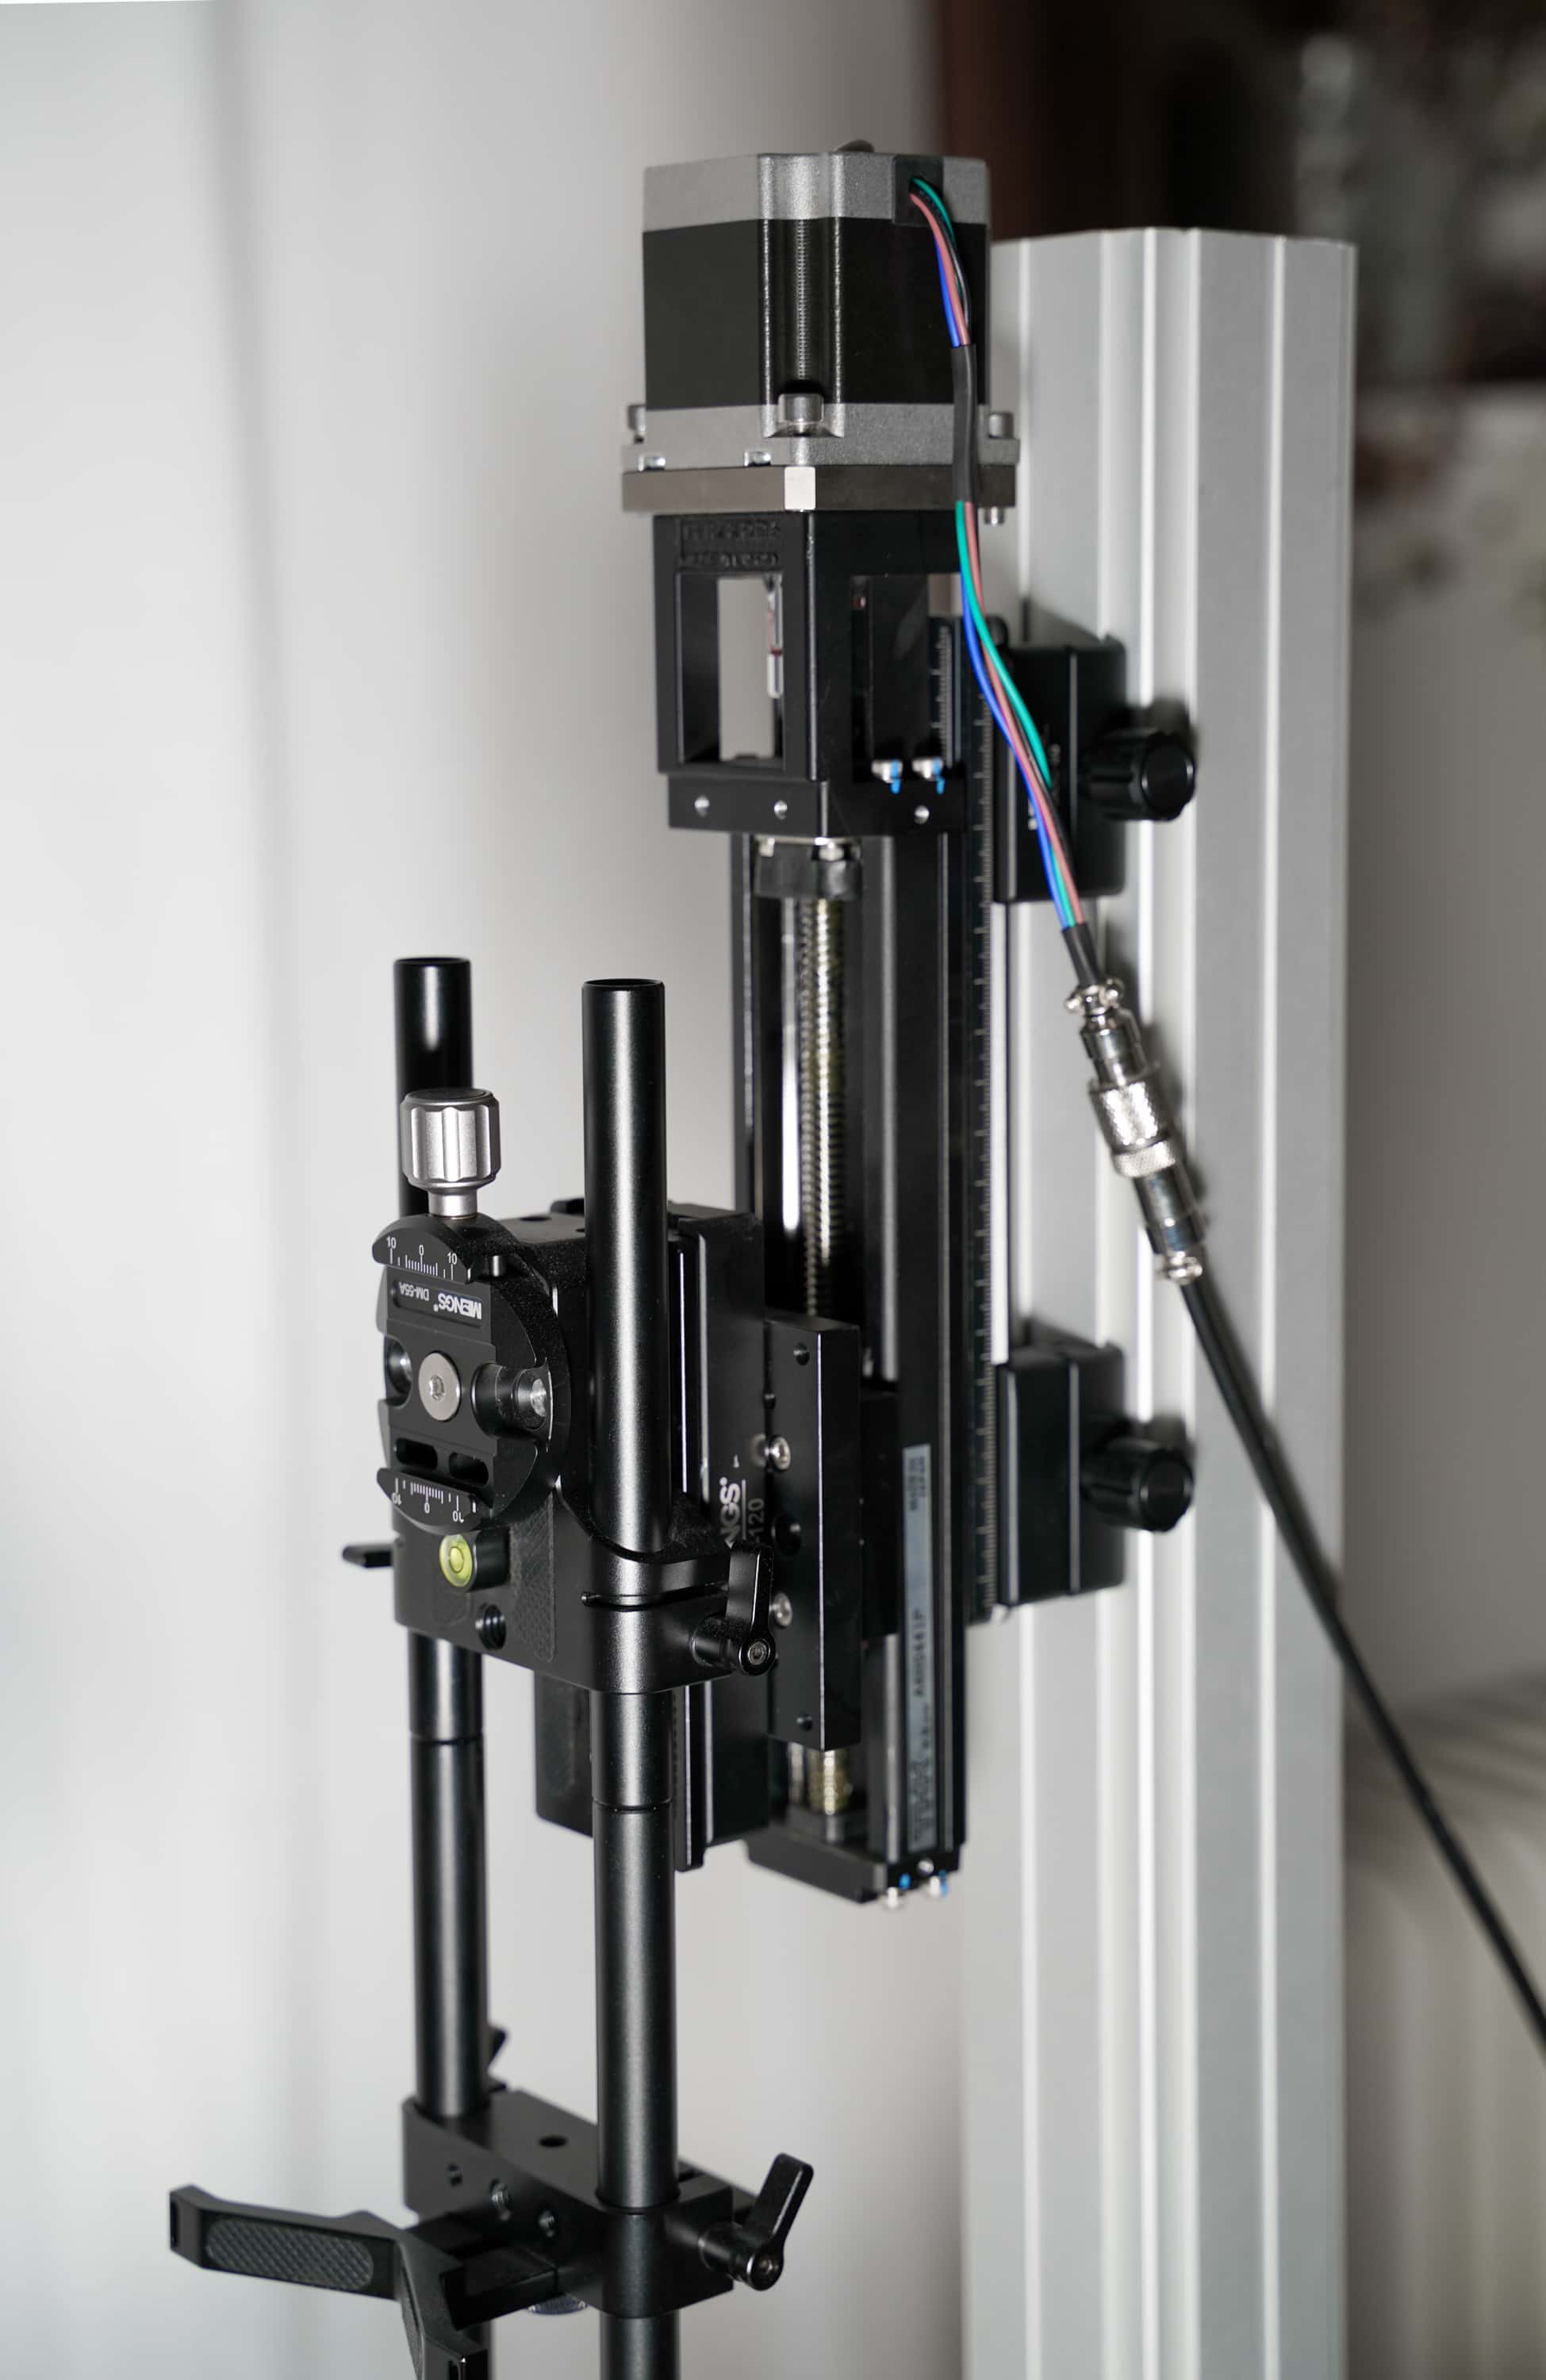
Precision and Reliability – Photographing coins at around 1x magnification does not require the highest tolerances. In my case, I plan to photograph other objects at between 1-10x magnification so invested more in a system that can achieve high precision. My linear actuator from THK is highly regarded as a piece of precision equipment suitable for focus stacking up to 20x magnification. It has minimal backlash and axial rotation around the ballscrew and is controlled by a sophisticated, but cheap, stepper motor driver (TMC5160).
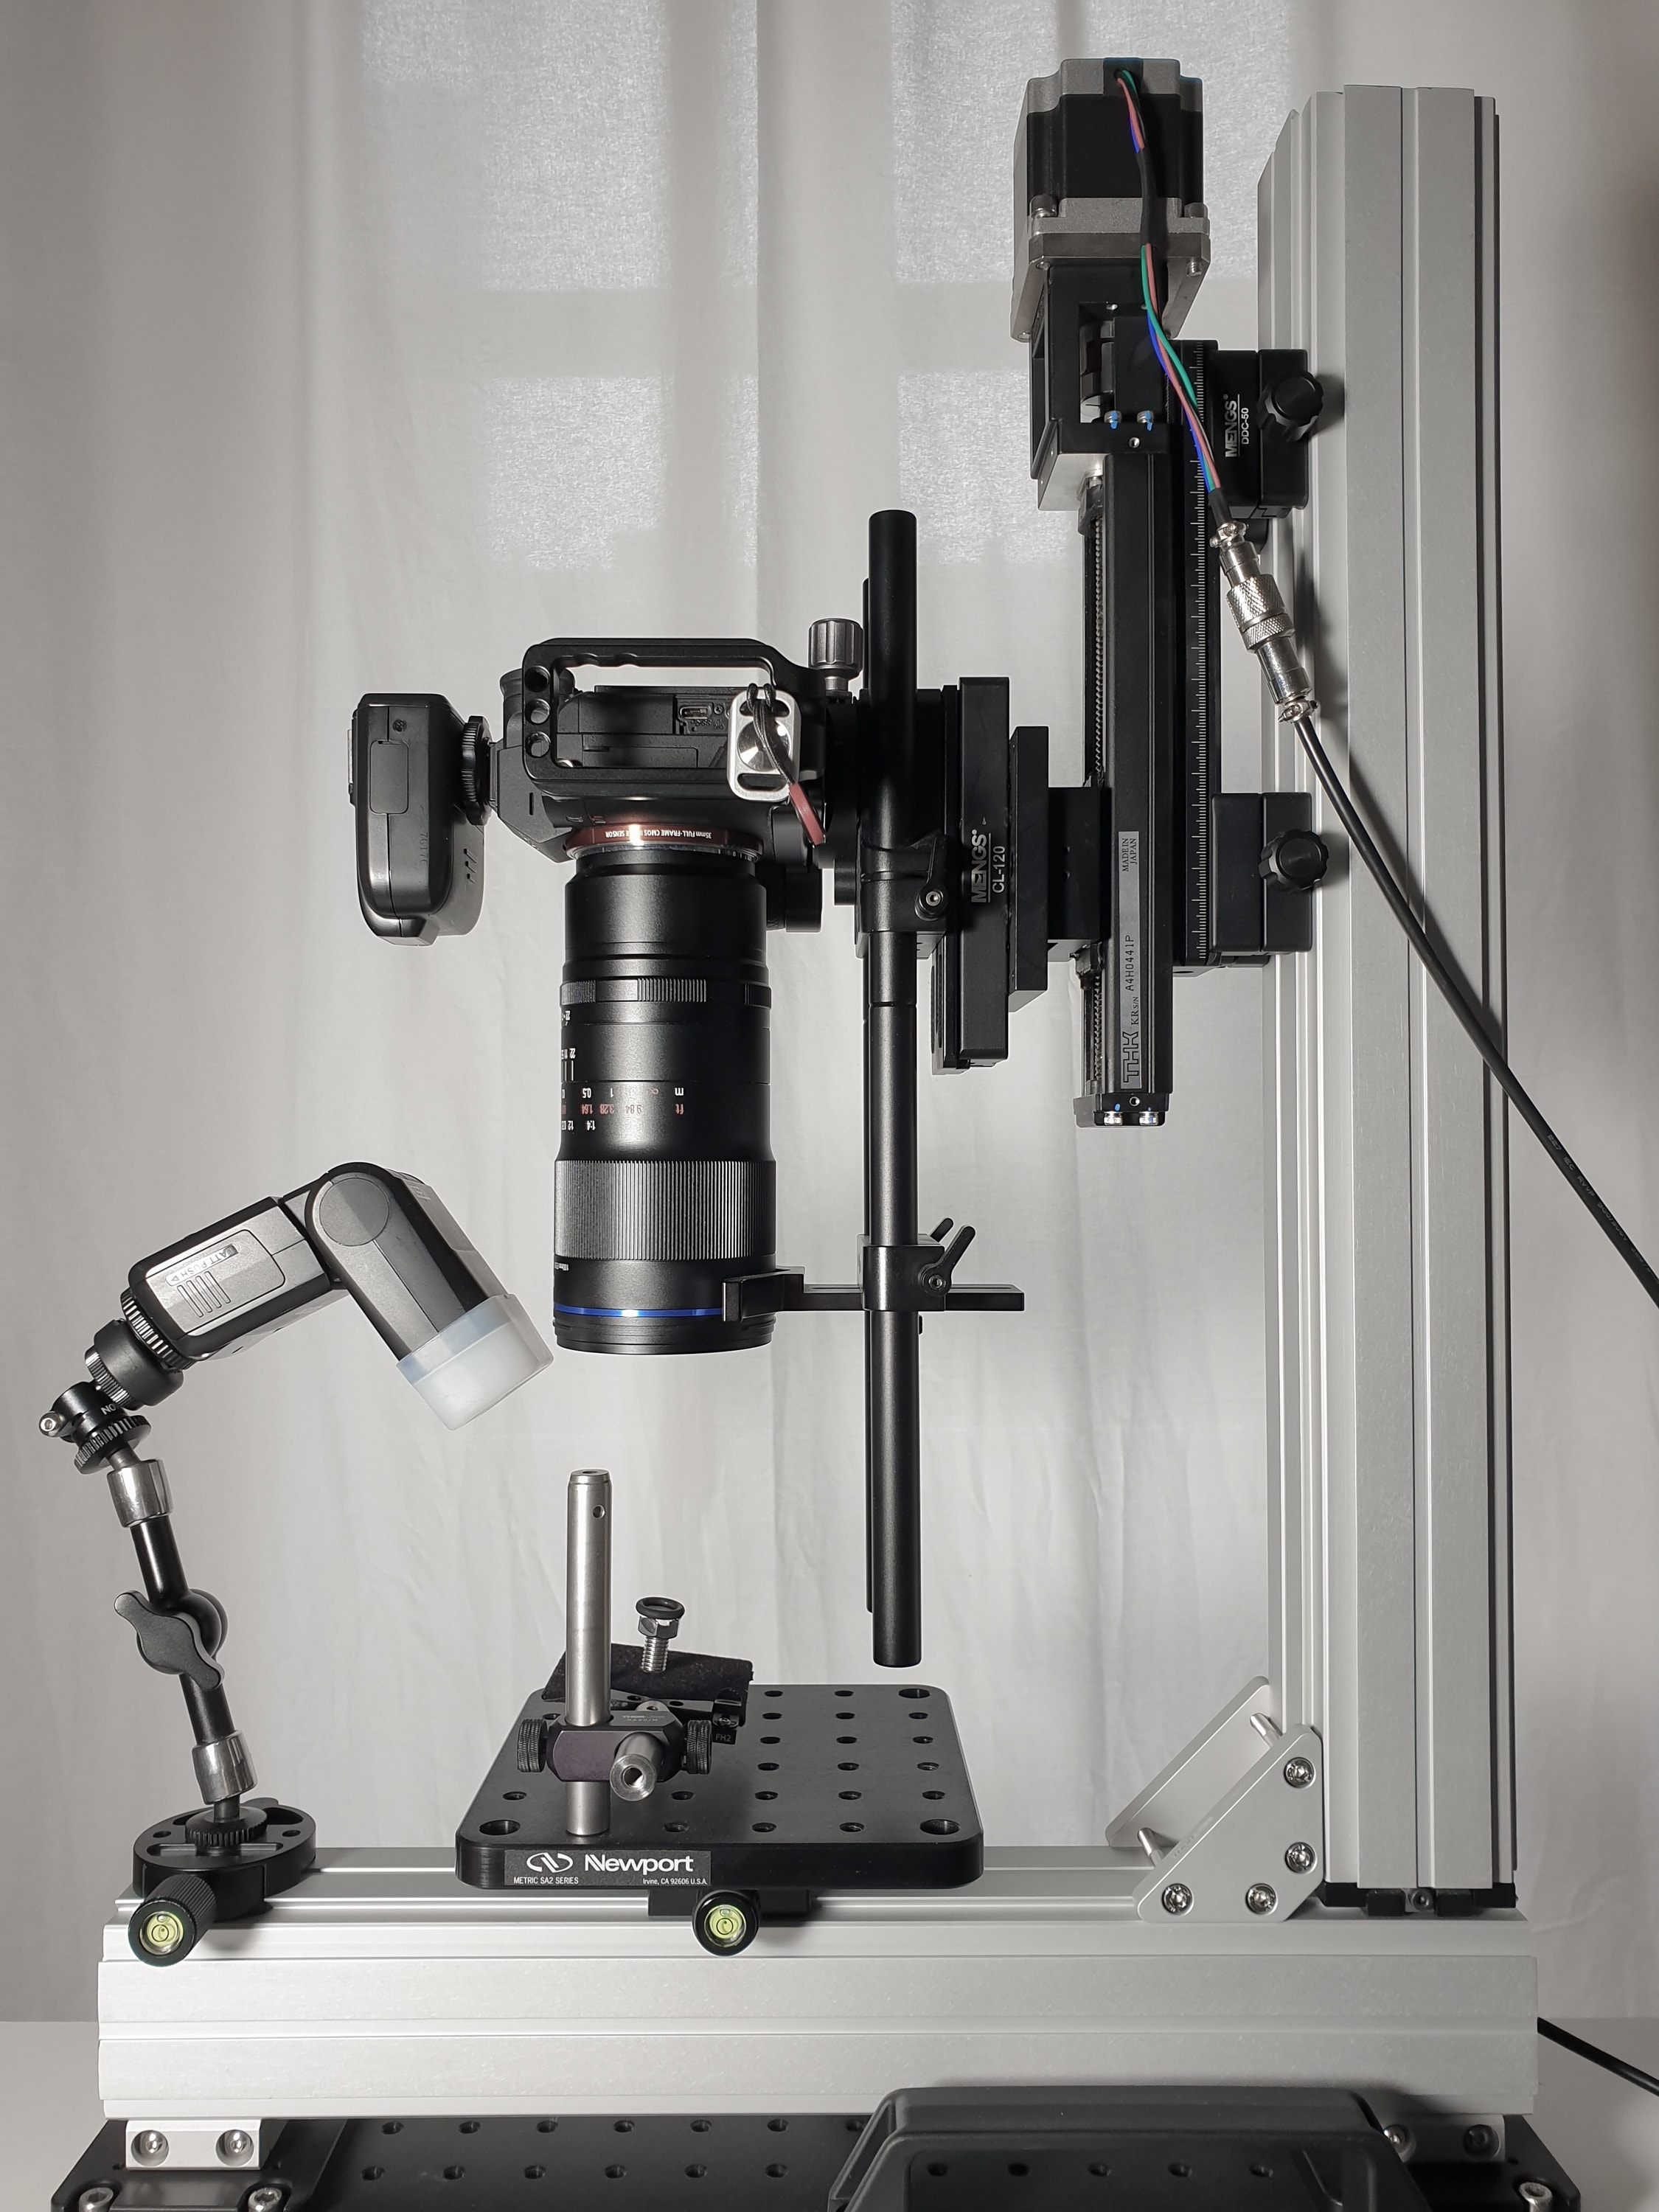
Flexibility – As I photograph other objects besides coins, flexibility was an important factor. It can also be important to keep in mind just for coin photography as the smallest coins can be mere millimetres in diameter while the largest can exceed 40mm. This requires you to place the camera at significantly different distances from the object object so you need to ensure your rig has the ability to move the camera as close to or far away from the object stage as necessary. In my case I also wanted to shoot some objects with the camera mounted horizontally. This setup allows me to rotate the orientation of the two aluminium optical rails so that the vertical one is horizontal and the horizontal one becomes vertical.
Size – Many of us don’t live in large houses with ample space and even if we did, even fewer likely have partners or spouses willing to tolerate large contraptions that are often a bit of an eyesore. Ensuring the focus stacking rig rig had a relatively small footprint, only 600mm long by 150mm wide makes it considerably easier to move around as needed, particularly when moving apartments!
Modularity – Similar to flexibility, modularity is ensuring you can tweak the setup to suit your current and future needs, whenever the arise. This may be the addition of new lighting gear, a camera monitor, something to hold some diffusion in place, or a new bit of gear that has a different adapter. I went with the Thorlabs XT66 rails because their dovetails are compatible with ARCA clamps for cameras. ARCA clamps are affordable and widely available so creating a system that is based on the ARCA clamp was an obvious choice for me. I can mount most things anywhere to the camera rig by using the 1/4″ or 3/8″ threaded holes in ARCA clamps.
Vertical Focus Stacking Rig

Camera and Lens
Sony A7R III
Like the focus stacking rig itself, expensive cameras and lenses don’t guarantee quality but they do allow you to push the limits and achieve incredible photos. I started out with a Sony A6000 mirrorless camera, which has an APS-C sized (23.5 x 15.6 mm) 24MP sensor. This is plenty good enough for taking great photos of coins as the resolution (megapixels) is about double that of most phone cameras and the sensor many times larger. The number of megapixels and the sensor size play a large role when it comes to achieving highly detailed images and are the reasons behind my upgrade to a Sony A7R III.
Megapixels are important for capturing more detail but a sensor with a high number of megapixels doesn’t guarantee you’ll capture all of that detail. The size of the sensor combined with the megapixel count tells you how many pixels make up the sensor. For an example, let’s compare an APS-C sensor with 12MP and one with 24MP. The 12MP sensor has half the number of pixels and means each individual pixel has a relatively large size and captures a lot of light, allowing the sensor to perform better in low-light conditions and resolve detail that isn’t smaller than the pixel itself. Conversely, the 24MP sensor with a high number of pixels will have pixels twice as small (in terms of area) and capture less light per pixel. While they will theoretically be able to resolve finer detail because the pixels are smaller, the less light per pixel can mean there is more noise in the resulting image.
This is one reason as to why you will never achieve highly detailed images with an iPhone or Samsung phone (unless you “stack and stitch”). As soon as you start zooming in or cropping the image, any detail will quickly become blurry as the camera wasn’t able to resolve as much fine detail. Going back to the Sony A6000, it has a significantly larger sensor size and number of pixels than any phone camera but I still found it lacking. Upgrading to a Sony A7R III camera with a full-frame sensor helped improve the quality of my photos by being able to capture more detail. The 42MP sensor has nearly twice as many pixels but the sensor size is 2.5x larger, meaning the pixel area for the Sony A7R III is about 35% larger. If I take a photo of a coin with the A6000 so that the top and bottom of the coin fit perfectly in frame, and then do the same with the A7R III, I have an identical composition of the coin but 2.5x as many pixels making up the image of the coin for the A7R III compared to the A6000. I can then zoom in much further on the A7R III image and still resolve a lot of the fine detail that would otherwise be blurry on the A6000 image.
Laowa 100mm f/2.8 2x Ultra Macro APO
As with the camera, a good lens doesn’t mean you’ll take good photos but it does increase the upper limit of what you can achieve. I have bought two commercial macro lenses, a Sigma 105mm f/2.8 HSM 1x and the Laowa 100mm, but I have dozens of industrial or analogue film macro lenses that I use for higher magnifications. In regards to photo quality, there are two main considerations for macro photography: ability to resolve detail and ability to correct for optical effects such as chromatic aberration. The ability to resolve detail is often measured in lines per millimetre (LPMM) and represents how well a lens can distinctly resolve two parallel lines at a given magnification. The point at which the two lines are blurry and cannot be differentiated is the limit of that lens’s ability to resolve detail. Correction for optical effects refers to how well a lens can correct for chromatic aberration, diffraction, and distortion. When looking at reviews for macro lenses you want to ensure the lens is capable of being very sharp across the image, can resolve fine detail well, and corrects for optical effects.
If you have two lenses that perform similarly in those regards, your choice may come down to other factors such as whether the lens has optical stabilization, an electronic connection to the camera, a larger magnification range, or more niche features such as aperture and focus locks or a manual focus override switch on the lens body. For coin photography you will likely be in a studio or your house with the lens attached to a fixed mount that ideally does not move, thus optical stabilization is not needed and your camera body may have OS anyway. The niche features are also less important as you’re often not changing settings frequently. However, an electronic connection with the camera is very handy for being able to control focus and aperture from the camera itself and save these settings in the image file so you know what settings were used to take a particular photo.
The Sigma 105mm 1x macro has these features and the electronic connection with the camera while the Laowa 100mm does not – yet I switched from the Sigma to the Laowa. Two reasons were behind this choice, the first is the optical quality of the Laowa is highly regarded, though the Sigma is no slouch. The second is the magnification range. The Laowa can go up to 2x magnification while the Sigma only does 1x. For large coins you will be shooting at 1x and below but for small Roman and Greek denominations, I often find myself shooting at between 1.3x and 1.5x magnification. Although you can get the Sigma to achieve higher magnification with attachments (e.g. close-up lenses or extension tubes), or perhaps by reversing/stacking another lens on the Sigma, these methods typically reduce image quality and also provide fixed magnification increases. The Laowa allows me to easily change magnification from 0.5x up to 2x with a simple turn of the lens ring.
Coin Pedestal
Focus Stacking Controller
Alongside my improvements to the vertical focus stacking rig over the past few years, I have also been developing an automated control system to let a computer take over the manual work of moving the linear rail in small increments and taking a photo each time. This is the third iteration of an automated controller for this purpose but all of them were built on similar foundations and perform the same general functions.
The controller is powered by an Adafruit Grand Central M4, which can be thought of as a high-powered version of an Arduino Mega and it has the same footprint. The Adafruit board has a faster clock speed and more memory, allowing me to do more, faster, than with a standard Mega. Clock speed is particularly important for updating the touch-screen; a 3.5″ TFT display. The Arduino Mega can handle touch-screen displays of this size but at a much slower refresh speed, noticeably taking longer to load each “page” of buttons and text in the user interface.
The user interface is built around two core functions: manual and auto mode. The auto mode will take care of the entire focus stacking shoot. You set a start point from where to start taking photos and an end point where you want to stop taking photos, then it’s a matter of setting the increment size (distance travelled between each photo) and you are good to go. The manual mode is similar but has no defined start or end point, you tell it when to move the camera and whether to take a photo or not. Another function built in to the controller include flash recycle detection – if using a camera flash, the controller will ensure the flash has recycled after each shot and is ready to be fired again. There’s also an endstop detection routine that will find the upper and lower travel limits of the linear actuator automatically so that the absolute position of the camera on the rail is known precisely.
A Trinamic TMC5130 stepper driver board controls the stepper motor itself. These are much more sophisticated than the standard A4988 or DRV8225 drivers and require some expertise to get working correctly. The Trinamic drivers have in-built functionality for detecting endstops without microswitches (StallGuard), running the stepper motors silently (SilentStep), and several options for correctly managing current to ensure the stepper motor doesn’t skip steps. Additionally, it provides easy and reliable routines for moving the stepper motors a certain distance at either a specified speed or with a customisable acceleration profile. These drivers are a worthwhile improvement over more basic options and, once mastered, are incredibly powerful and useful.
