I’m often asked whether I photograph my coins in RAW or JPG and people are often surprised when I respond that I always shoot in JPG. In photography circles, RAW is king and most hobbyist or professional photographers are going to be shooting in RAW. There are several reasons for this: increased bit depth, wider dynamic range, more accurate colour, greater editing control with non-destructive adjustments, and a lossless file.
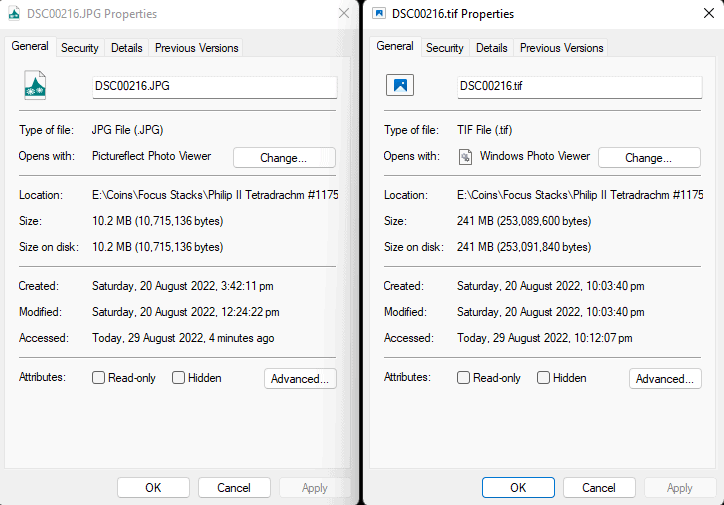
On the other hand, RAW files are much larger than JPGs and require conversion to a different file type to edit and share online. While RAW files may only be 3-4x as large as JPGs, when converted to a more useable lossless image format such as TIFF, the file sizes can jump to 10x or 20x larger than their equivalent JPG! This may not be a problem when you only need one photo per side of a coin, but it quickly becomes a problem when you do focus stacking. I often take anywhere between 20 to 50 photos per side of a coin and merge those photos together to create my ultra high resolution and detailed photos. If each of those photos were a 220 megabyte TIFF file instead of a 12 megabyte JPG file, one coin may require as much as 22 gigabytes of space to store the photos. If they were JPGs instead, they may take up as little as 1.2 GB.
One option would be to delete the individual images that make up a focus stack once the focus stack has completed. The resulting focus stack image might be around 240 MB for the TIFF files and 24 MB if created from JPG files. Then file size and harddrive space would not be an issue at all, though you do lose the ability to go back and fix any issues from the focus stack once you delete the individual images. Is it worth the trade-off? That’s what I hope to answer here.
I took photos of four of my coins in my usual style and process. On my camera, I enabled the JPG+RAW option so that for each press of the shutter, the camera saved both a JPG and RAW copy, ensuring the composition of the image is identical. The RAW files were converted to TIFF files in Adobe Lightroom and then the JPG and TIFF files for each side of each coin were focus stacked using the same software and configuration settings. The resulting focus stacked images were then edited in Adobe Lightroom with identical edits applied to both the JPG and TIFF versions.
Finally, the two versions were brought into Adobe Photoshop to combine the obverse and reverse of each coin before being exported using identical settings. Since a TIFF file is too large to host on my website or otherwise share on the internet, the TIFF was exported as a JPG file. You may be wondering if this test is still a fair comparison. I believe it is for two reasons:
(1) The more times you edit and save a JPG file, the more compressed it becomes. The photos that were originally taken as JPGs in the camera have been saved (compressed) four times: when first saved to the camera, when exported from the focus stacking software, when exported from Adobe Lightroom, and when exported from Adobe Photoshop. In comparison, the TIFF photo has just been compressed once, when it finally is exported as a JPG file from Photoshop. An argument for shooting in RAW is that it allows you to make multiple changes to a lossless file without recompressing it and losing information every time you save it.
(2) The purpose of this comparison is to see which is better for coin photography. Unless you are creating giant prints of your coin photos and hanging them in a room, then you probably aim to upload your coin photos to the internet. Short of using a tiled image viewer like my Ultra Zoom tool, you’re unlikely to find anywhere to upload a 240 MB TIFF file, let alone any users who will want to download such a large image to view.
The full size JPG and TIFF files exported from Photoshop were then converted to DZI files so as to be used in the “Ultra Zoom” tool below. The DZI files are a tiled image format that supports displaying high resolution images online without making users download the entire image at once. It is also optimal for making it easy to zoom in on an image to a higher magnification than most browsers allow so that you can compare pixel-level detail.
Comparison
For each coin below, the JPG version is on the left and the RAW version is on the right. Use the slider to drag back and forth over the two sides to compare the images and see if you can spot any differences.
Don’t forget to zoom in by clicking in the photo area and scrolling with your mouse, or keep using the left-click of your mouse to zoom incrementally.
Conclusion
So what do you think: is there a noticeable difference in the detail between the photo shot in RAW vs the one shot in JPG? I personally can’t spot any significant differences in the detail of the coins, though you can notice some slight differences in both the colour rendering and dynamic range. Even though all the photos above were edited identically for their RAW and JPG pair, the JPG image is slightly brighter and seems to have less dynamic range. On the Tarsos stater, the third coin, notice how the toning in the fields is more white-ish in the JPG image compared to the better exposed yellow-ish tint in the RAW version. The JPG image also appears to be more saturated compared to the RAW image.
For me, this test demonstrated what I already knew, which is that it’s not worth it for me to shoot in RAW for my photos and the way I use them. If I were only taking single photos per side of each coin, I probably would shoot in RAW since the main downside, the file size, would be much less of a concern. I also don’t doubt that the RAW image has some advantages over the JPG, only that they aren’t significant enough to be a factor in my decision.