If you have a limited budget or you’d rather spend it all on coins, then this is the guide for you. I will show you how you can make a simple and cheap photography setup with your phone to take good and consistent photos of your collection.
To set expectations, you won’t be achieving quite the same results as if you used an expensive DSLR or mirrorless camera where you can zoom-in on every detail. You can, however, bring out the best of your coins by careful and creative use of lighting and some limited photo editing.
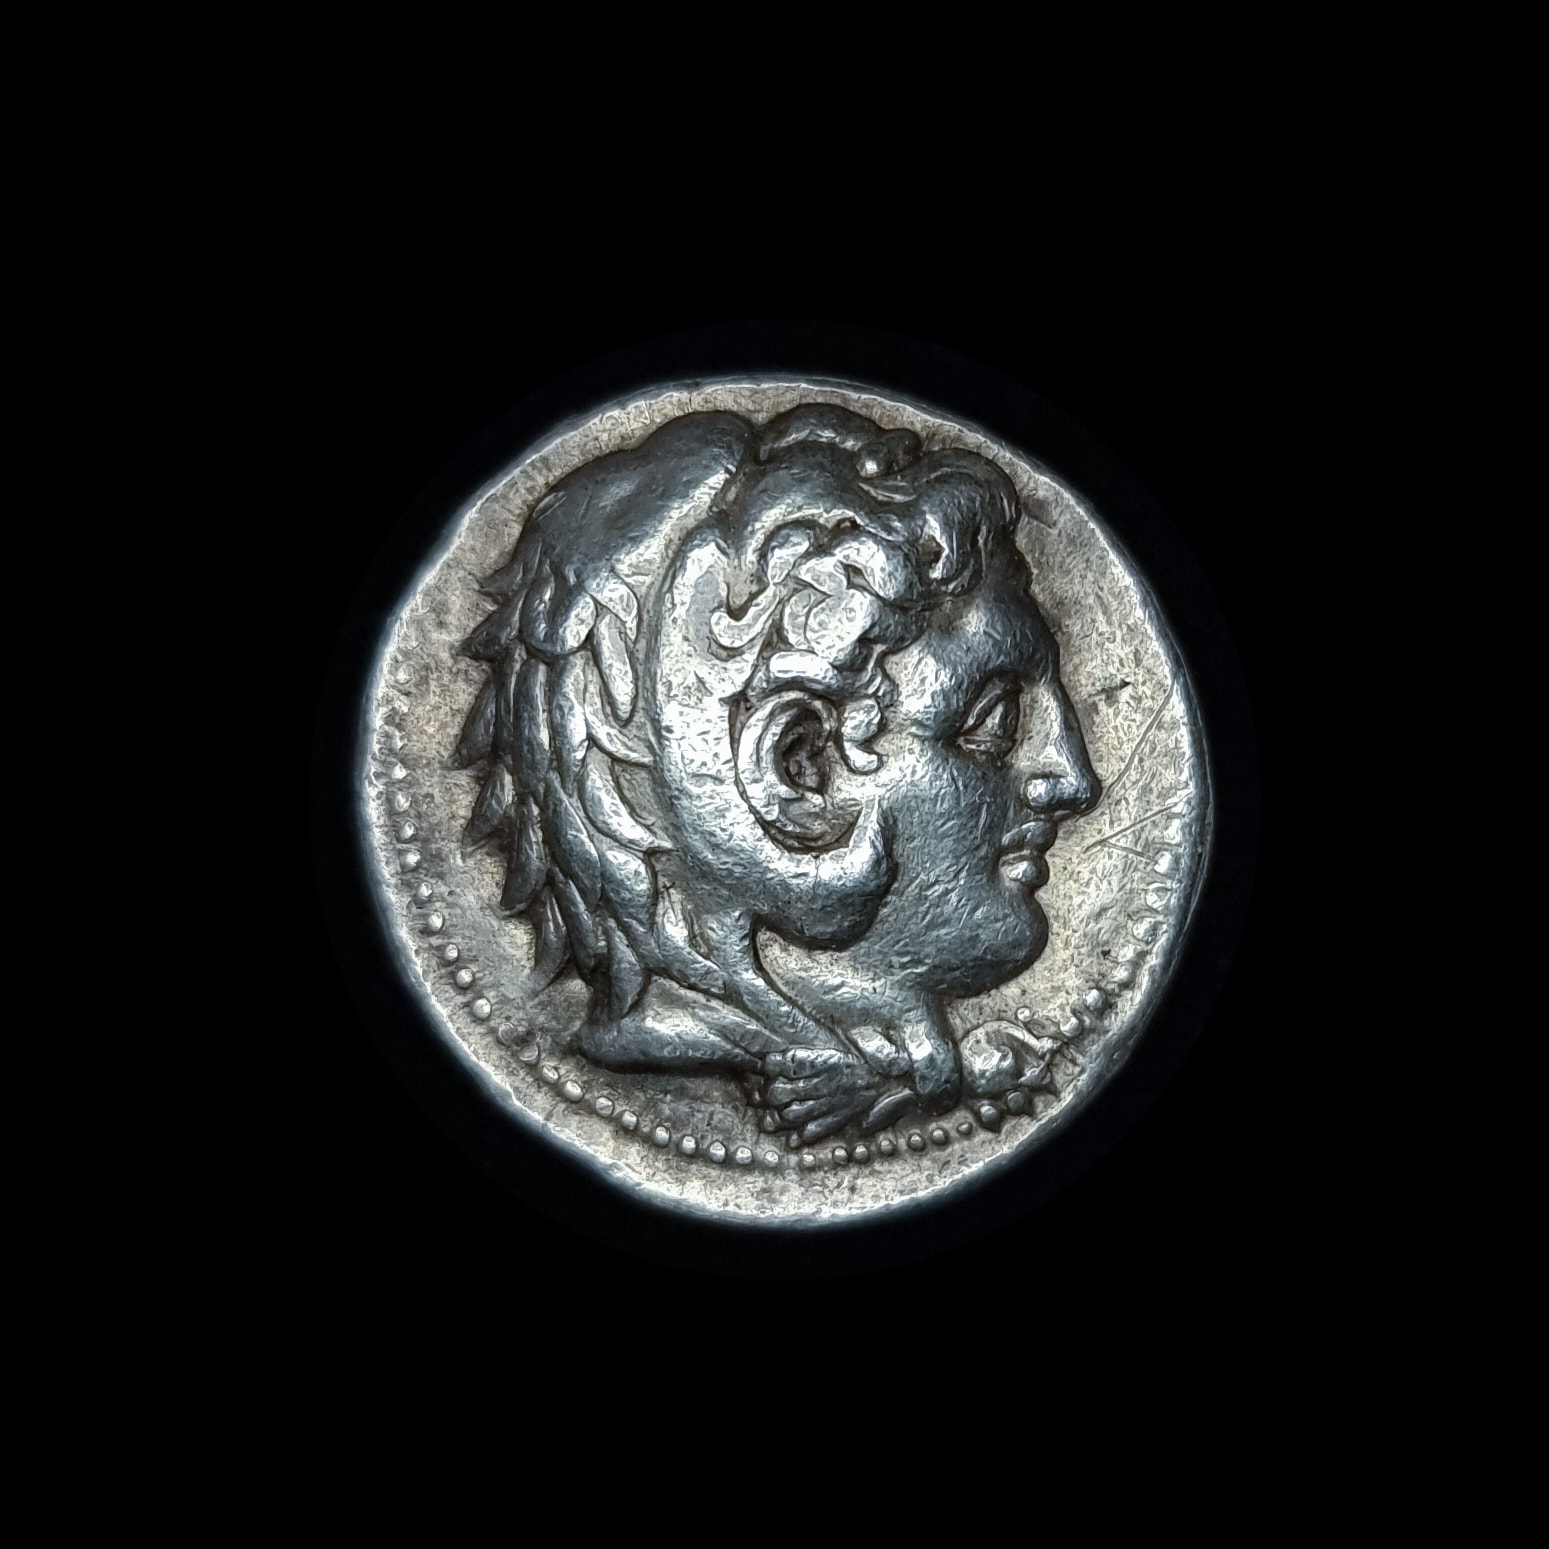
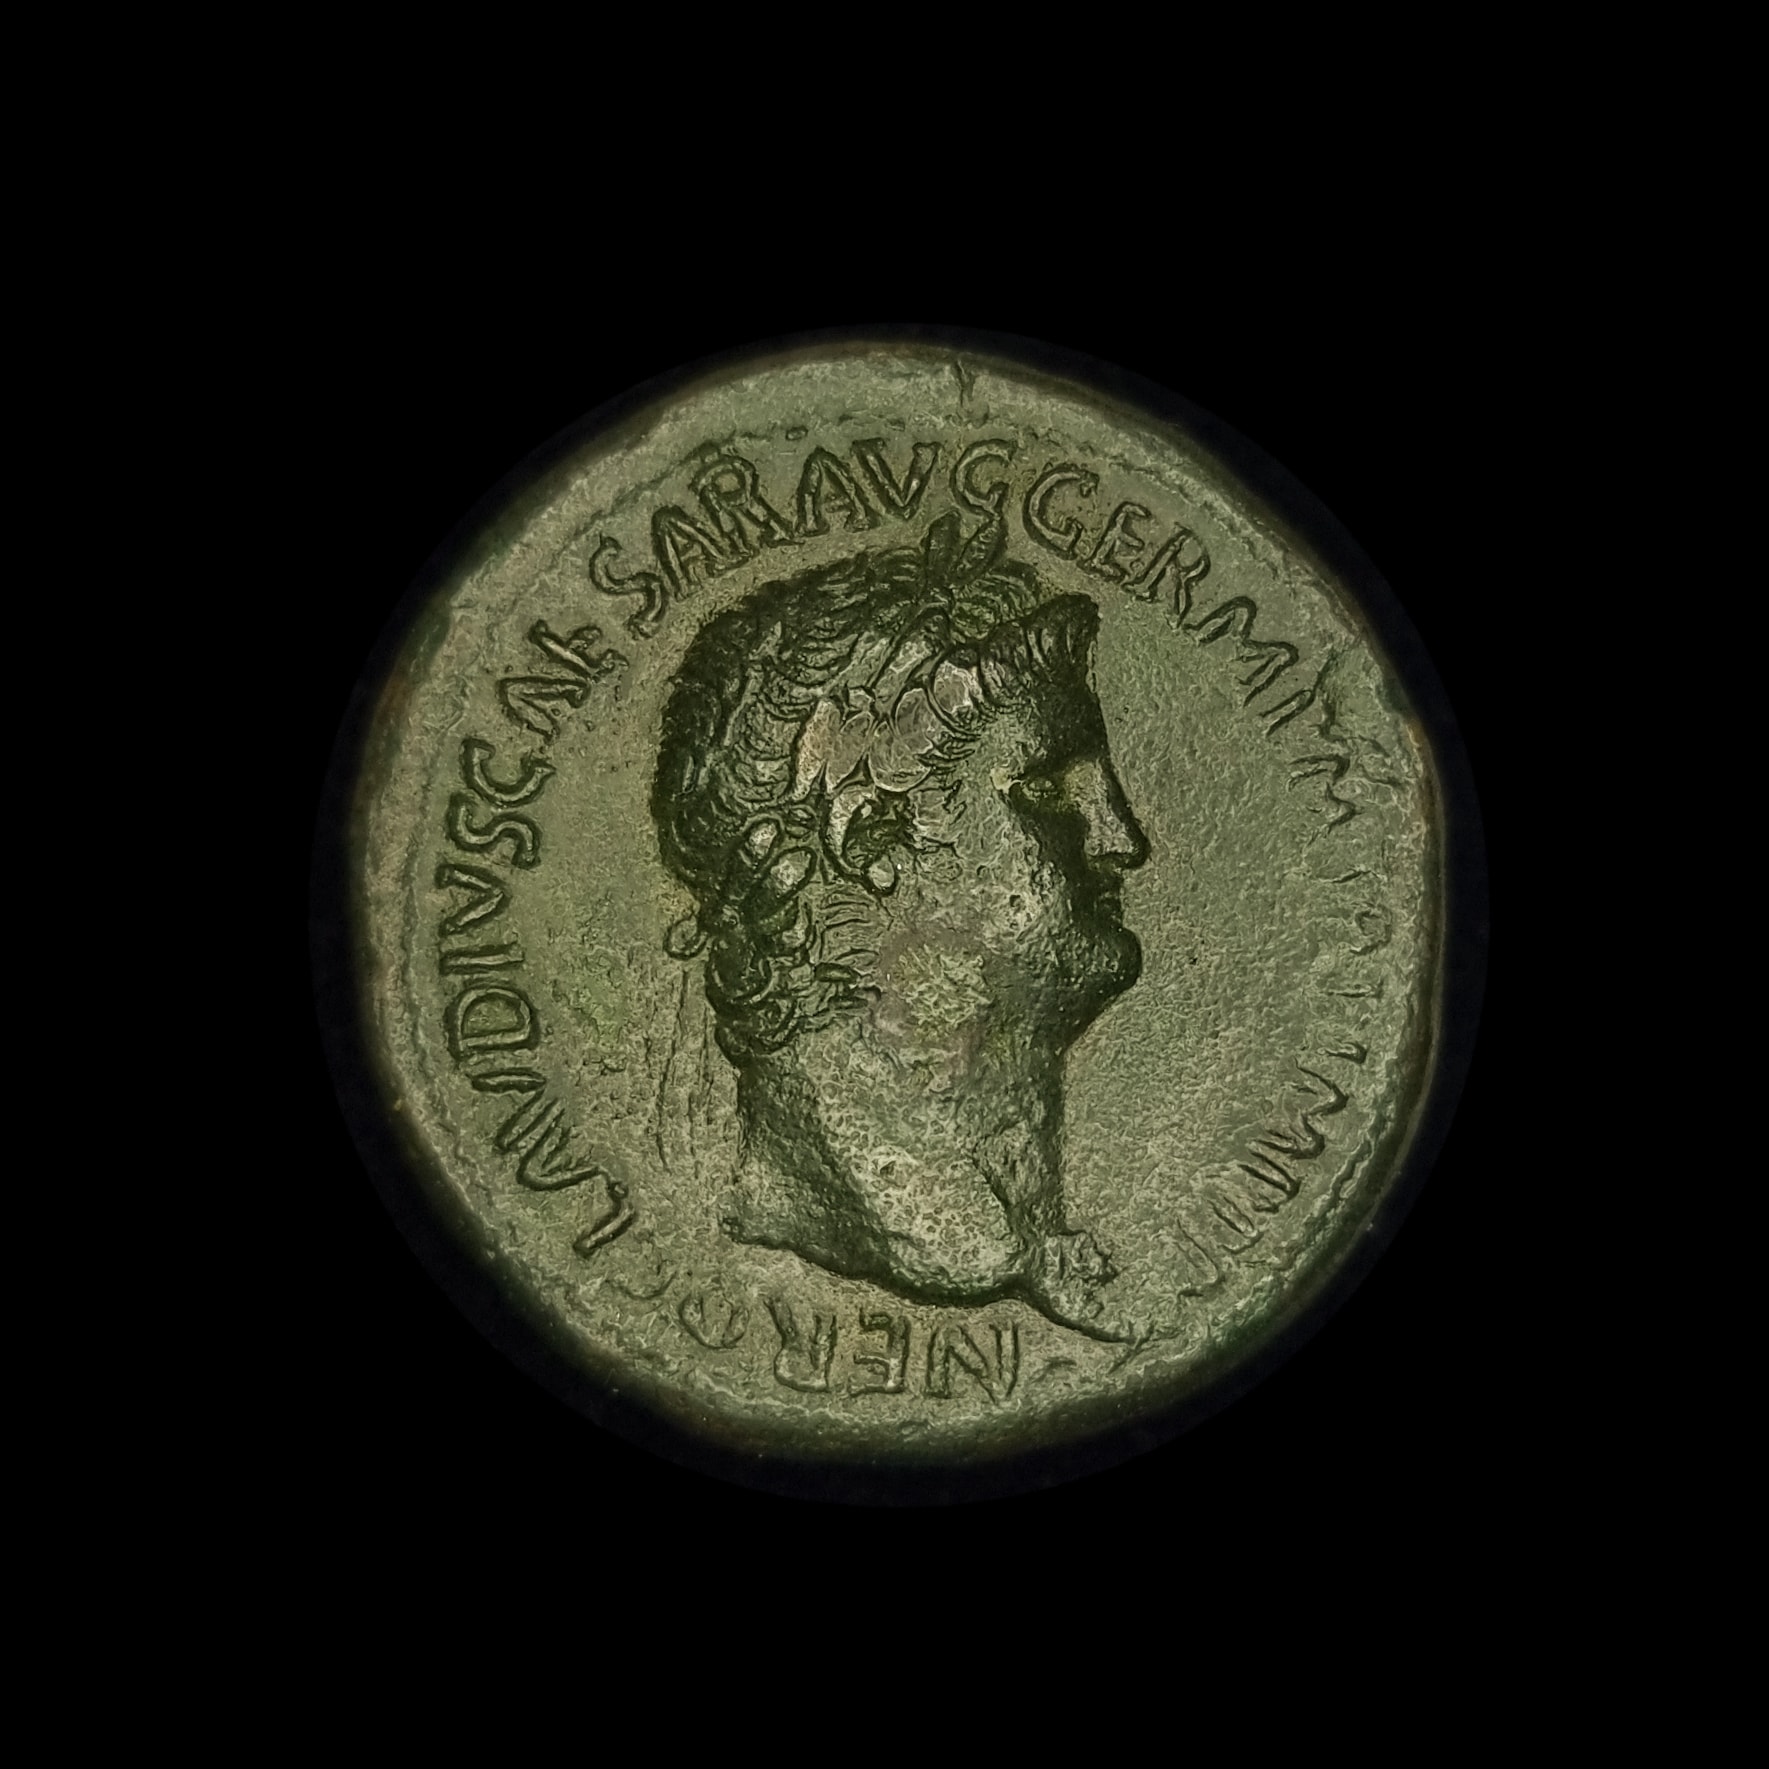
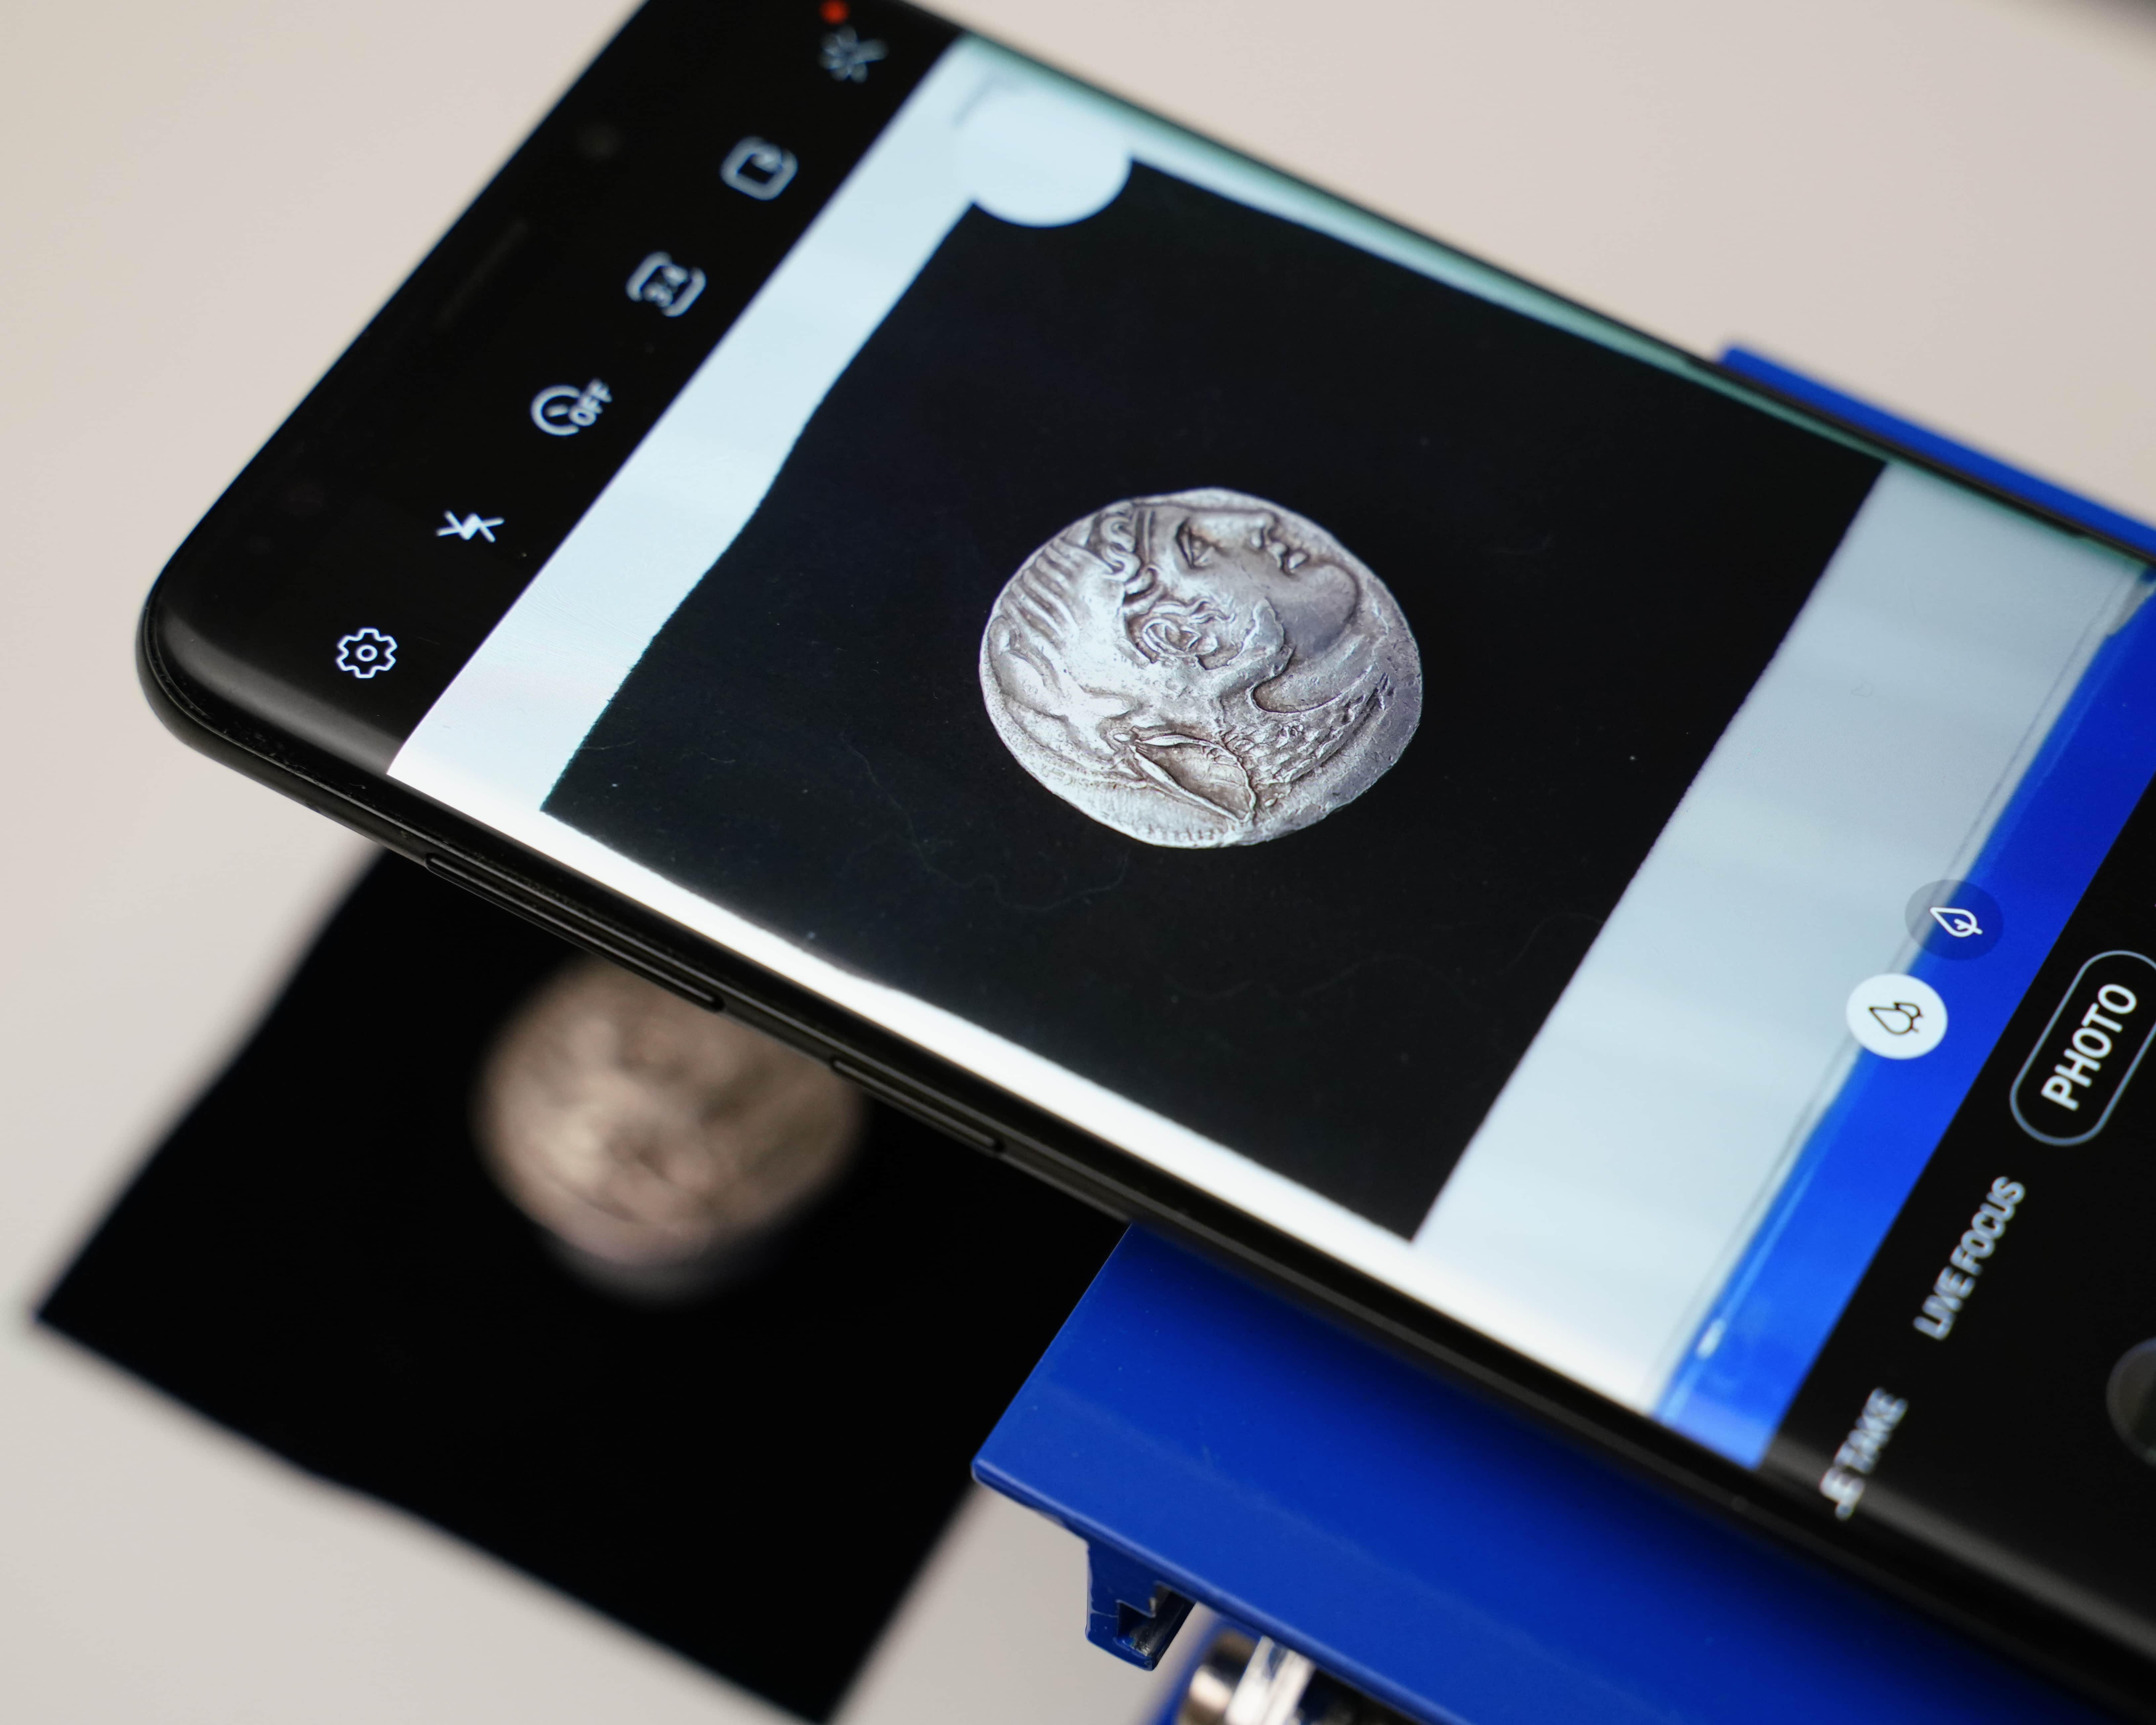
Photos taken with a Samsung Galaxy S9+ using the setup below
1. Fundamentals
There are a few fundamentals to taking good photos of your collection. Getting the fundamentals right will take you 80% of the way to getting a good photo each and every time. Once you have these perfected, you can focus on tweaking the more minor details to produce photos that make a coin look its absolute best.
Focusing
Phone cameras are the jack of all trades when it comes photography but are masters of none. They’re not particularly good at focusing on subjects close to the phone. We need to help force the camera to focus on its subject while also ensuring the subject is not so close to the phone that it can’t focus at all.
We will achieve this by having an adjustable stand that the phone sits on and can be moved up and down to bring it closer to or further away from the coin. If the coin is not in focus, the whole photo is ruined and you will have to start over. There’s no fixing the focus in post-production.
Lighting
Similarly, phone cameras are not great when it comes to the kind of photography suited for coins. The camera software in the phone wants to try and make the entire image bright and this can be a headache when it comes to lighting your coin. The phone will create extremely bright spots in some areas and brighten the background, or shadows on the coin, when we may want them to remain dark.
It is key that we use adequate lighting that plays ball with the phone’s software while still allowing us to make the coin look it’s best. This will require us to take full advantage of the phone’s camera features, some of which you may not be familiar with but I will cover below.
Background
Lastly, the background of the photo is what ties everything together to ensure we have consistent photos across our entire collection. Ideally, all our coins are shot against the same background and the background is a solid colour (white, black, grey, etc). This makes it easy to embed the photo in a website or similar and achieve a professional and consistent look.
Even though we may use software to remove the background later, choice of background is still important and can make our lives either easier or harder down the road. I would suggest taking photos of a few coins with both black and white backgrounds before deciding which to use for your entire collection.
These fundamentals help ensure we achieve the consistency needed for a professional-looking photographic record of our collection. Ideally, the photography setup we build will help us achieve all of the above as easy as possible.
Namely, we need:
- A stand that can adjust the height between the coin and phone while keeping the phone steady
- A setup that makes it easy to light the coin from whichever angle is needed
- A solid colour background that is easy to remove later when editing the photo.
2. The Setup
Here’s what we need to create our budget photography setup. You don’t need to buy the exact products I’ve listed below, they’re only examples, so feel free to swap them out with similar products if you prefer.
- 100mm lab scissor jack. $16.99 – This will be our height-adjustable stand for the phone.
- Magnetic car mount for phones. $9.99 – We’ll attach this to the lab jack so we have an easy mount for our phone that will prevent it from moving around too easily (optional).
- Gooseneck LED ring light. $11.99 – The ring light will be our main light source and provide several options for lighting our coins.
- Foamcore / foam board. $2.99 – This will be our background or platform. We can add other backgrounds when needed over the top of it.
- Black felt with an adhesive backing. If you want a black (or white) background for your coins, I highly recommend buying adhesive felt fabric to stick to a piece of foamcore to use as a background. Felt absorbs a lot of light, preventing reflections and providing a consistent background colour for your photos. I would recommend visiting your local craft store to buy it for much cheaper than is available on Amazon.
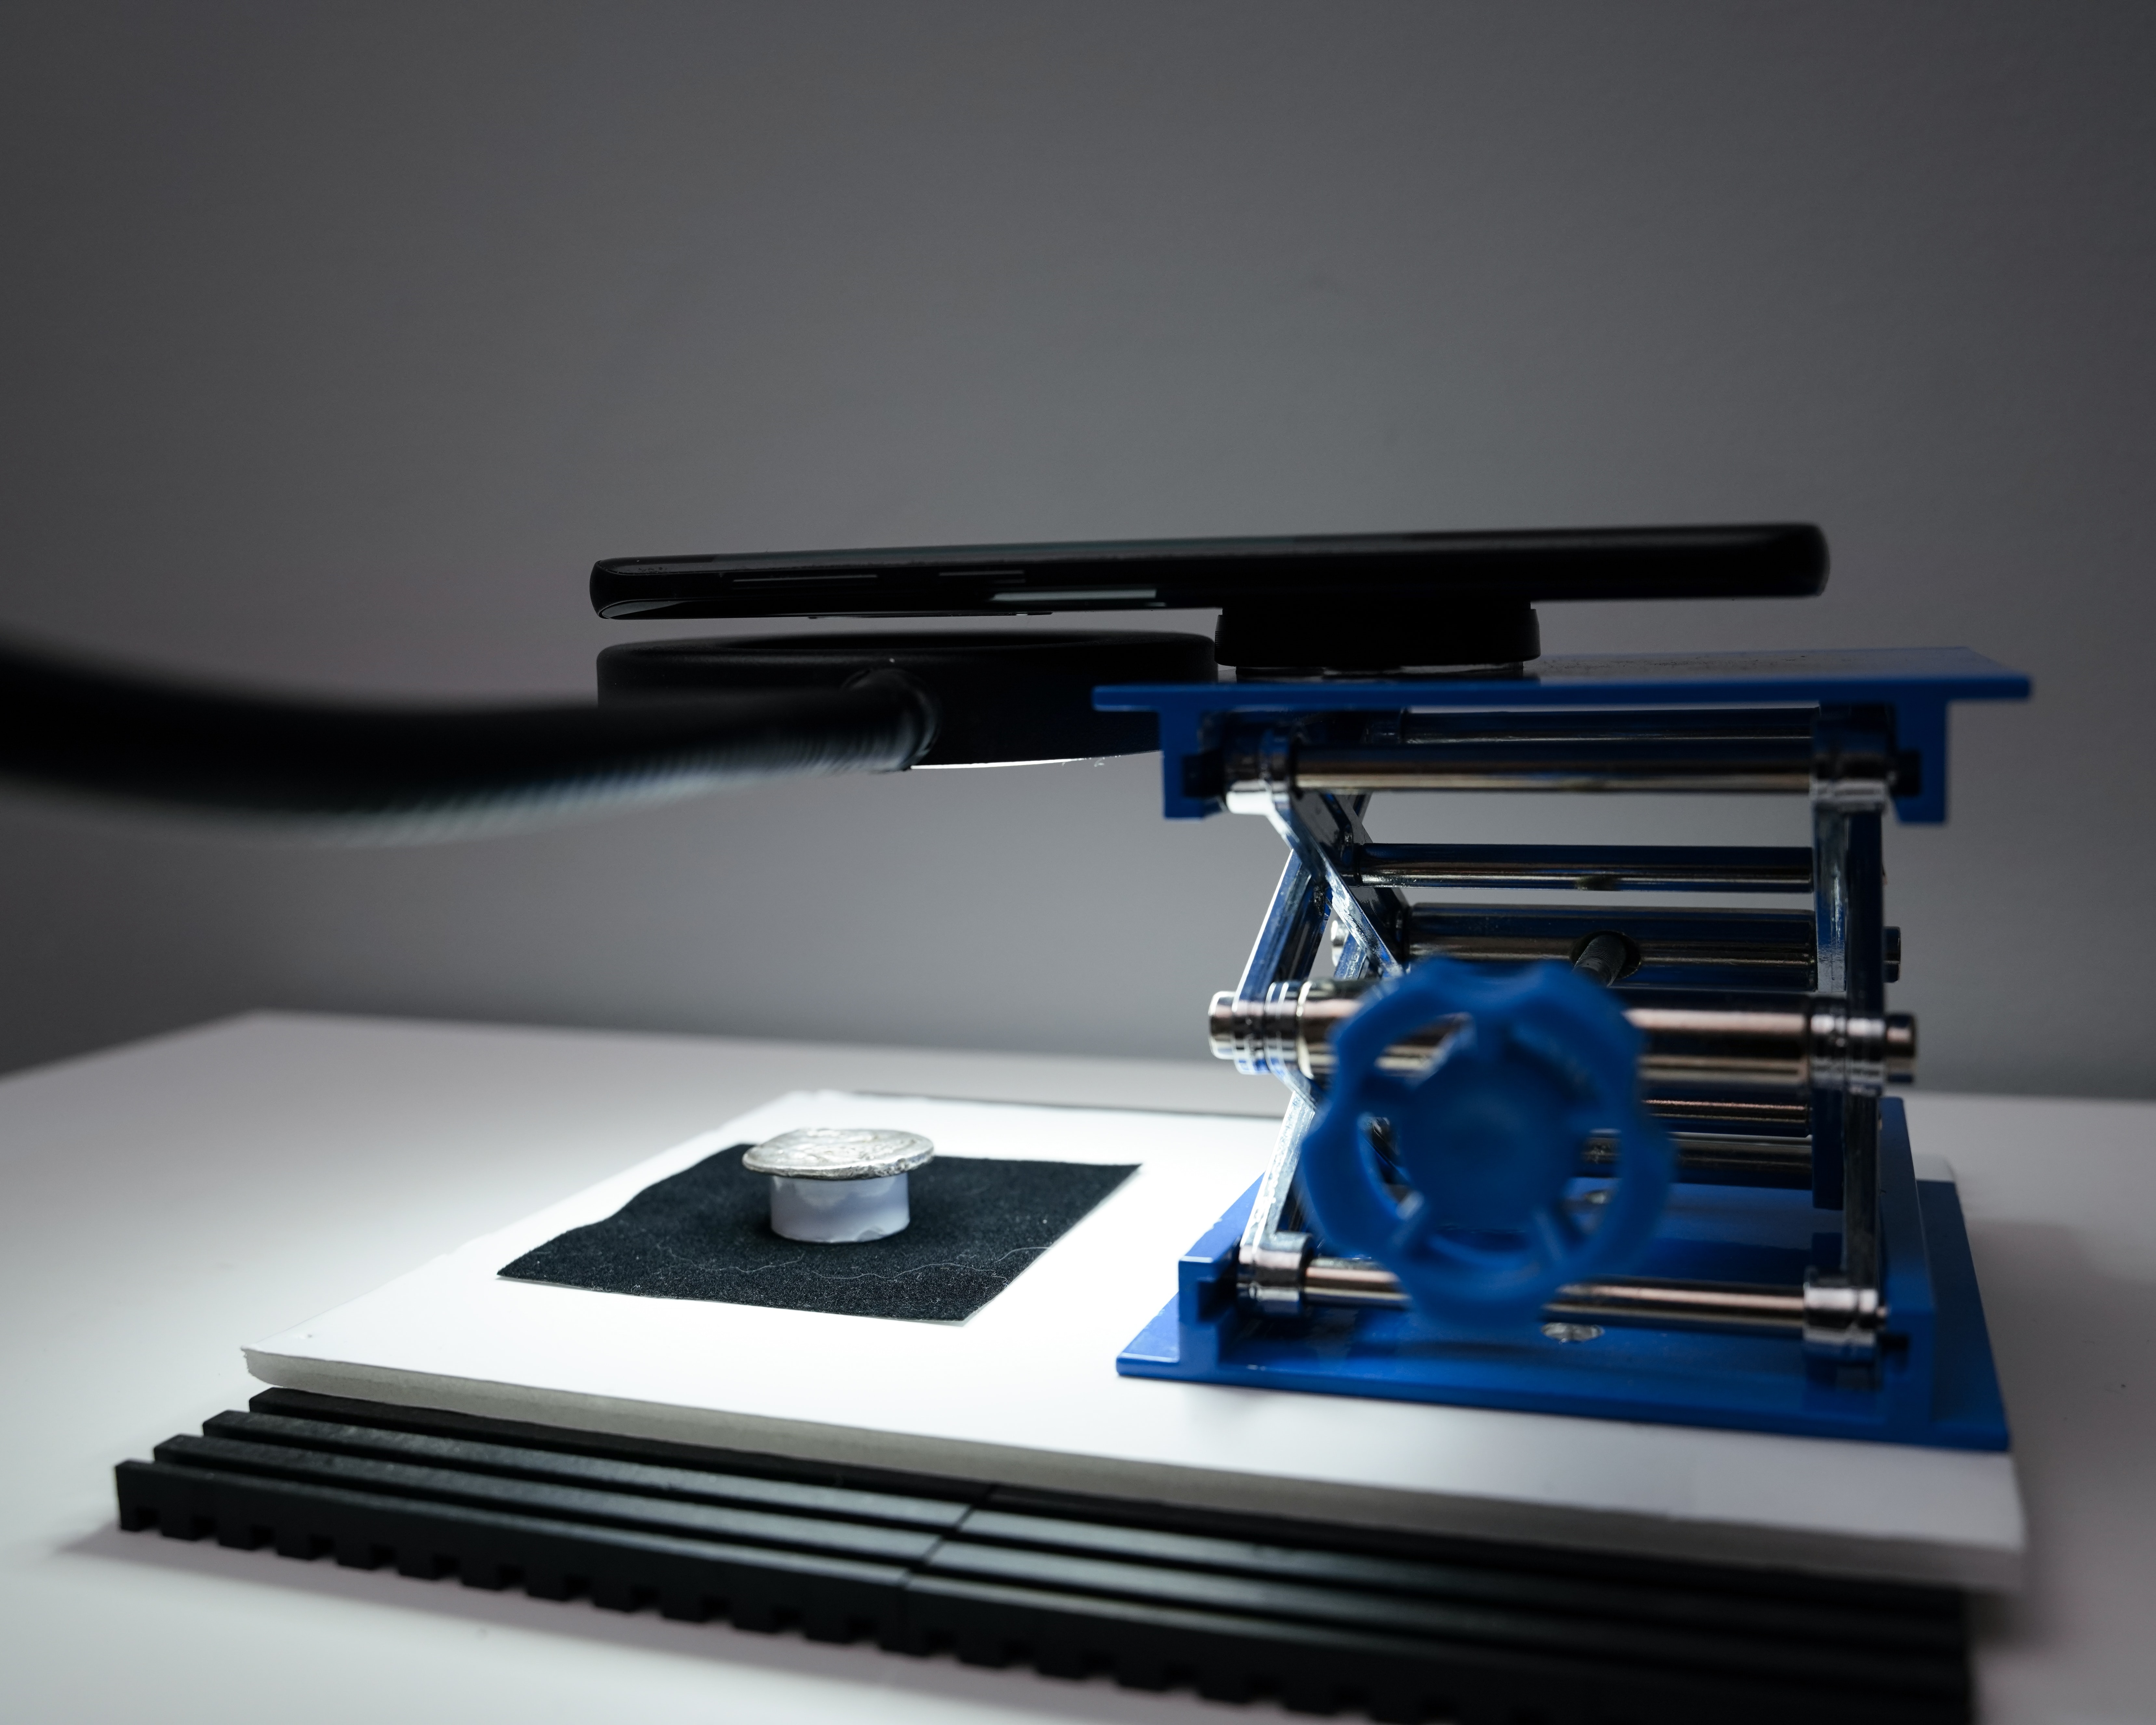
Assembly
There is very little assembly required for our setup. First, you want to peel off the sticker on the back of the magnetic mount and stick it near to the edge of the top of the lab jack. I recommend placing it in on a side that does not have the adjustable knob as the phone will be sticking out over the edge and make it difficult to adjust the height.
Next, cut a 100mm x 200mm rectangle from the foamcore. This will be the base of the setup and provides a flat surface for everything to sit on. Using superglue or similar, glue the underside of the lab jack to one end of the foamcore. The goal is to have your phone on top of the lab jack stick out over the foamcore board, where we will be placing the coins.
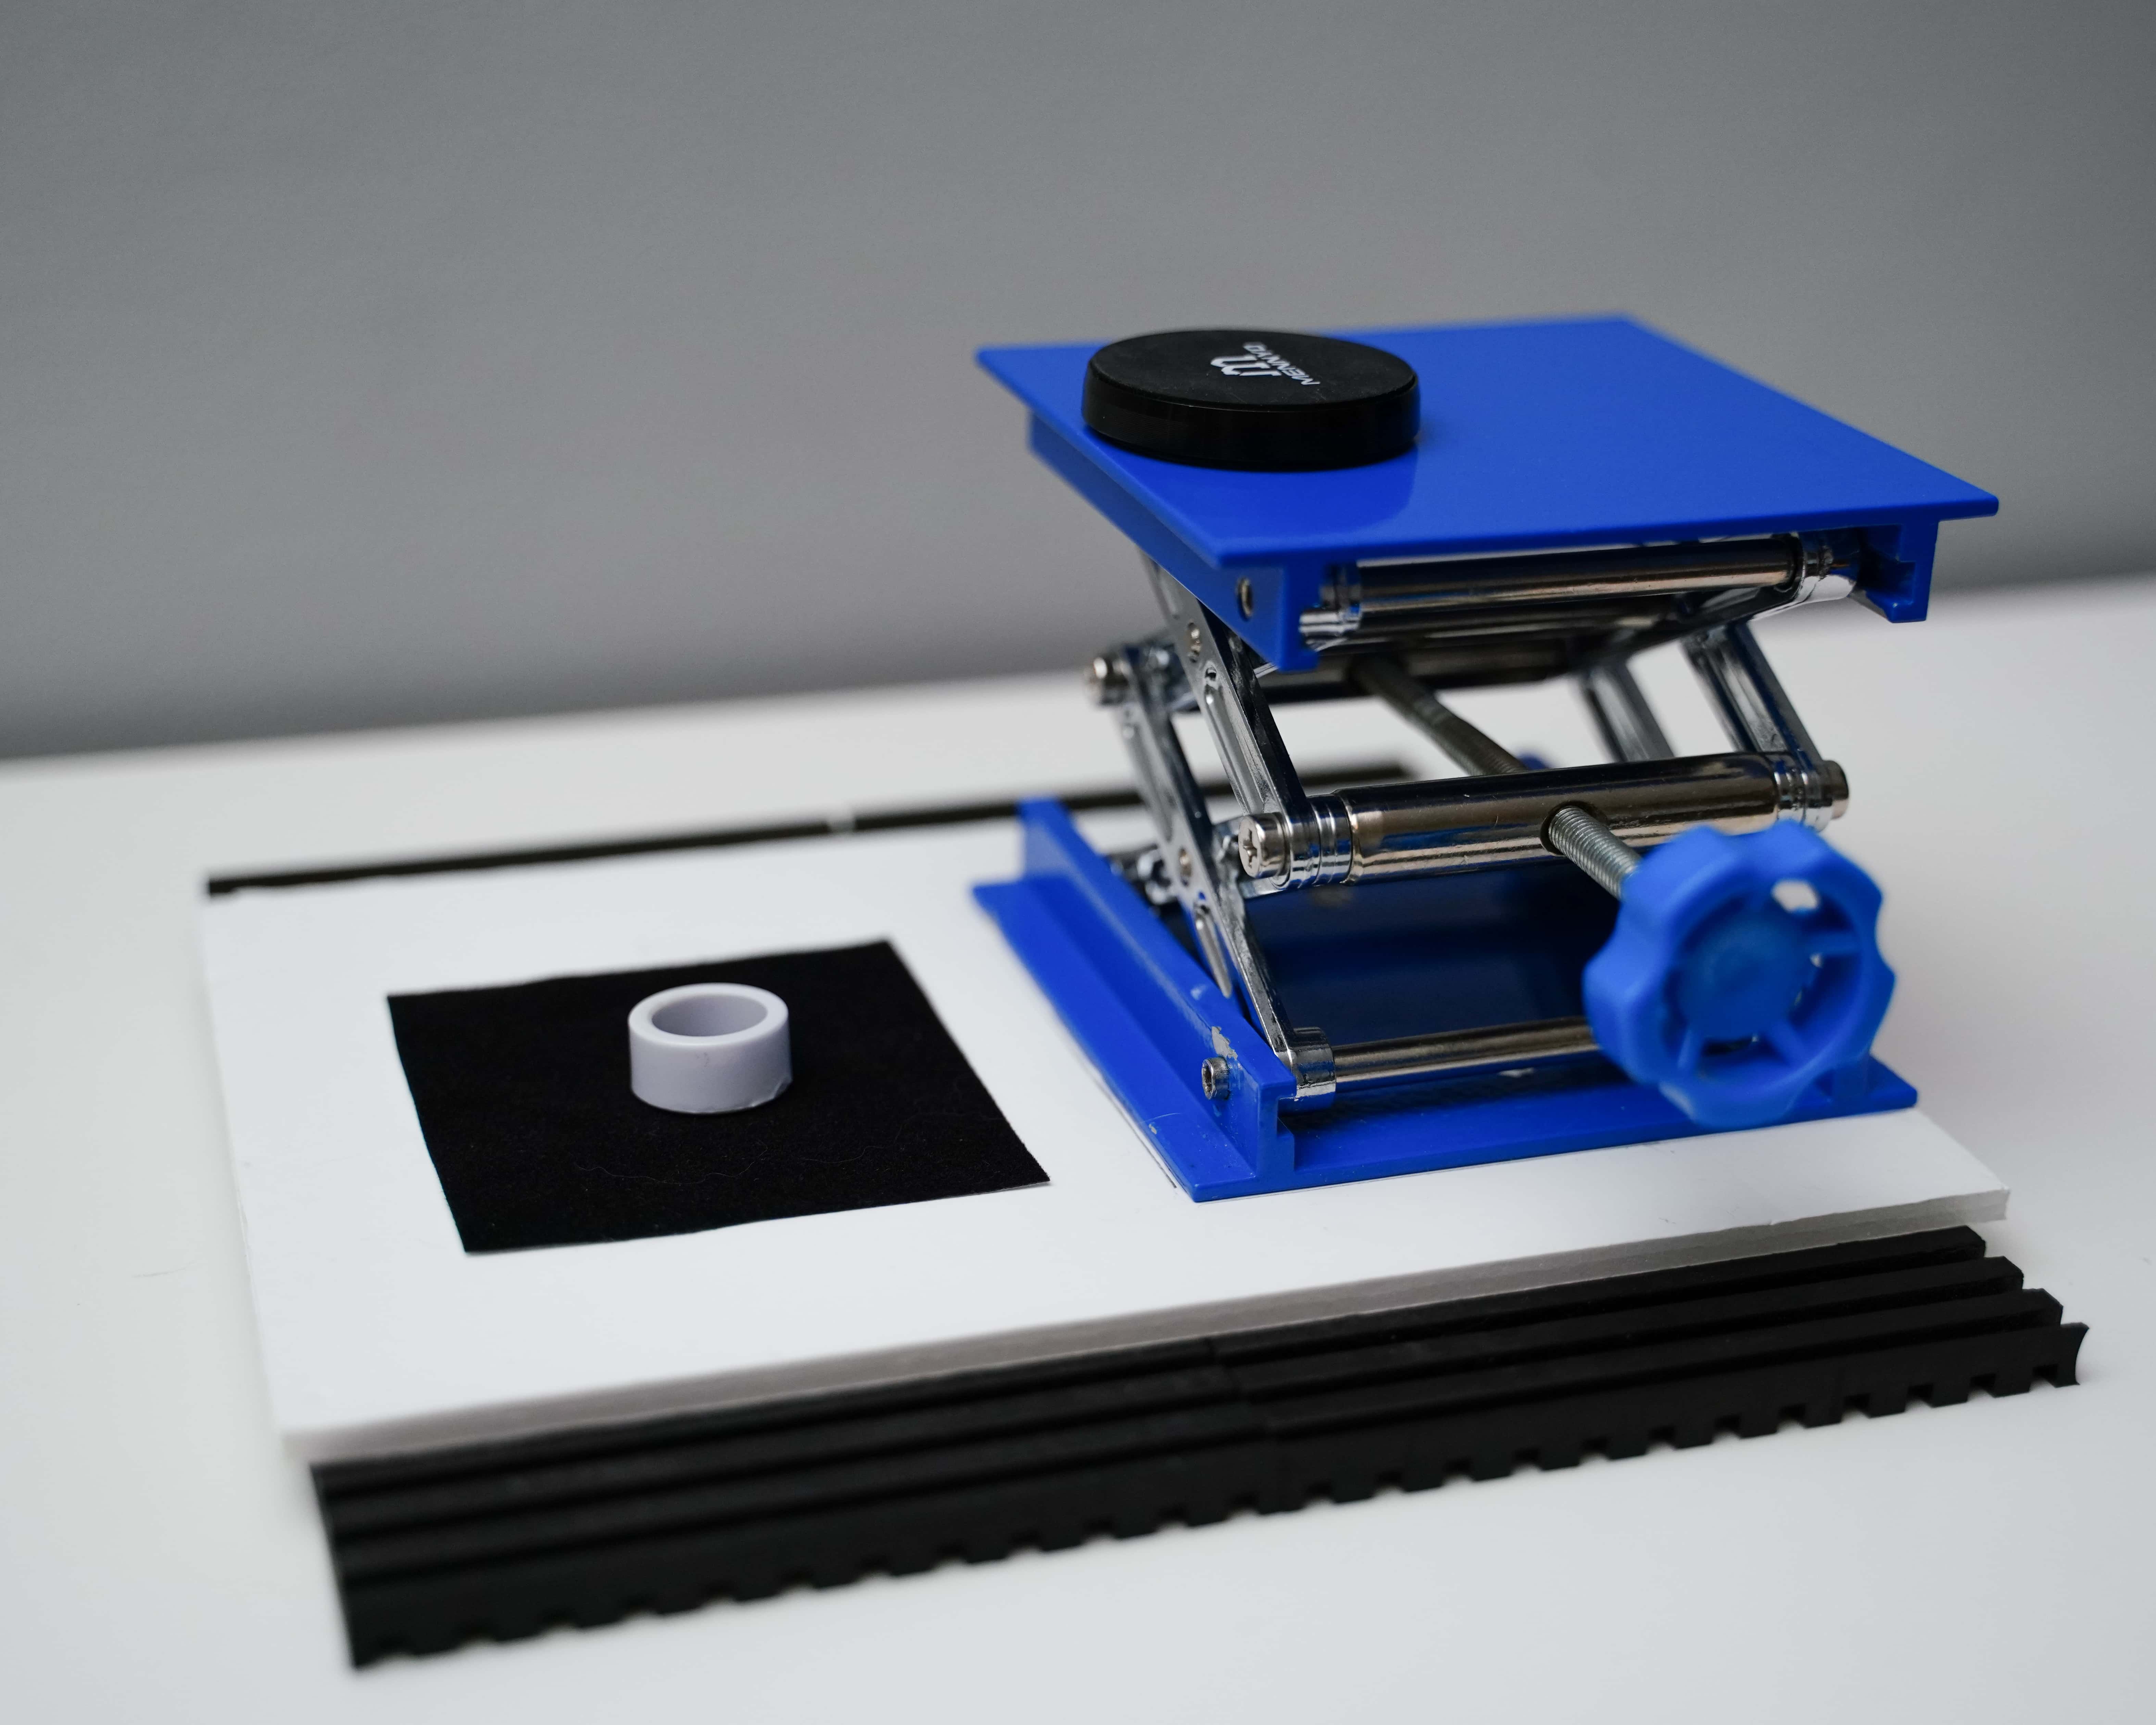
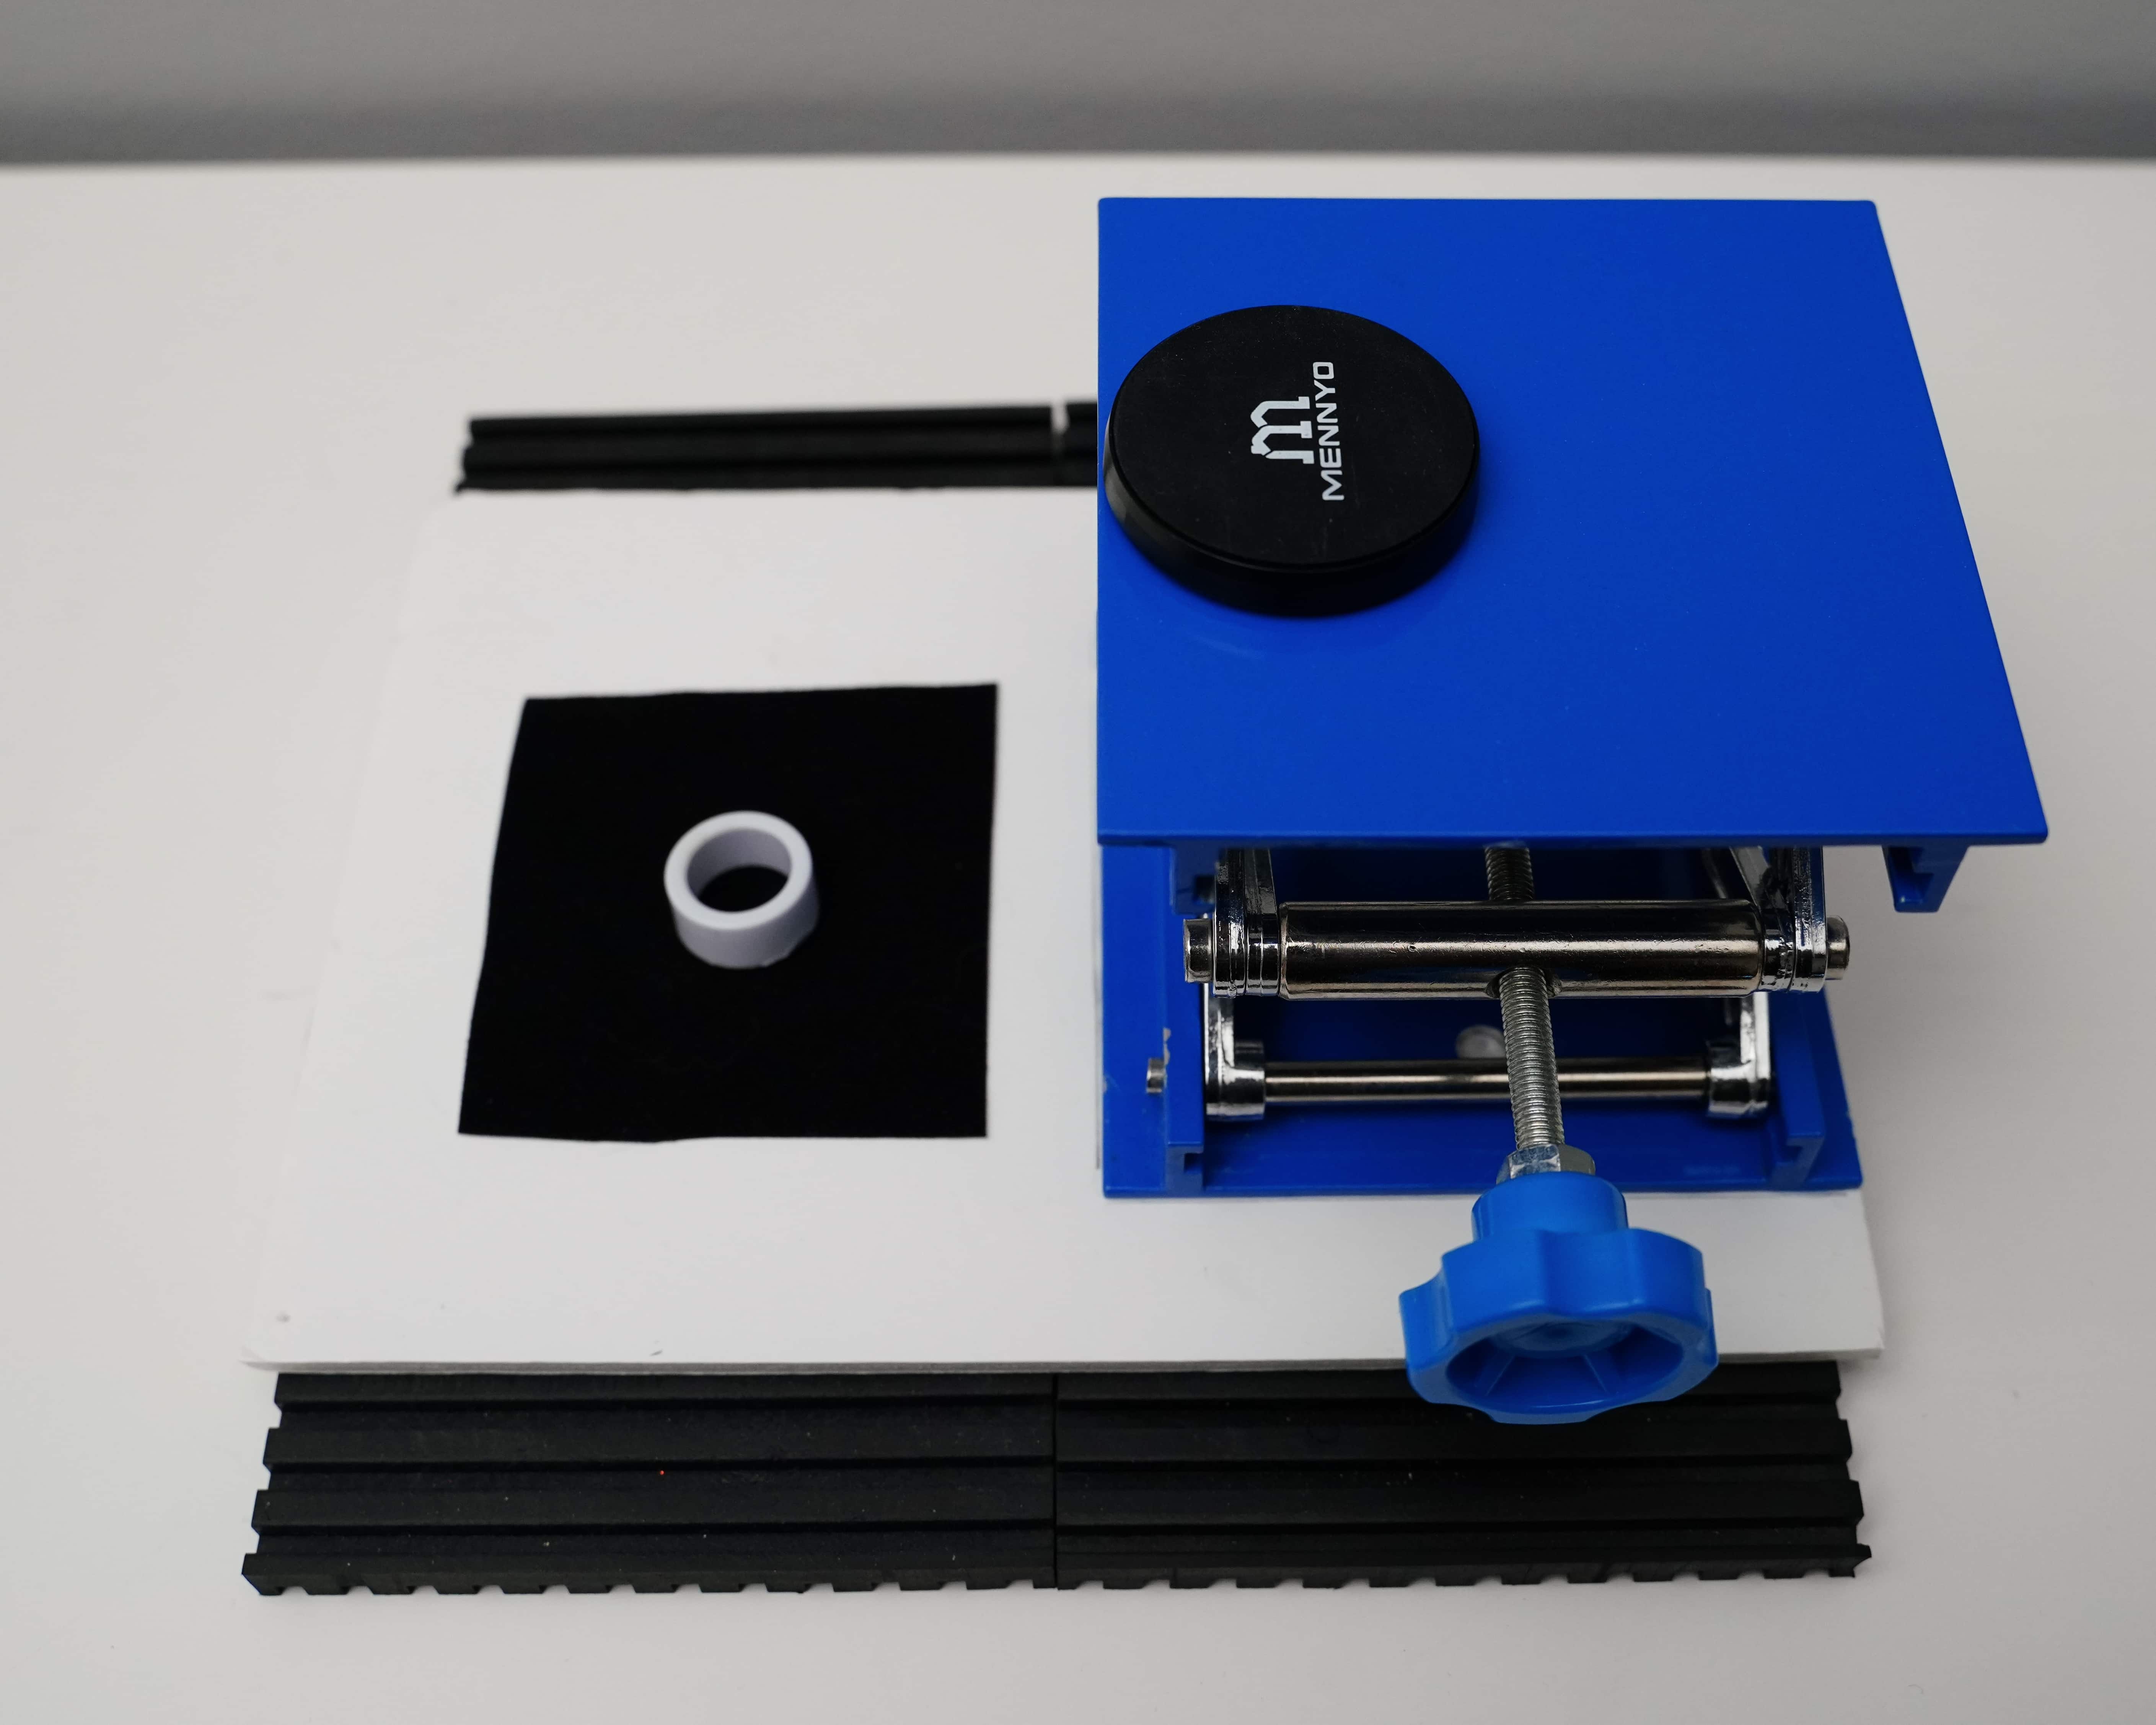
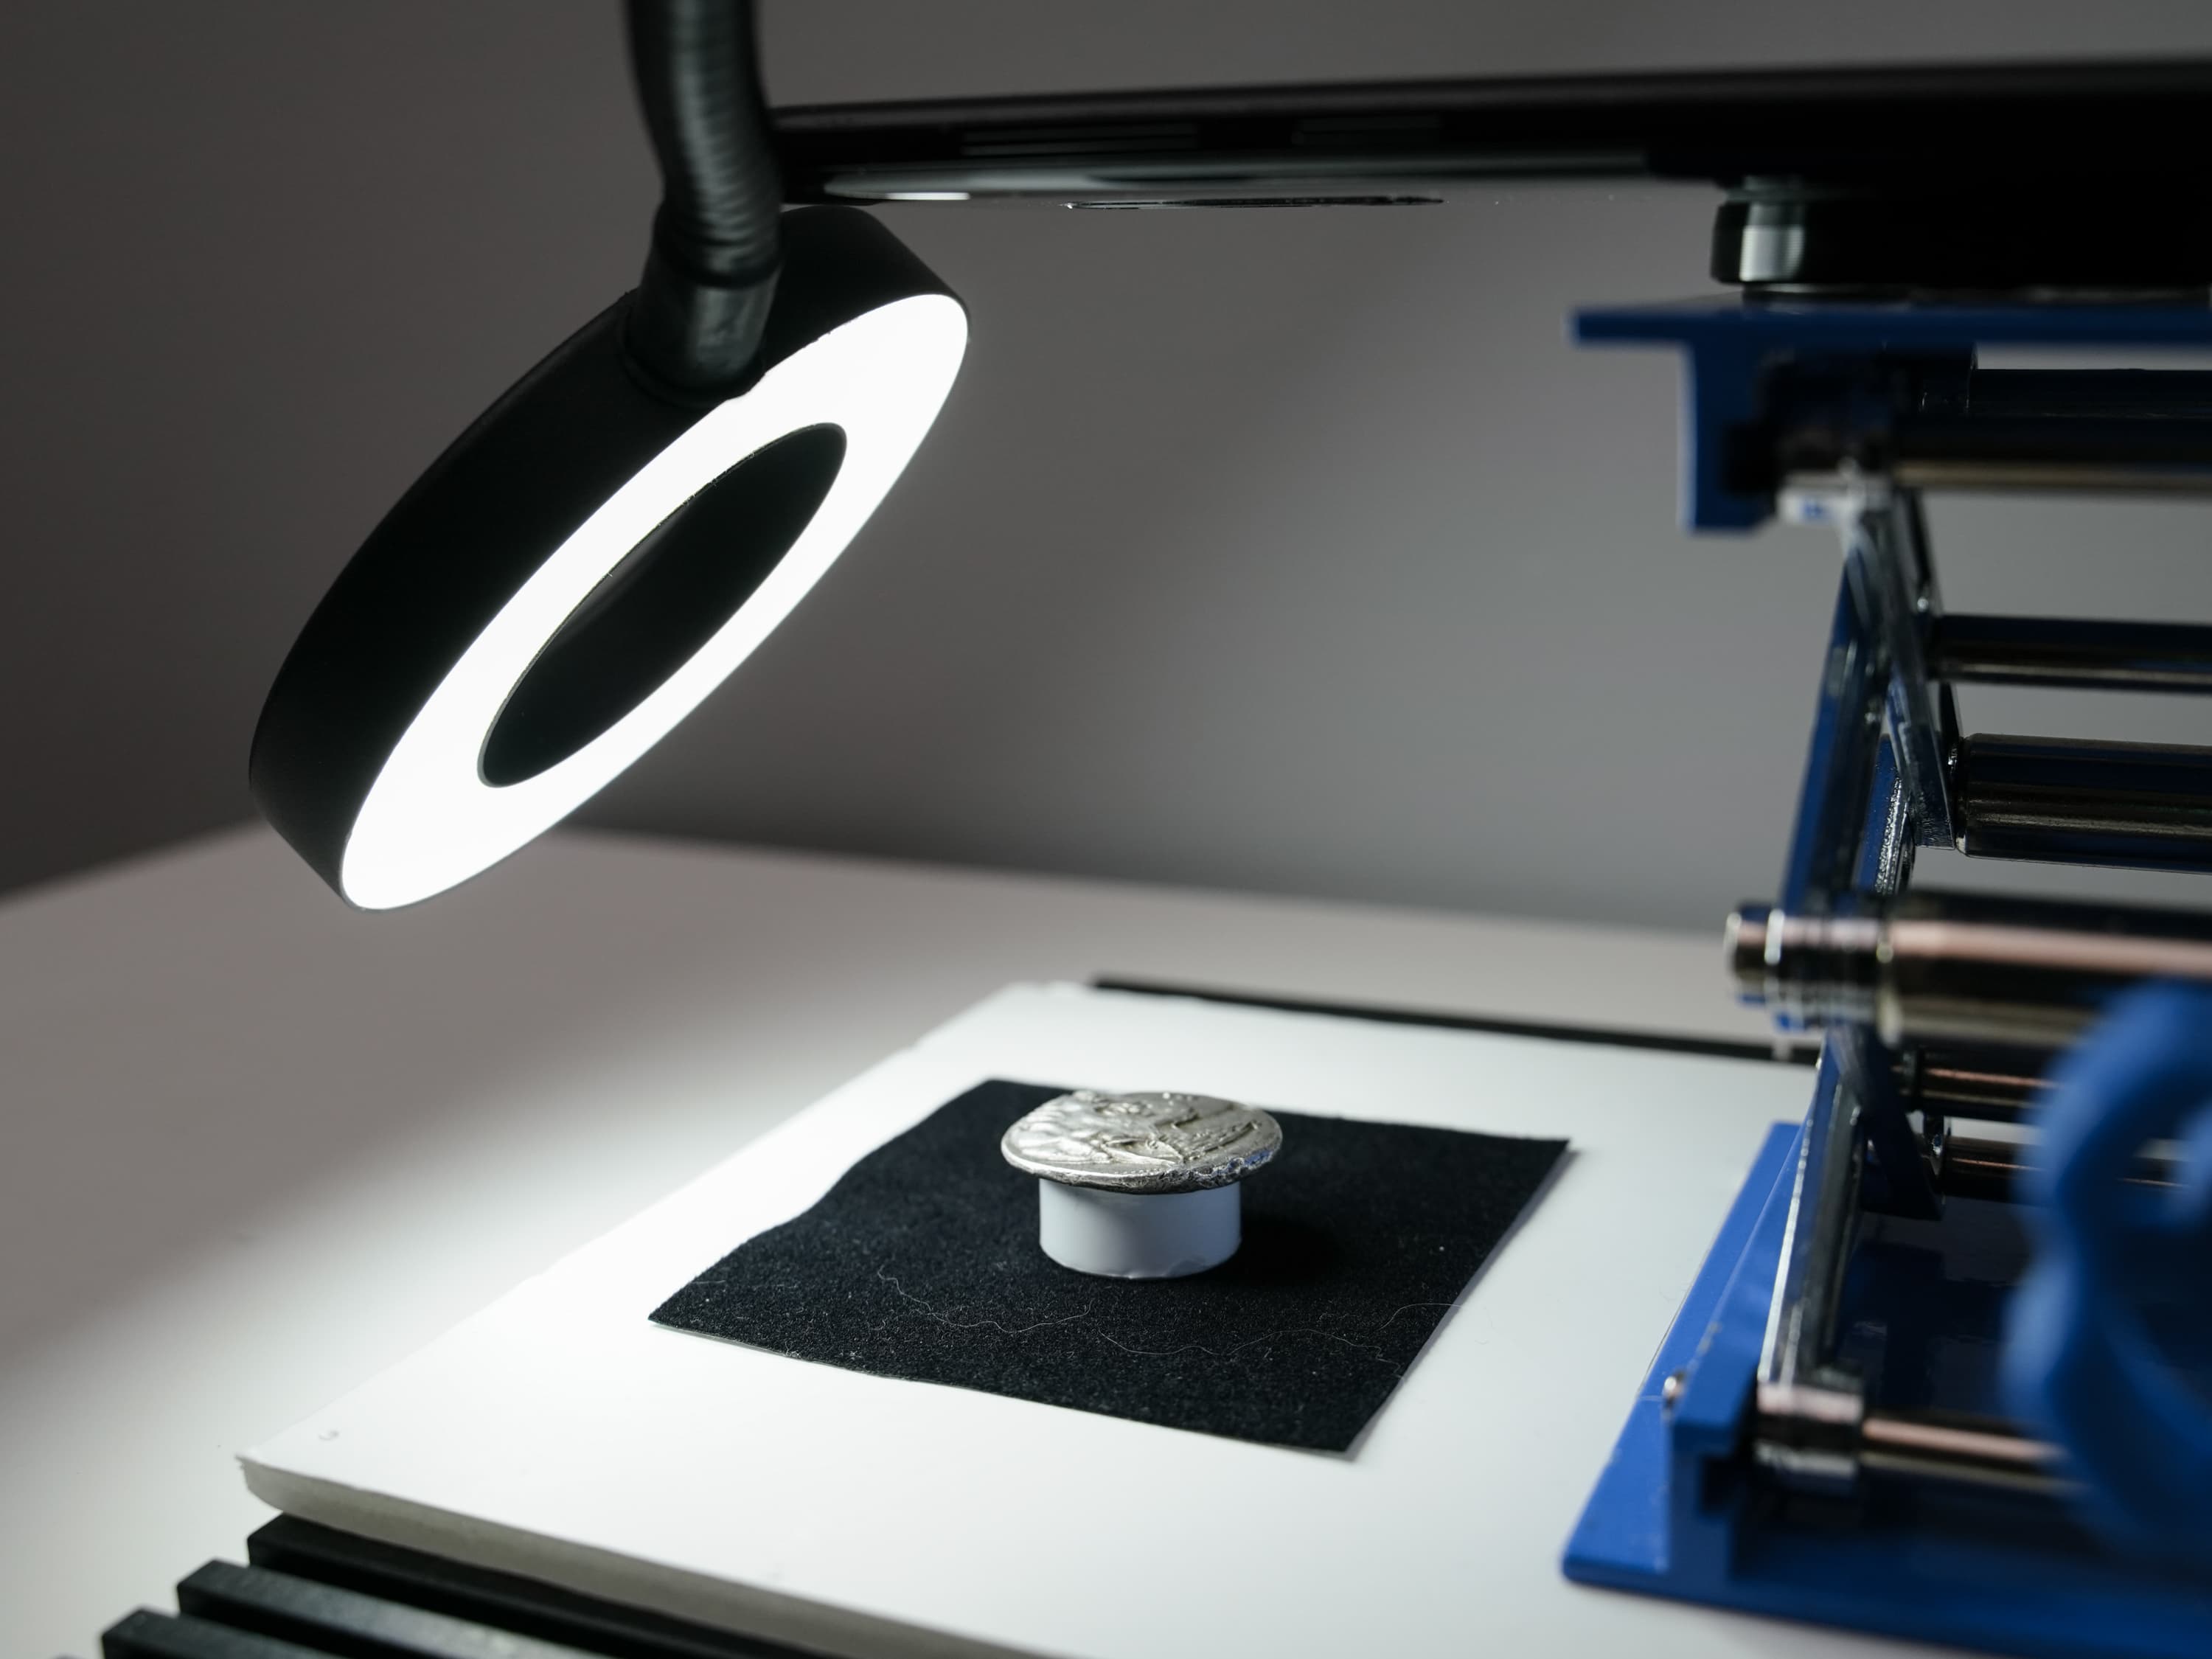
When all is done, you should have something similar to the example in the photo.
3. Lighting
There are roughly three main styles of lighting you might consider, each of which has endless variations but for the purposes of this guide I’ll discuss them generally.
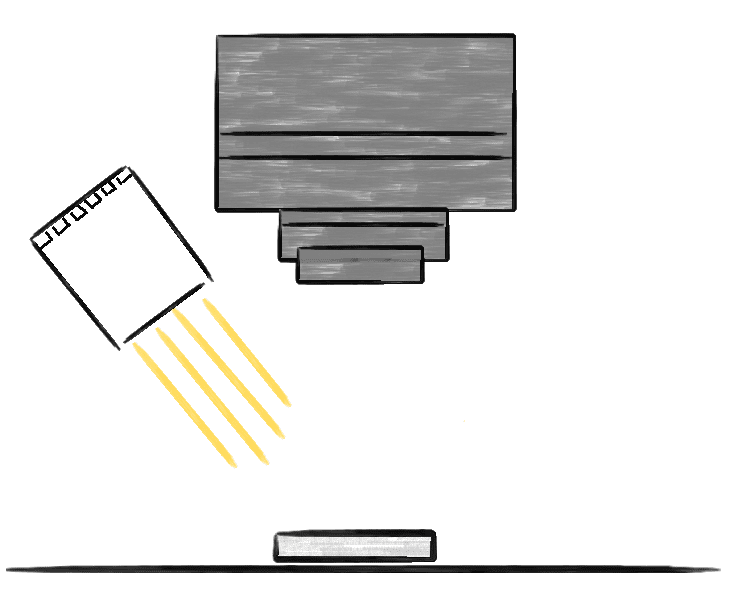
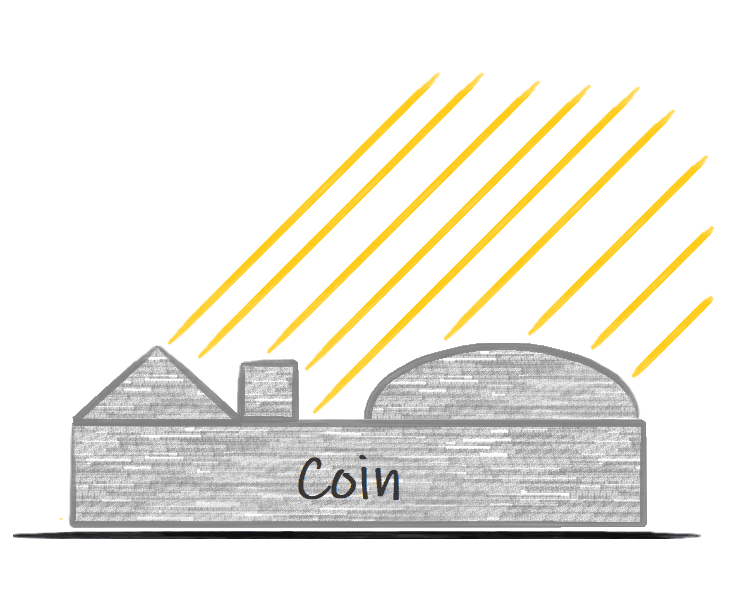
The first two are perhaps straightforward. You have one or more light sources (e.g. an LED lamp) that are angled down towards the coin and illuminate it from either a high or low angle.
- Using a single angled light source, the light shines on one side of the coin more than the other, creating shadows on features opposite the light source and producing an uneven light across the coin. This type of lighting exaggerates the relief of a coin at the cost of creating shadows that can hide detail as well as creating distracting bright areas that are much more well lit than other parts of the coin.
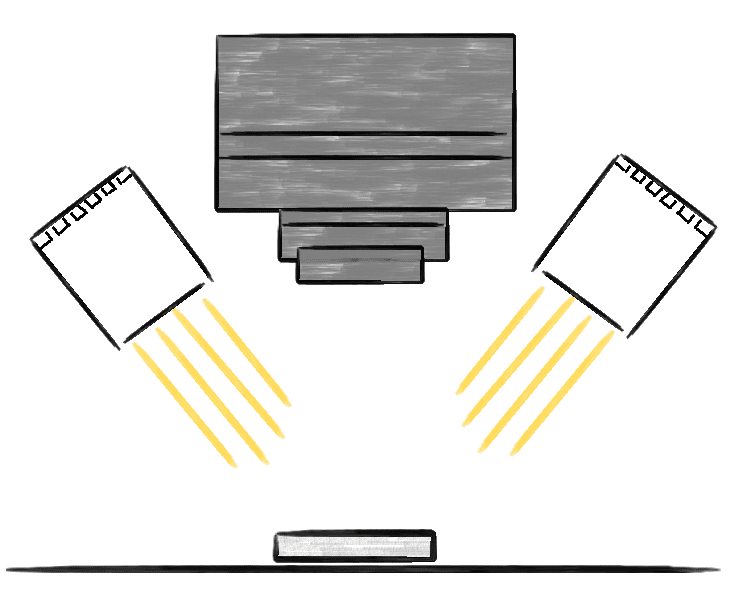
- With two or more angled light sources, you can attempt to correct for this by illuminating the coin from the other side, or many sides. The shadows will be removed, as will the uneven lighting. The downside to this approach is that you can have a very flat looking image as there are no shadows to help illustrate the depth of a coin’s features. Typically, the surface of a coin lit this way will also look relatively plain and dull, any toning will be washed out and surface features like flow lines hidden.
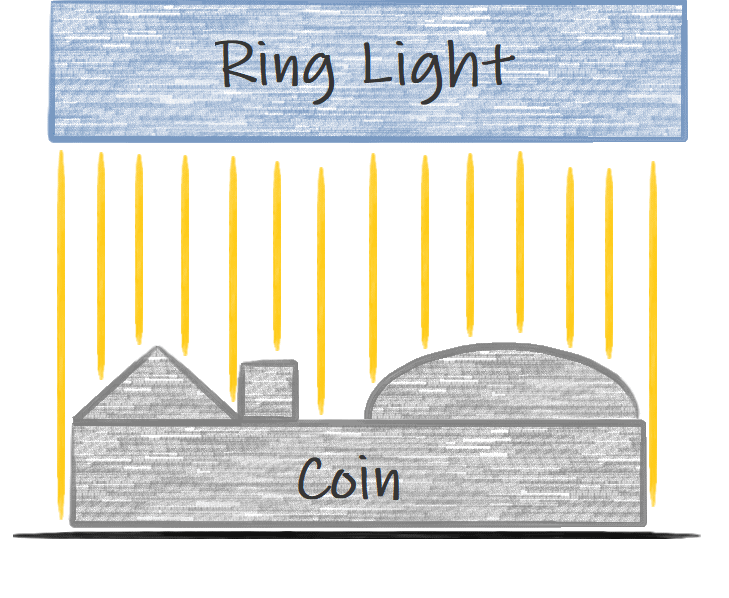
- Lastly, axial lighting illuminates the coin directly from above — in axis with the camera lens — allowing you to achieve a unique effect. As the light hits the coin from a near 90-degree angle, there are no shadows produced but there is contrast at the edges of features. This occurs because the amount of light reflected back to the camera is a function of how flat the surface of the coin is. The fields of the coin are typically very flat and thus reflected a lot of light back. The cheek or neck area of a portrait is less flat, particularly if the portrait is high in relief and has contours, and a bit less light is reflected back. At the edges of the portrait, where the metal curves down to meet the fields, very little light is able to be reflected back and these areas appear much darker — providing contrast without requiring angled lighting to produce shadows that hide detail.
4. Setting Up Your Photo
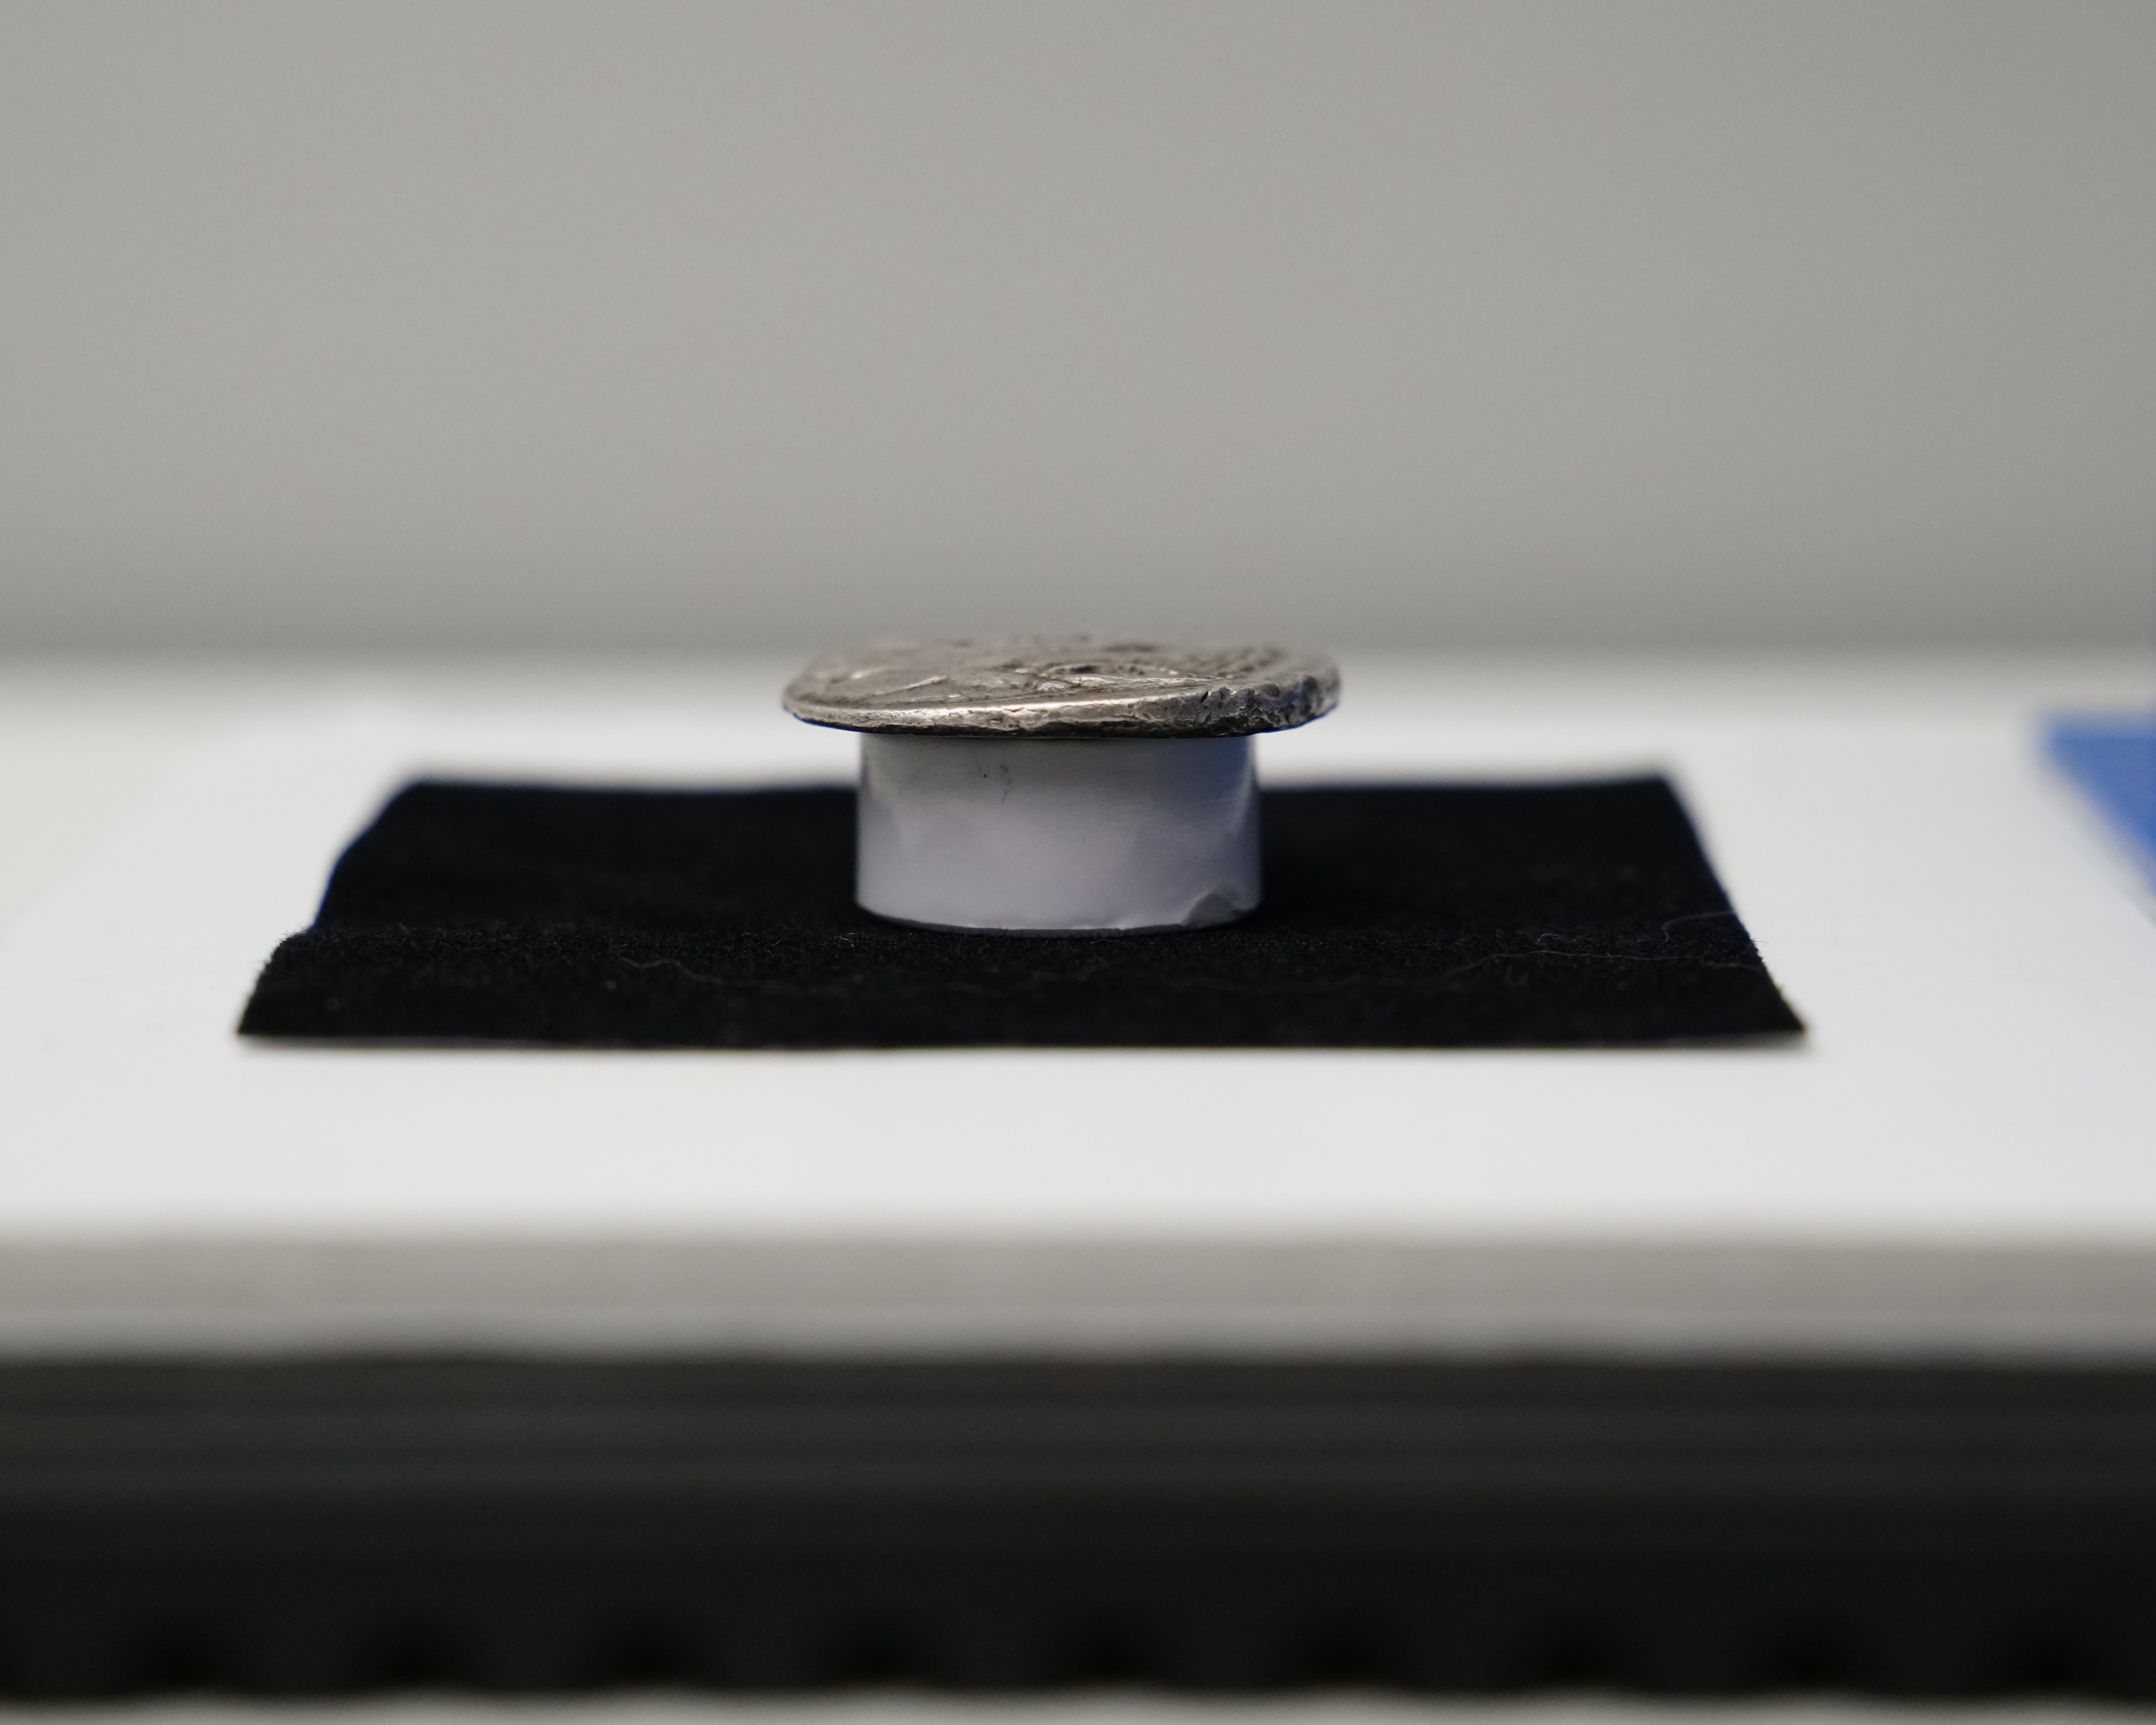
Coin Riser
You have everything assembled and now you’re ready to start taking photos. There are a couple of steps to go through first to ensure you get the best results possible.
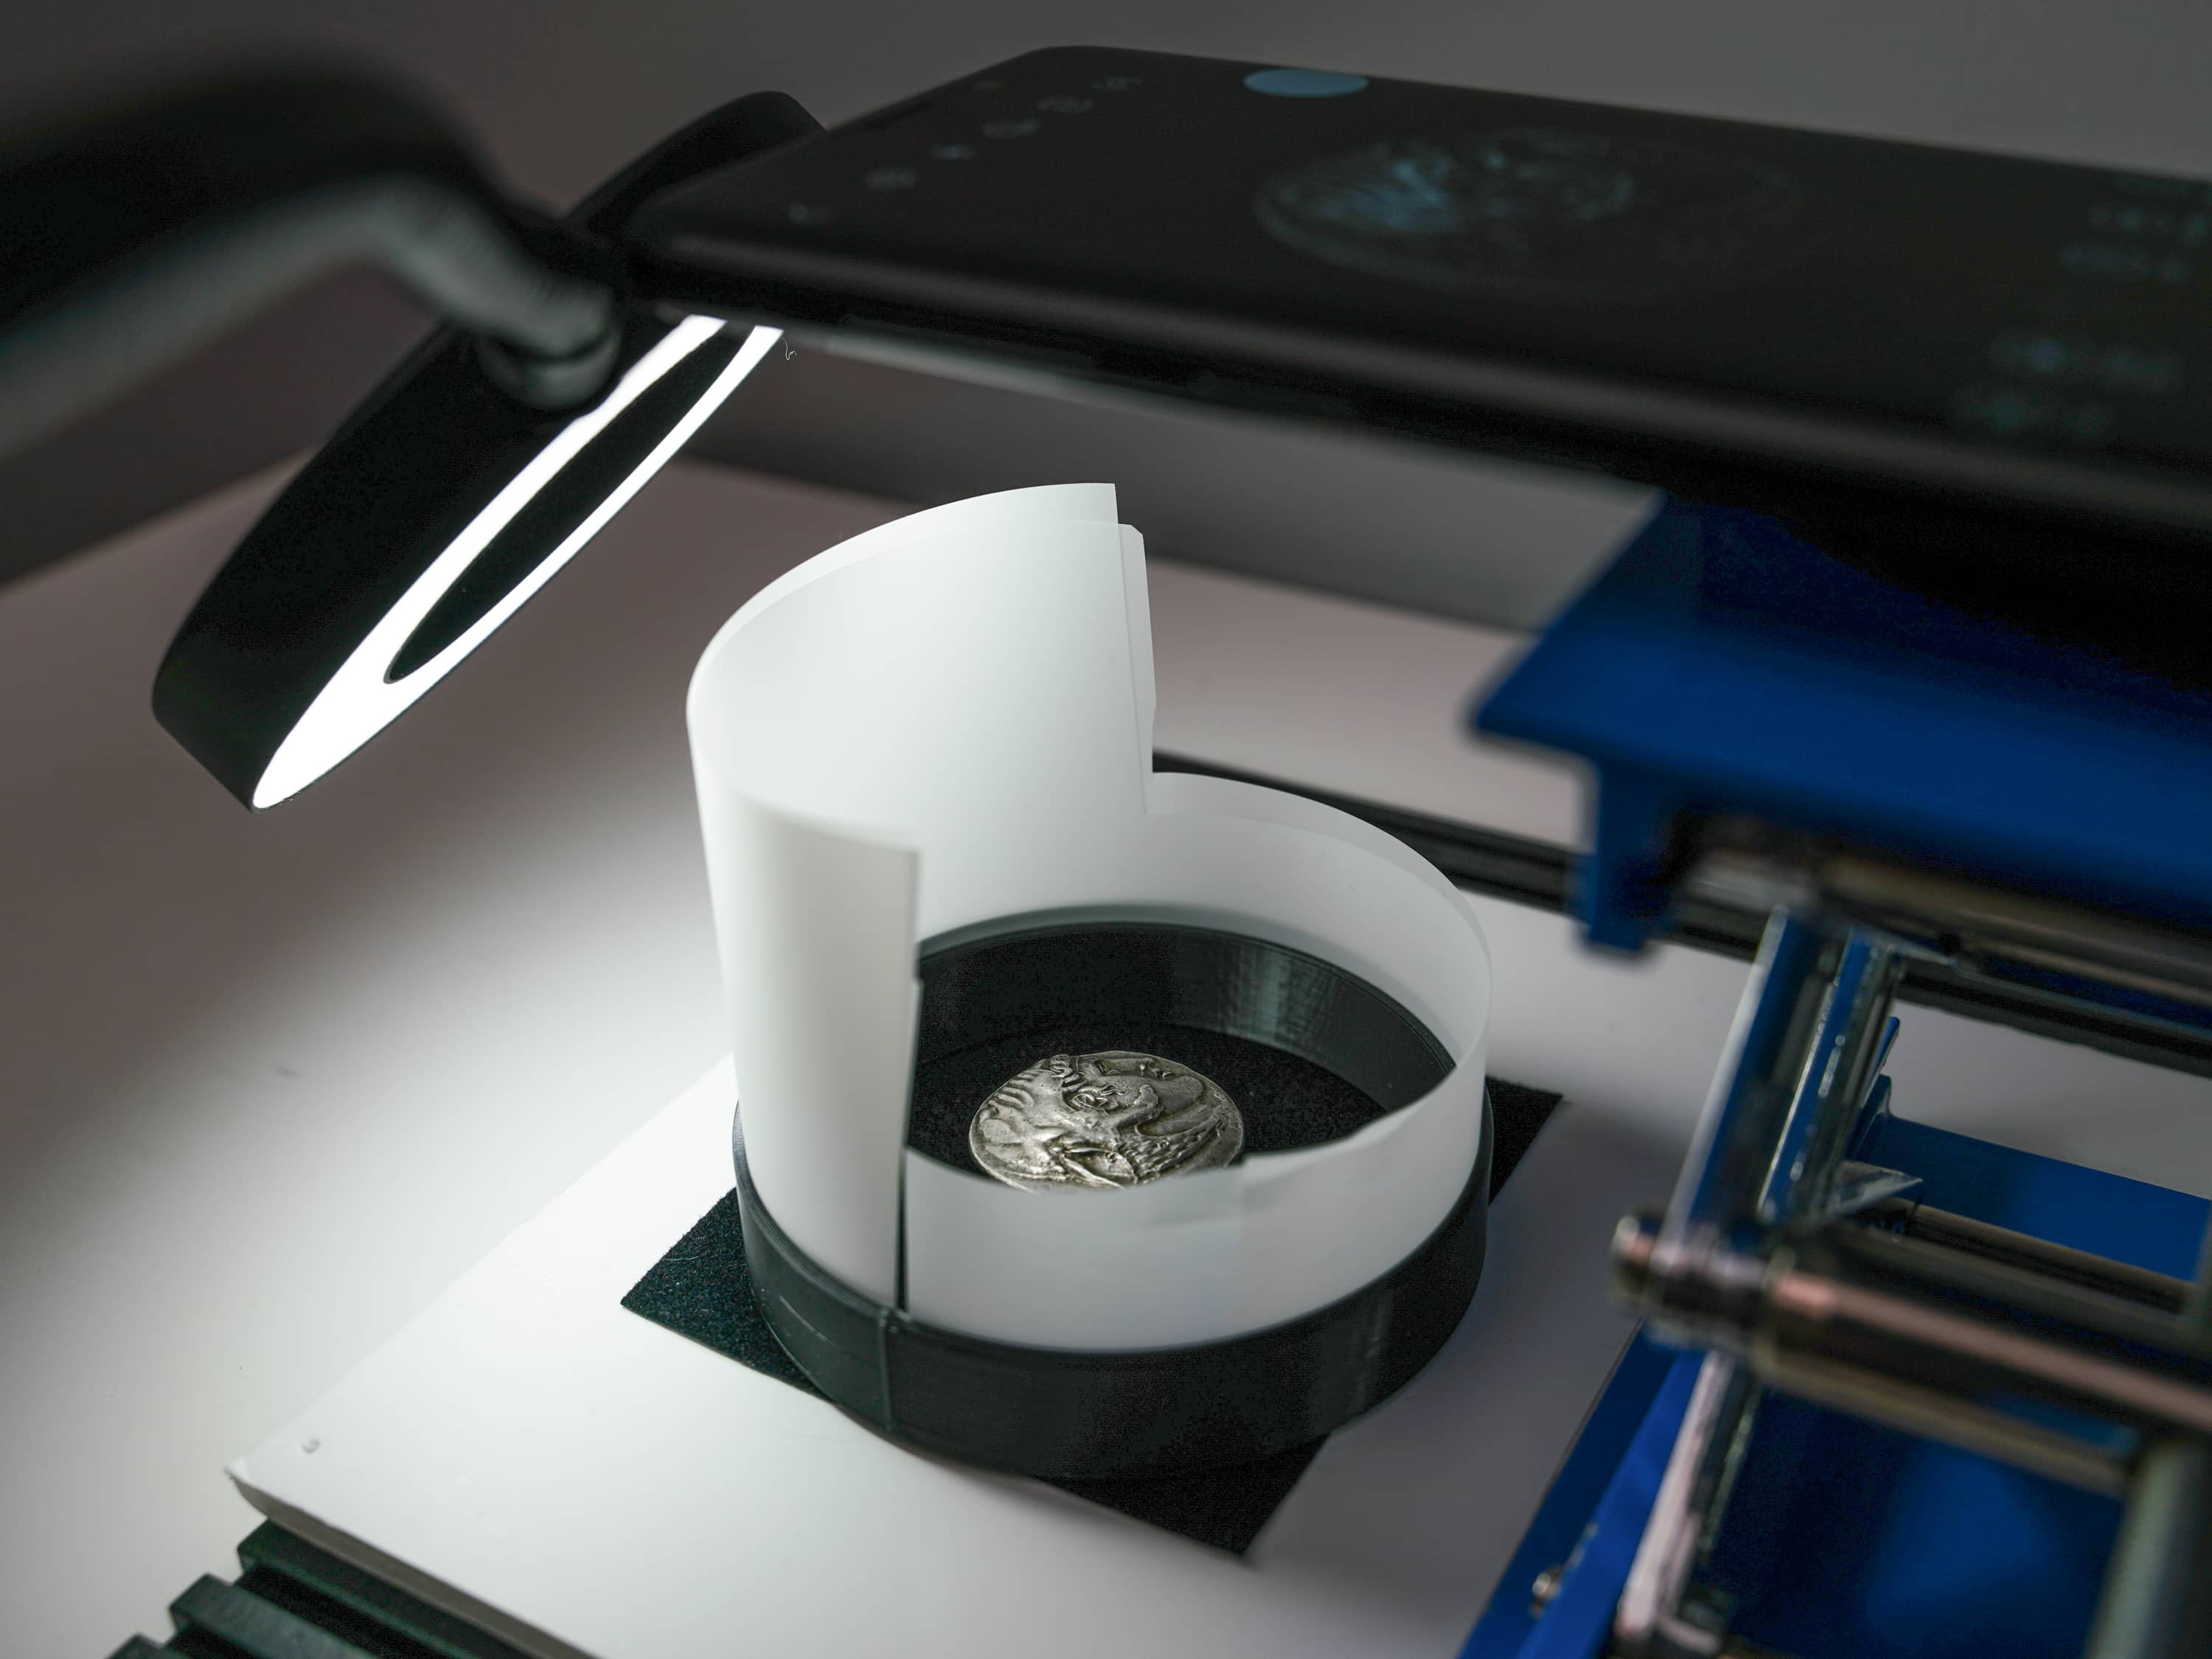
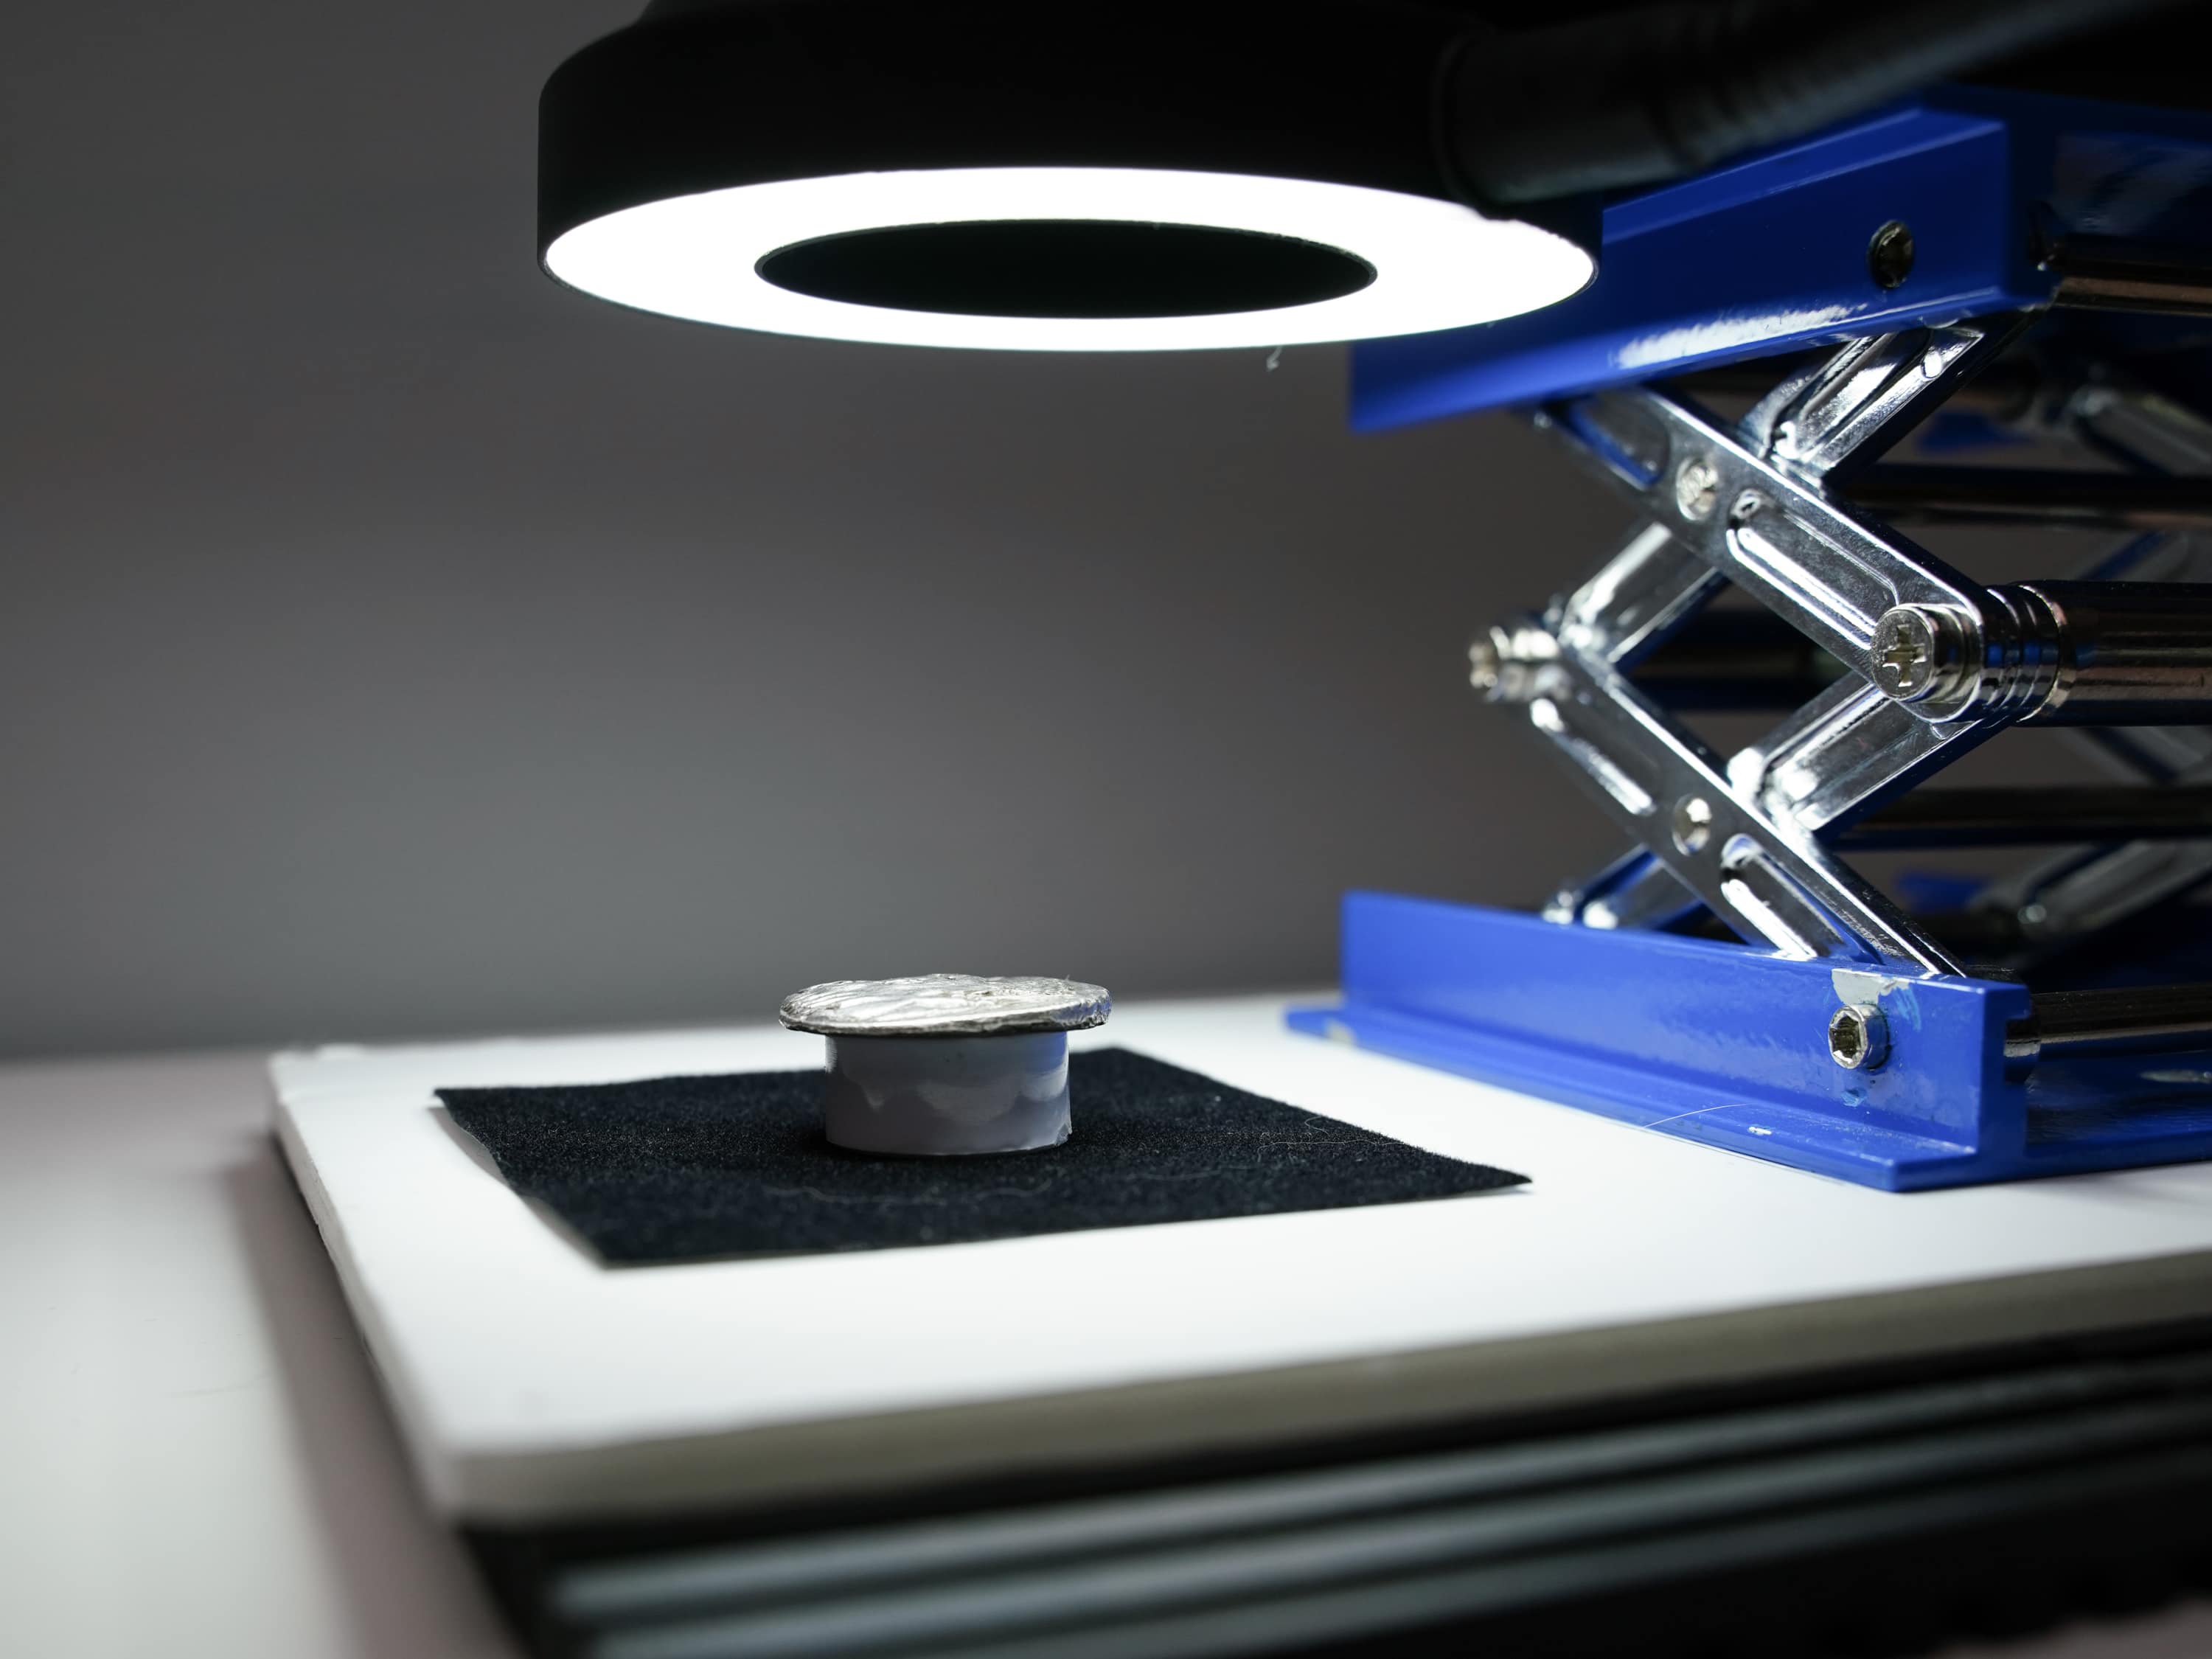
The first is to find a small object to raise the coin off of the background. This object should be circular but smaller in diameter than the coin you’re photographing. It should also be flat on both ends and ideally 10-30mm in height. Bottle caps can work well in a pinch but I would recommend finding something at a hardware store that fits the bill.
Raising the coin off of the background will do two things:
- Ensure the background is out of focus and blurry.
- Soften shadows that may form around the edge of the coin
An out of focus background will be easier to remove in editing as it will create more separate between the background and the coin. Otherwise, you may end up with the fibers of the fabric or details of the background surface in-focus and blending in with the coin’s edges.
Softening shadows around the coin also helps create separation, whether using black or white backgrounds. Shadows are rarely completely dark and discretely formed, more often than not they’re a gradient from darker to lighter at the edges as they diffuse out. This makes background removal particularly difficult as it’s hard to say where the coin’s edge starts and where the shadow ends.
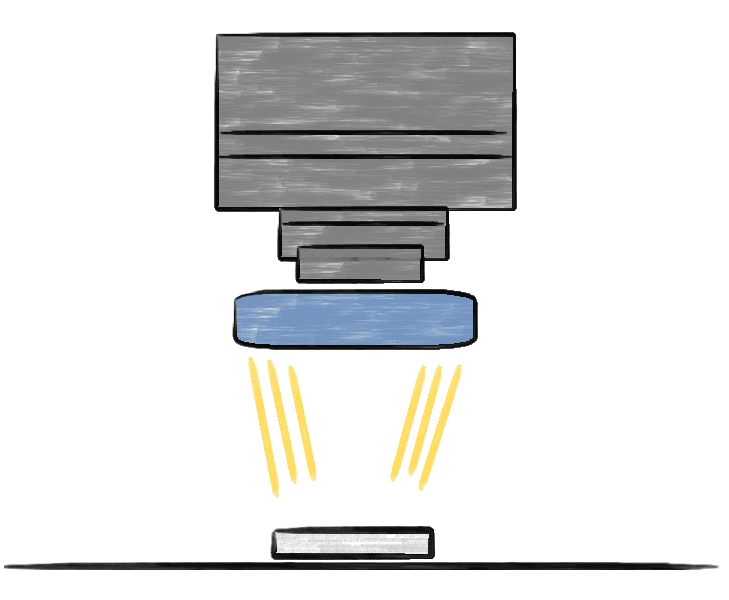
Ring Light
When it comes to positioning the ring light, you ideally want it as close to the back of the phone as possible. The phone camera will be centred over the middle of the ring light with the coin also centred to ensure even illumination.
The distance between the coin and the ring light has a significant impact on the resulting photo. For the “axial lighting” method to work, the light from the ring light needs to hit the coin from a near-perpindicular angle. If the ring light is close to the coin, it will instead light the coin with diffused light from the side—darkening the fields and only illuminating the edges of the coin’s features. This is bad.
For the ring light recommended in this article, which is one with an outer diameter of about 90mm and an inner diameter of 50mm, you should have at about 60mm of separation between the light and the coin.
5. Taking the Photo
From this point, taking the photo is relatively straight-forward but there are some additional steps worth taking to ensure you get the best photo possible.
Phone cameras are not suited for this kind of macro photography. By design, they want to produce a bright image with high dynamic range, allowing you to see details of a photo that might be in shadow or areas that may be in bright sunlight—all simultaneously.
This causes problems for taking photos of coins. We want the background to be darker than the coin, we only care that the coin is properly exposed. However, a phone camera will over-correct and try to brighten the background (particularly dark backgrounds), making the coin itself too bright. There’s a few things we can do to prevent this.
- In your phone’s default camera app, look for a mode that gives you full control over the camera settings. This may be called “Pro” or “Advance” mode.
- Disable HDR, filters, and reset any settings for contrast, brightness, saturation etc back to normal.
- Check your photo settings to make sure you’re saving photos in the largest resolution available at the highest quality setting
iPhone
Some phones, such as iPhones, don’t provide a “Pro” mode where you can change ISO or shutter speed. You can however download apps that will give you this functionality, see this guide. If you don’t want to pay for an app, there are some other things you can do. Use exposure lock on your iPhone to have it lock the exposure settings to the coin and not the background. Also, look for a light metering setting and if available, use “Spot” or “Center” metering.
Android
Samsung phones have decent in-built camera functionality that is sufficient for our purposes here. In the default camera app, choose the “Pro” mode to unlock access to the ISO, shutter speed, white balance, and manual focus settings. Google Pixel phones do not have the “Pro” feature but you can download free apps to unlock these, such as Open Camera and FV-5 Camera.
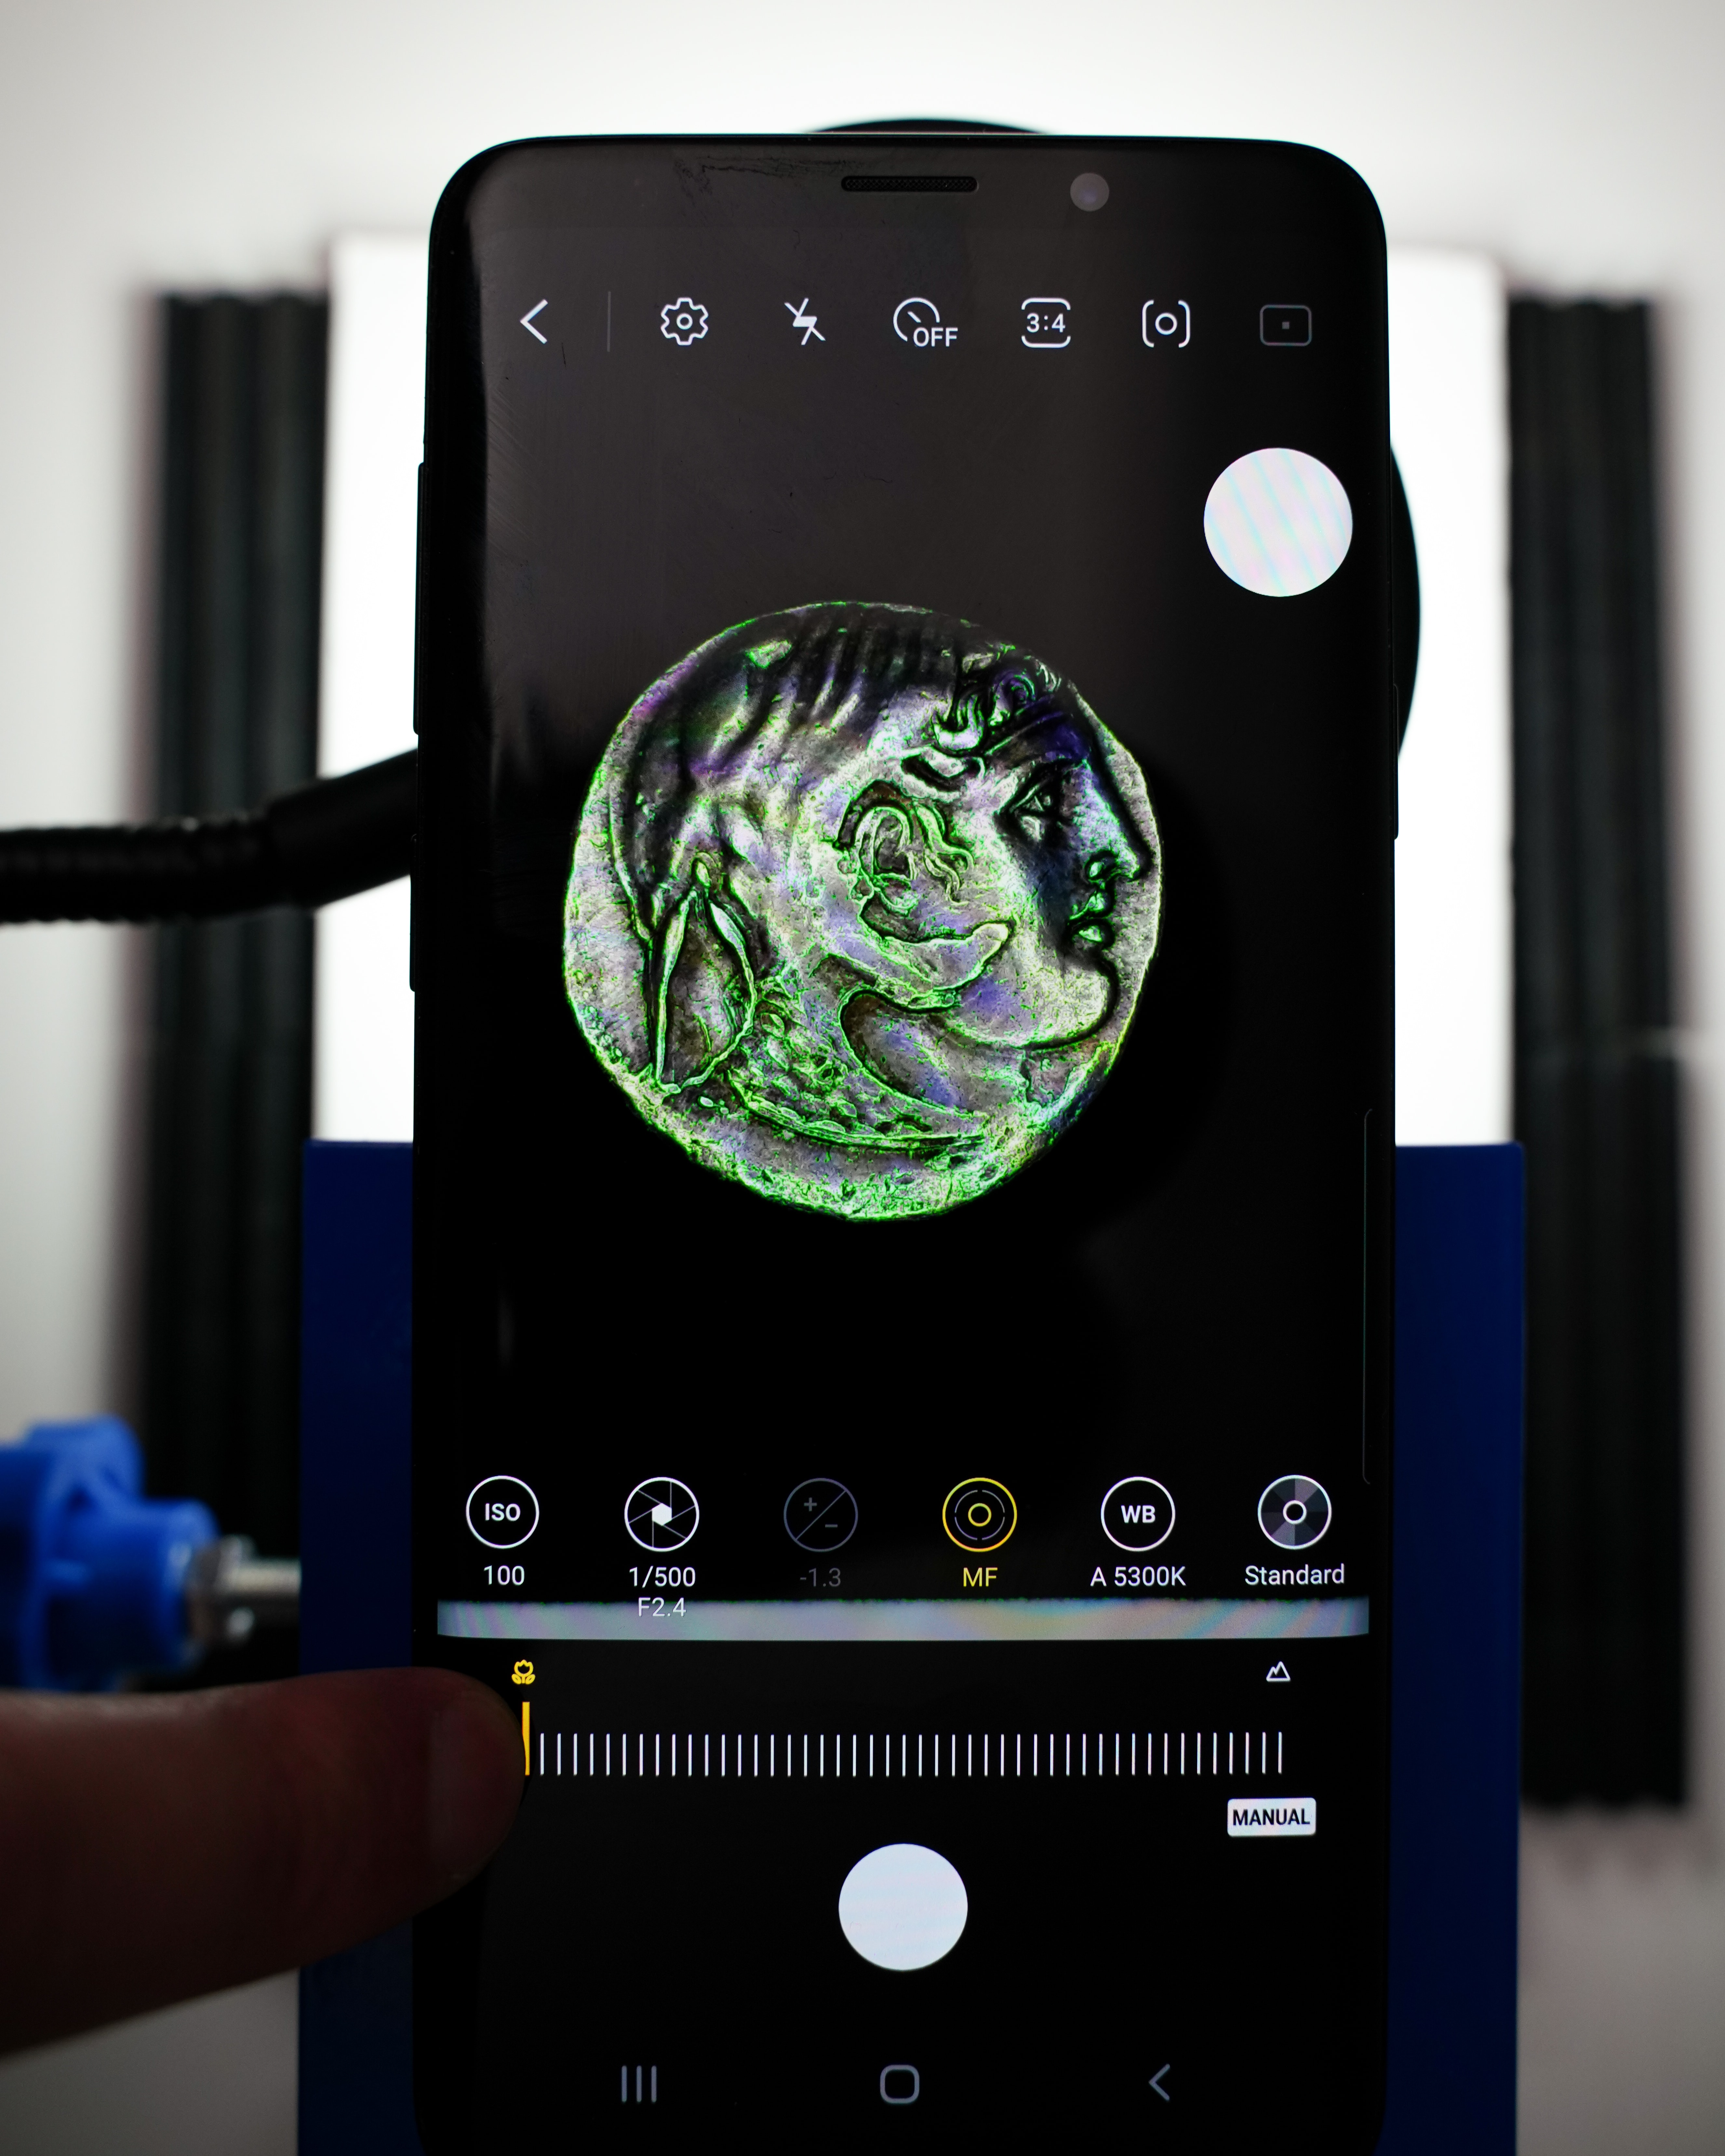
Camera Settings
There’s three settings that you will want to change to get the best photos:
- Focus
- ISO
- Shutter Speed
The focus is fairly straight-forward and easy to set. You will want to set your camera to it’s closest focusing capability, which is usually indicated by a flower (rather than a mountain) symbol. This tells the camera to try and focus on something close to the lens. I then recommend zooming in slightly to 2x or 3x magnification and whilst zoomed-in, adjust the height of the lab jack until the coin is in-focus. Go back and forward a few times to make sure you have the focus set optimally. Once this is done, I recommend zooming-out to 1x. In my experience, taking photos while zoomed-in results in a worse photo than taking a photo at 1x and cropping the image later.
Next, change the ISO setting. With the ring light I recommended above, you should be able to set the ISO to between 50-200. For now, set it to 100 and don’t worry if the image is too bright or too dark as we’ll be changing the shutter speed next.
The Shutter Speed determines how long the camera’s sensor takes in light for the photo. A “fast” shutter speed, such as 1/1000s, means the camera takes in light for one-thousandth of a second. A “slow” shutter speed, such as 1/30s, means the camera takes in light for a thirtieth of a second, which is 33x longer than 1/1000.
For the ring light, you should be able to set the shutter speed between 1/500s and 1/3000s. I would recommend setting it to the point where the coin is either just a touch too bright or a touch too dark. You can then go back to the ISO setting and adjust it slightly up or down until the coin is perfectly exposed.
Adjusting the distance between the coin and ring light drastically affects how the coin is lit. Ideally, the ring light should be as far from the coin as possible when your camera is at its minimum focusing distance.
6. Notes
This is not a definitive guide to coin photography, there are many ways in which you can photograph your coins and end up with amazing results. Instead, use this as a guide for either getting started or for trying some new techniques. I often find I will change my technique every few months, preferring a slightly different method of lighting my coins than previously. You should do the same. For every coin, play around with the lighting before settling on a choice and potentially wasting time editing the photo only to not be happy with the results.
Ring Light Size
As an example, here are two photos of the same coin both using ring lights. One photo was taken with the ring light recommended in this guide. The other, was taken with a slightly smaller ring light, that is the inner diameter of the ring light was only about ~35mm compared to 50mm for the other ring light. The difference is dramatic.
Why do we see such a stark difference for ring lights of only a slightly different size? The answer lies in how the light from the ring light is reaching the coin. All ring lights have a hole in the middle where no LEDs can be placed as this is needed for the camera lens to image through. If no LEDs can be placed in the middle, how does the ring light illuminate a small object such as a coin that is positioned in the centre of the ring light? The light from the LEDs does not exit the ring light entirely perpendicularly, some of the light will exit at an angle and head towards the centre, where the coin is positioned. Some light will also reach the centre by way of diffusion, where it has reflected off other surfaces at many angles.
With a wider ring light, i.e. one with a larger inside diameter (the hole in the middle, so to speak), less light is able to directly illuminate the centre where the coin is positioned. This is for two reasons: the hole in the middle has a larger area and thus needs more light to illuminate it, and the LEDs of the ring light are placed further from the centre of the ring light, meaning less direct light reaches the centre. What ends up happening is that you have more diffused light illuminating the coin than direct light and you end up with the first image below. When the ring light’s inner diameter more closely matches the diameter of the coin, more direct light is reaching the coin and you get the “axial illumination” effect described above.
7. Examples
Different Lighting Setups
High Angle LED Lamp
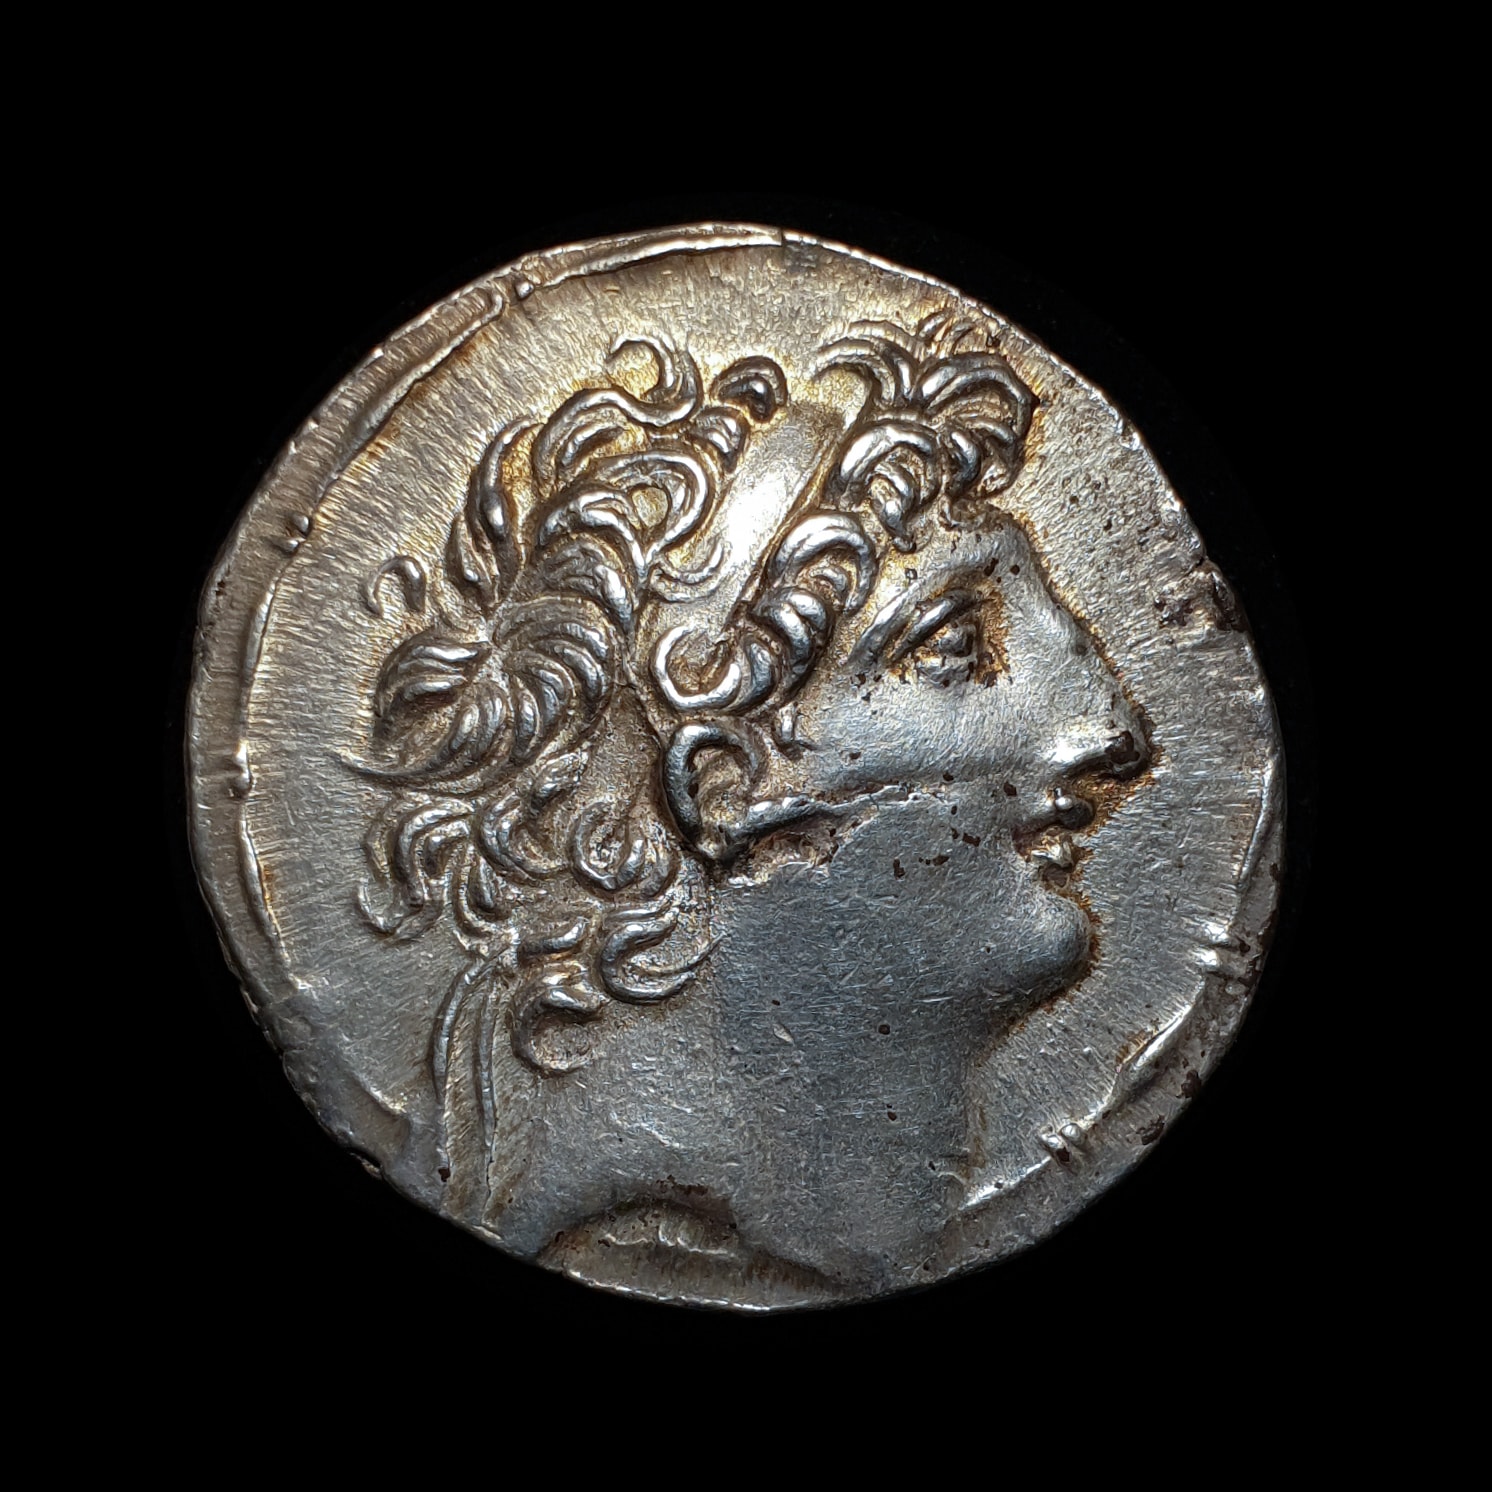
This lighting method works quite well with the coin. There is good contrast between the hair, the portrait, and the fields of the coin. Some toning and flow lines are also apparent. Note, however, the bright white spots on the high points (e.g. diadem) and the obvious directionality of the lighting: the top of the coin is better lit than the bottom. The shadows are also only apparent on the side of features opposite the direction of lighting.
High Angle LED Lamp with Diffusion
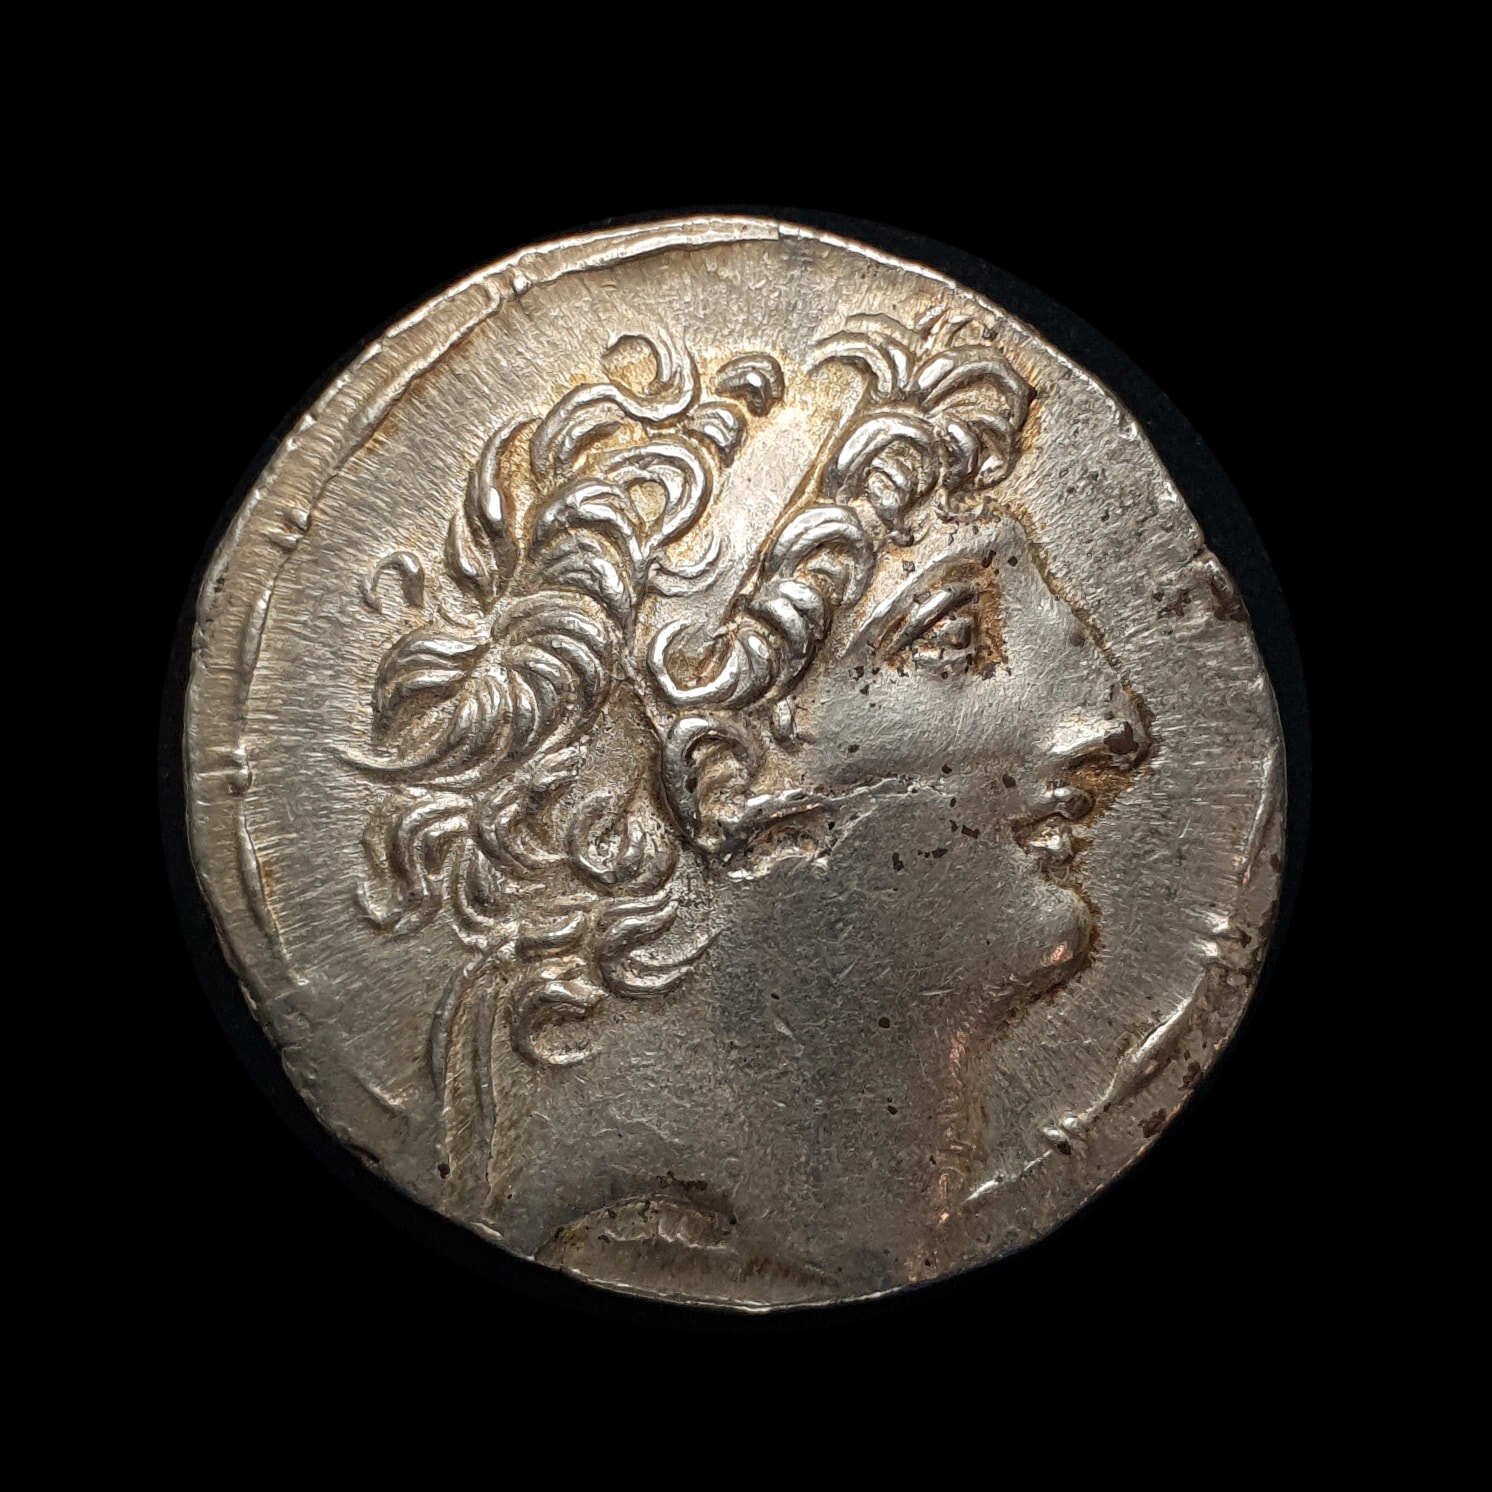
This is the same lighting setup as the previous photo except I’ve used a diffuser to help remove the bright spots from the high points of the coin and make the lighting more even. The downside is that it has removed many of the shadows and thus reduced the overall contrast: the portrait doesn’t “pop” from the surface as much. The result is a flatter looking image, although it is still a decent photo by many standards.
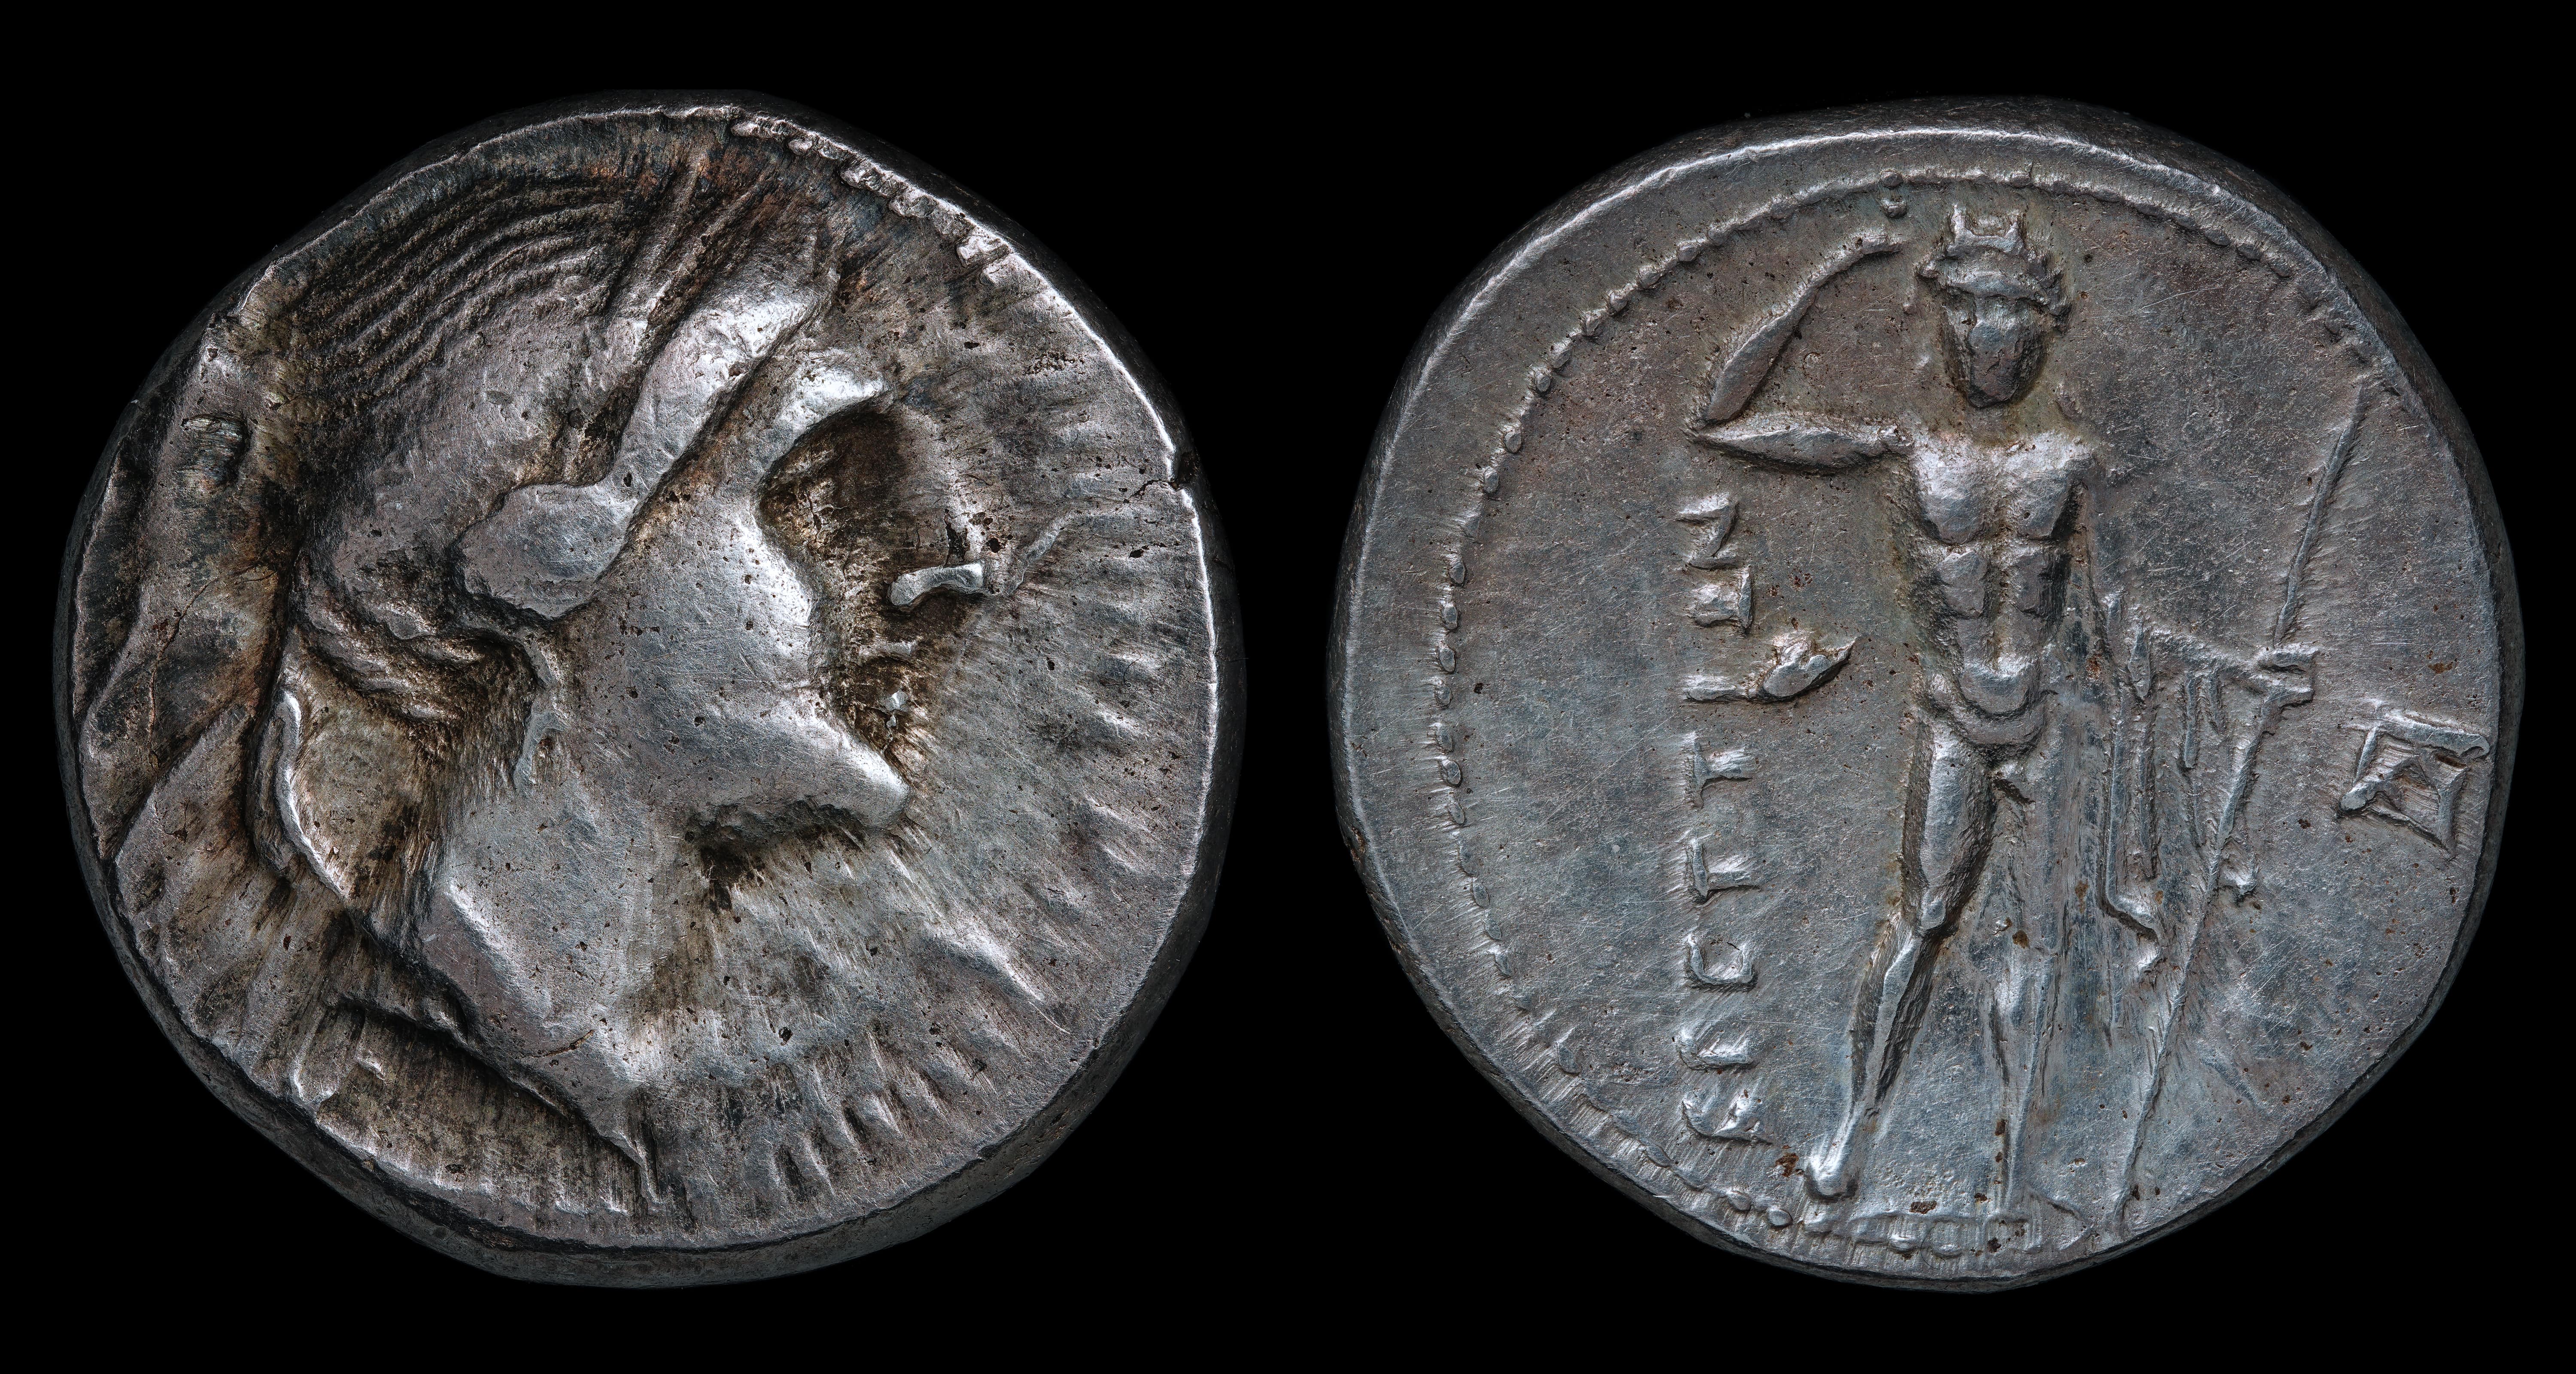
“Axial” LED Ring Light
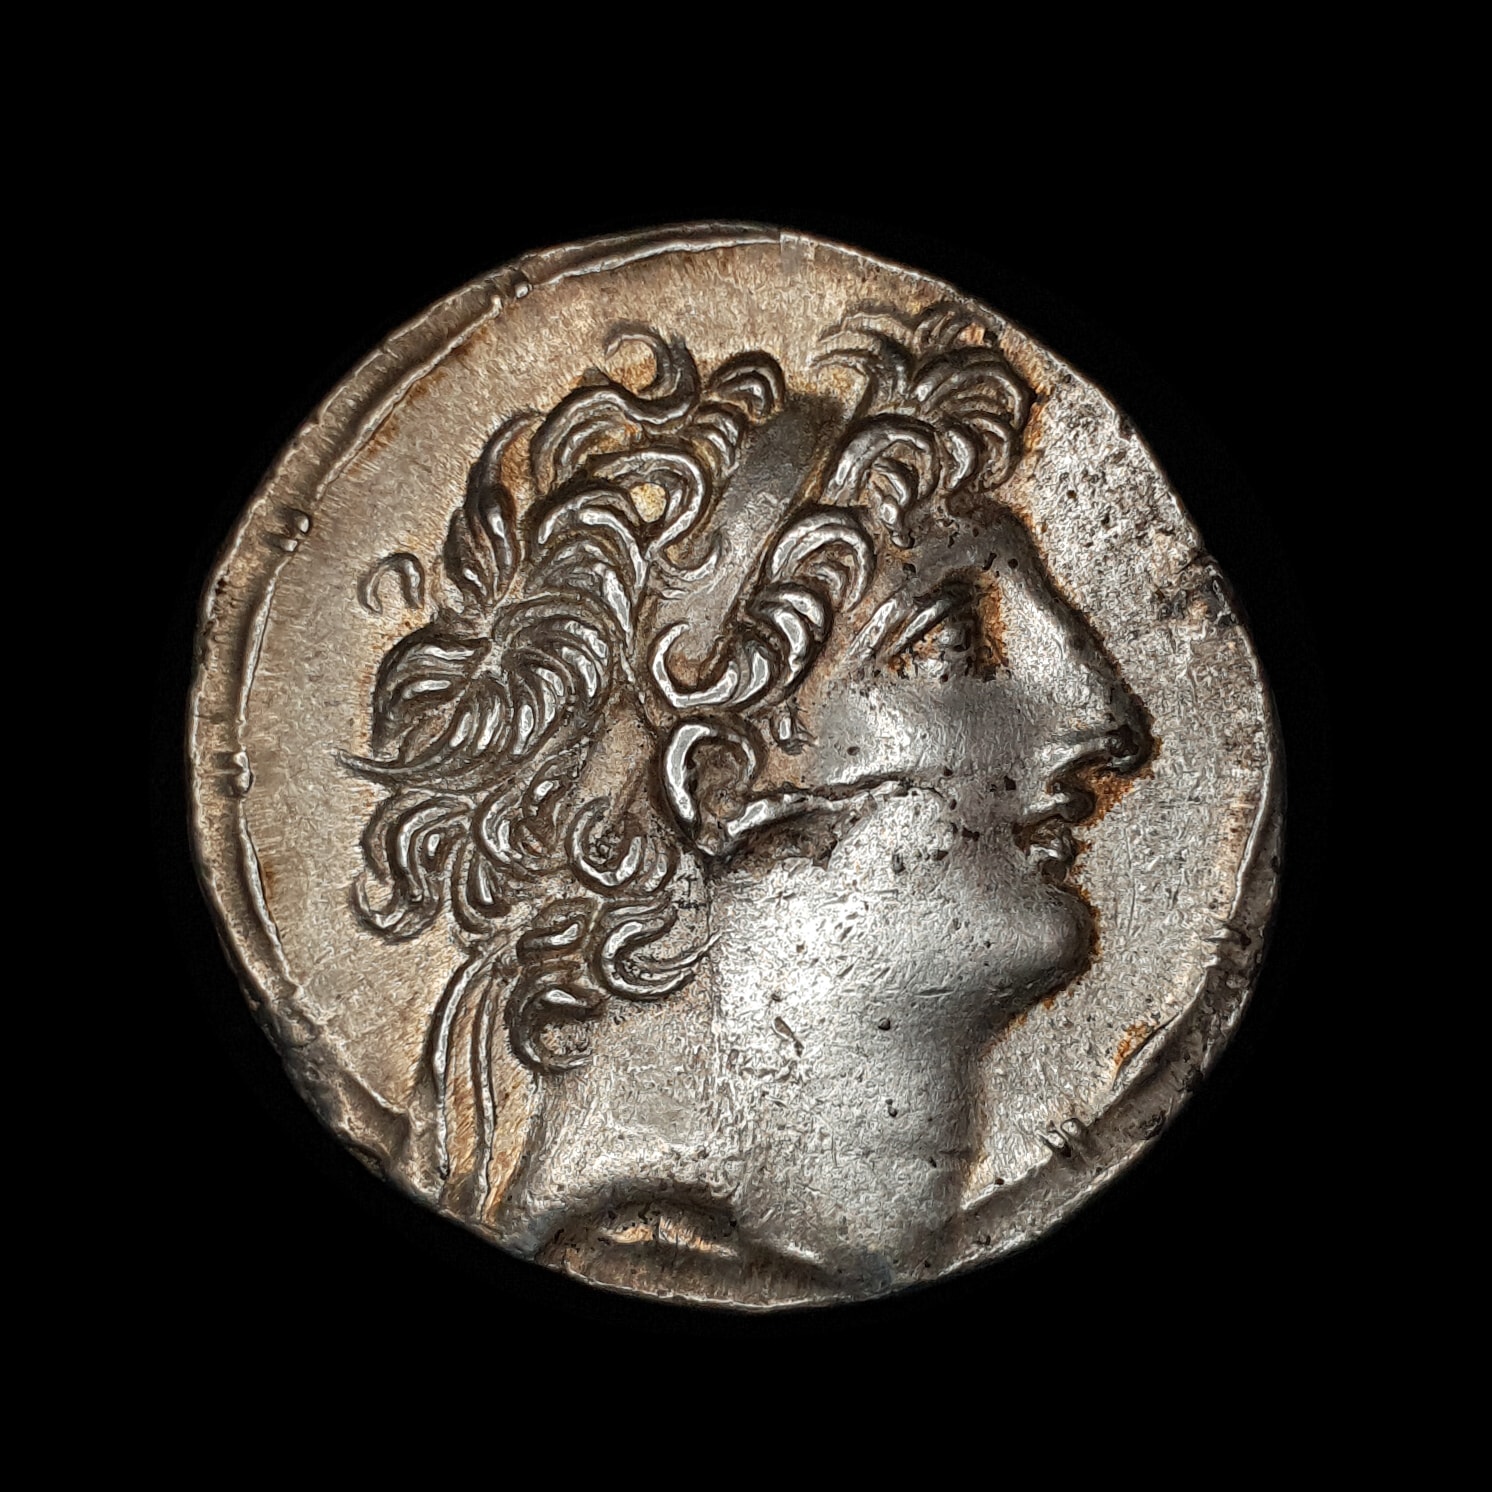
In my opinion, the ring light produces the most pleasing and balanced photo. The contrast is strong but not over-bearing. Note how there are dark lines outlining all the features and these dark lines appear on all sides. This is because they are not shadows but just areas that reflect less light back to the camera.
The toning really pops and we can see its full extent across much of the coin. We can also better appreciate the contours in the portrait, particularly around the neck and cheek area, where the lighting gives us the impression of depth. Lastly, note how there are no bright spots on the high points of the coin – and this is without any diffusion! The coin is evenly lit across its surface and has no apparent directionality to its lighting.
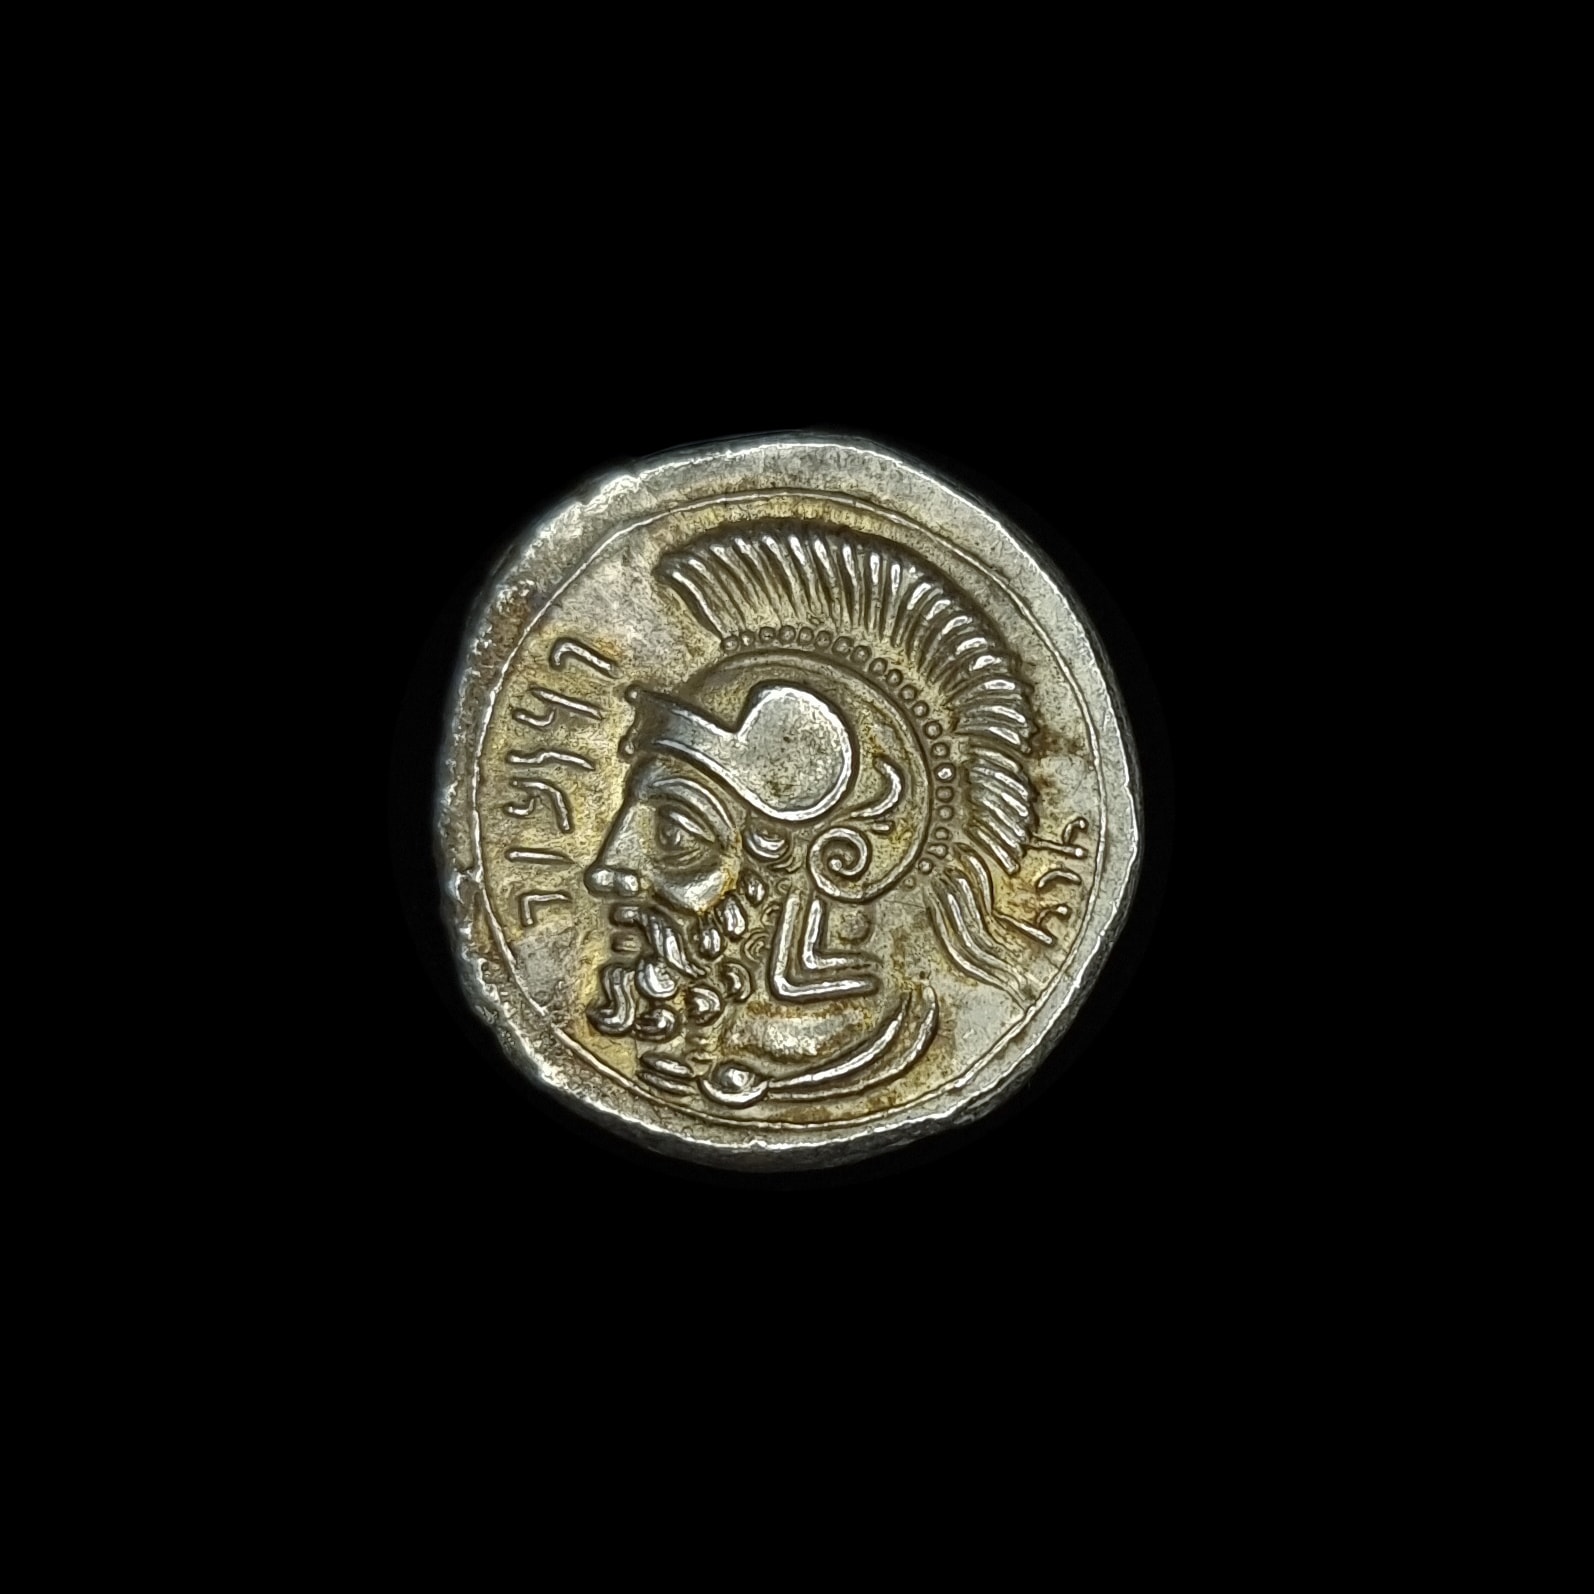
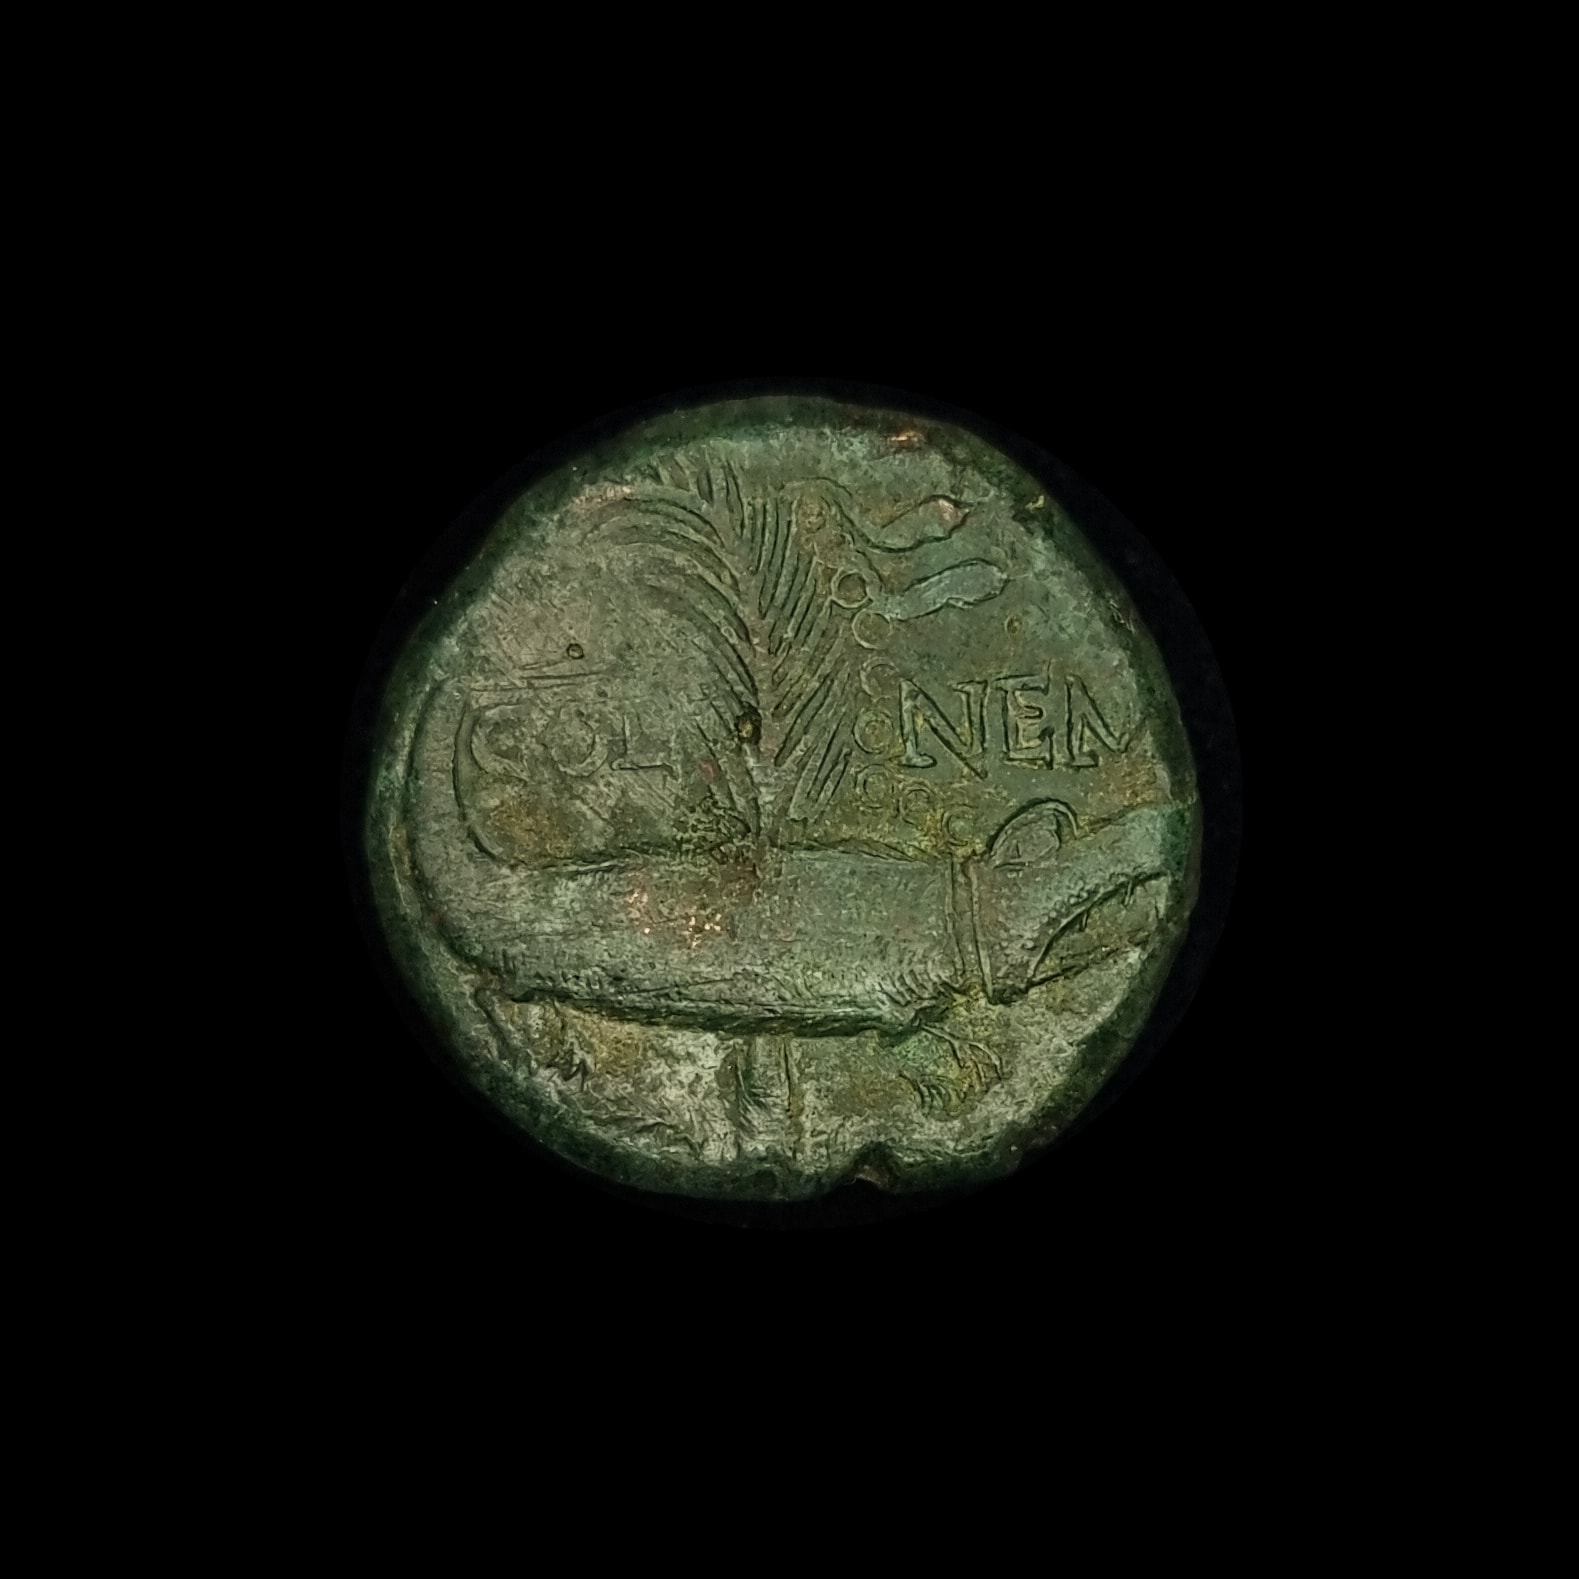
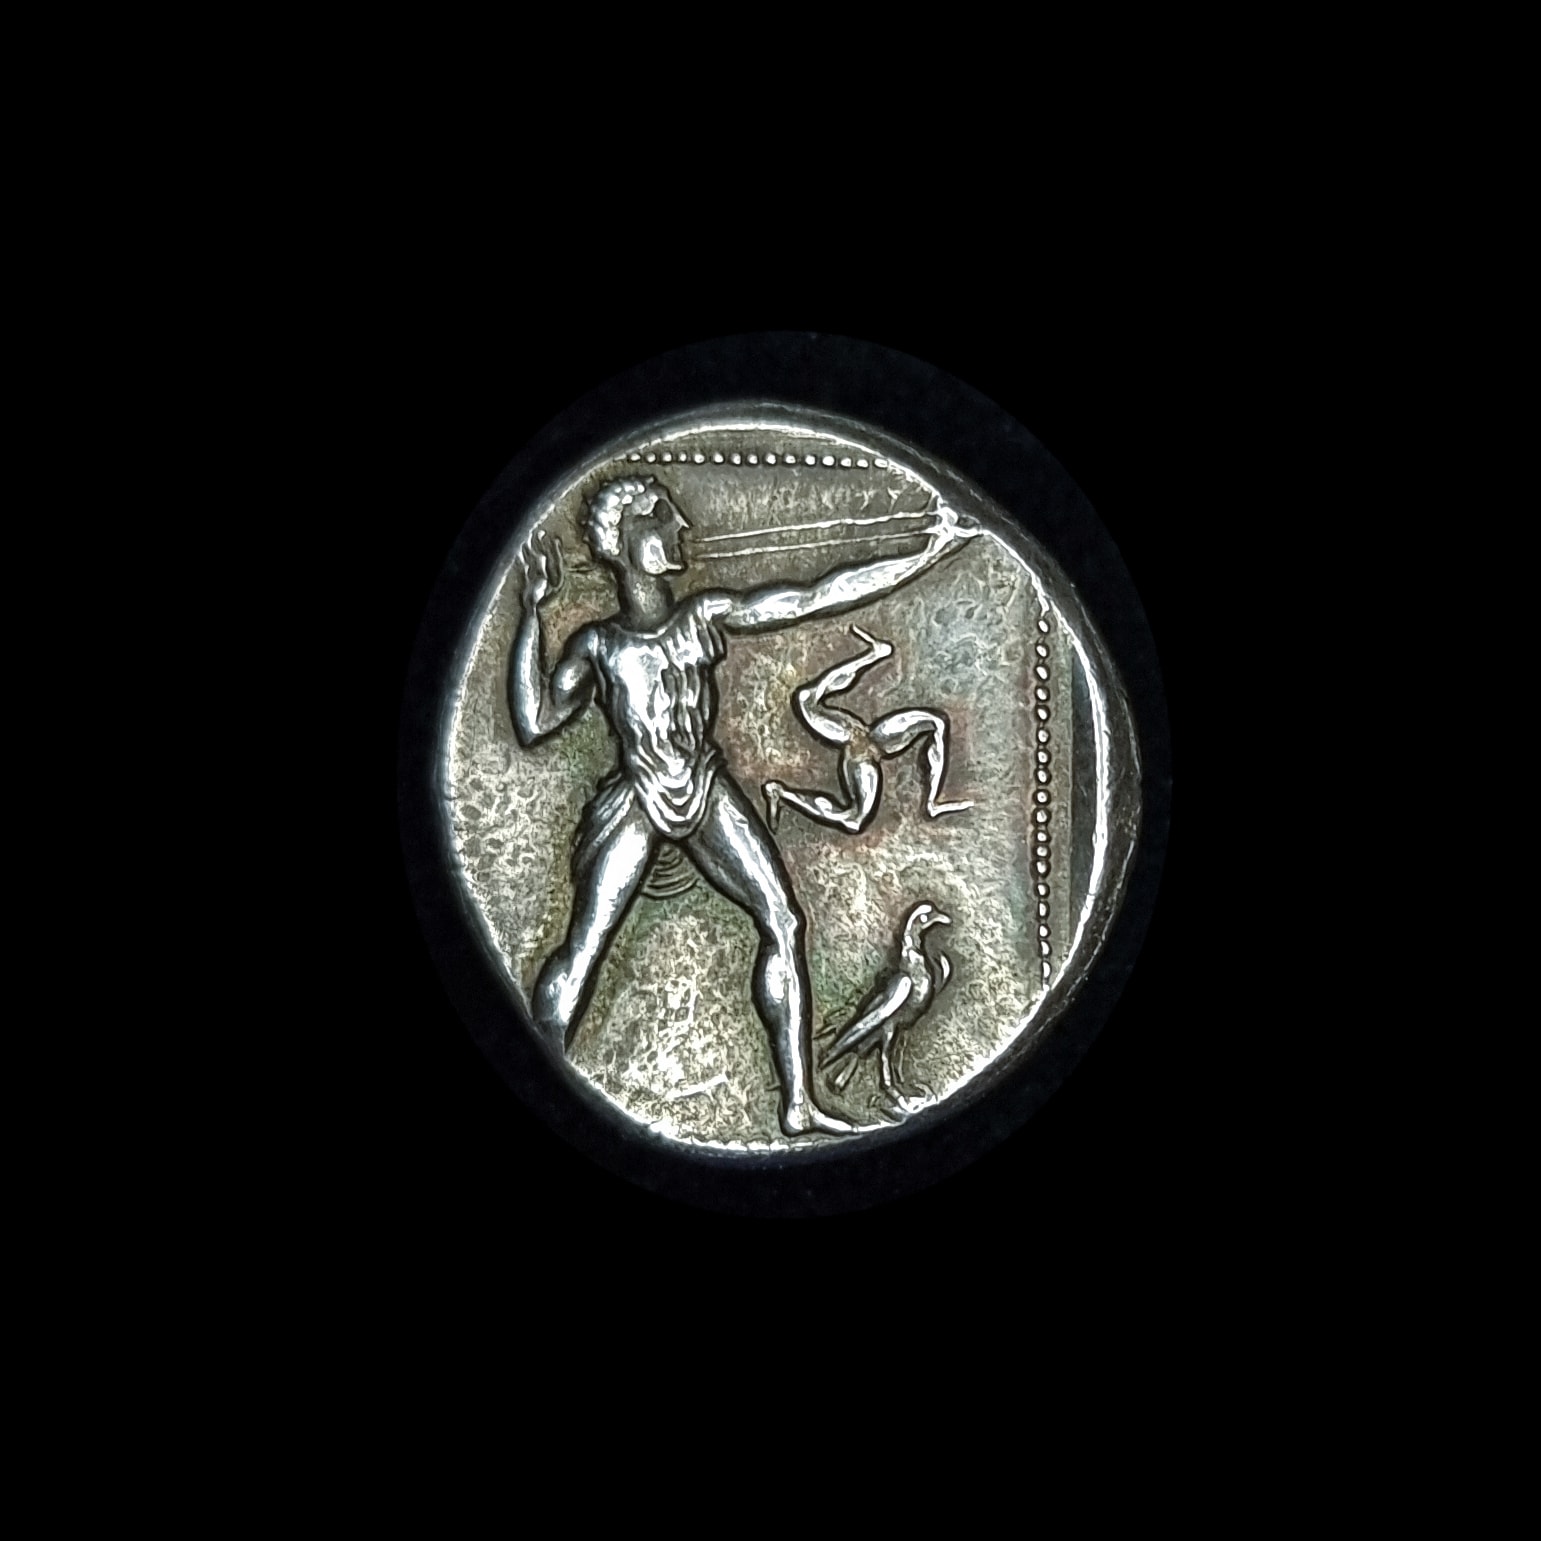
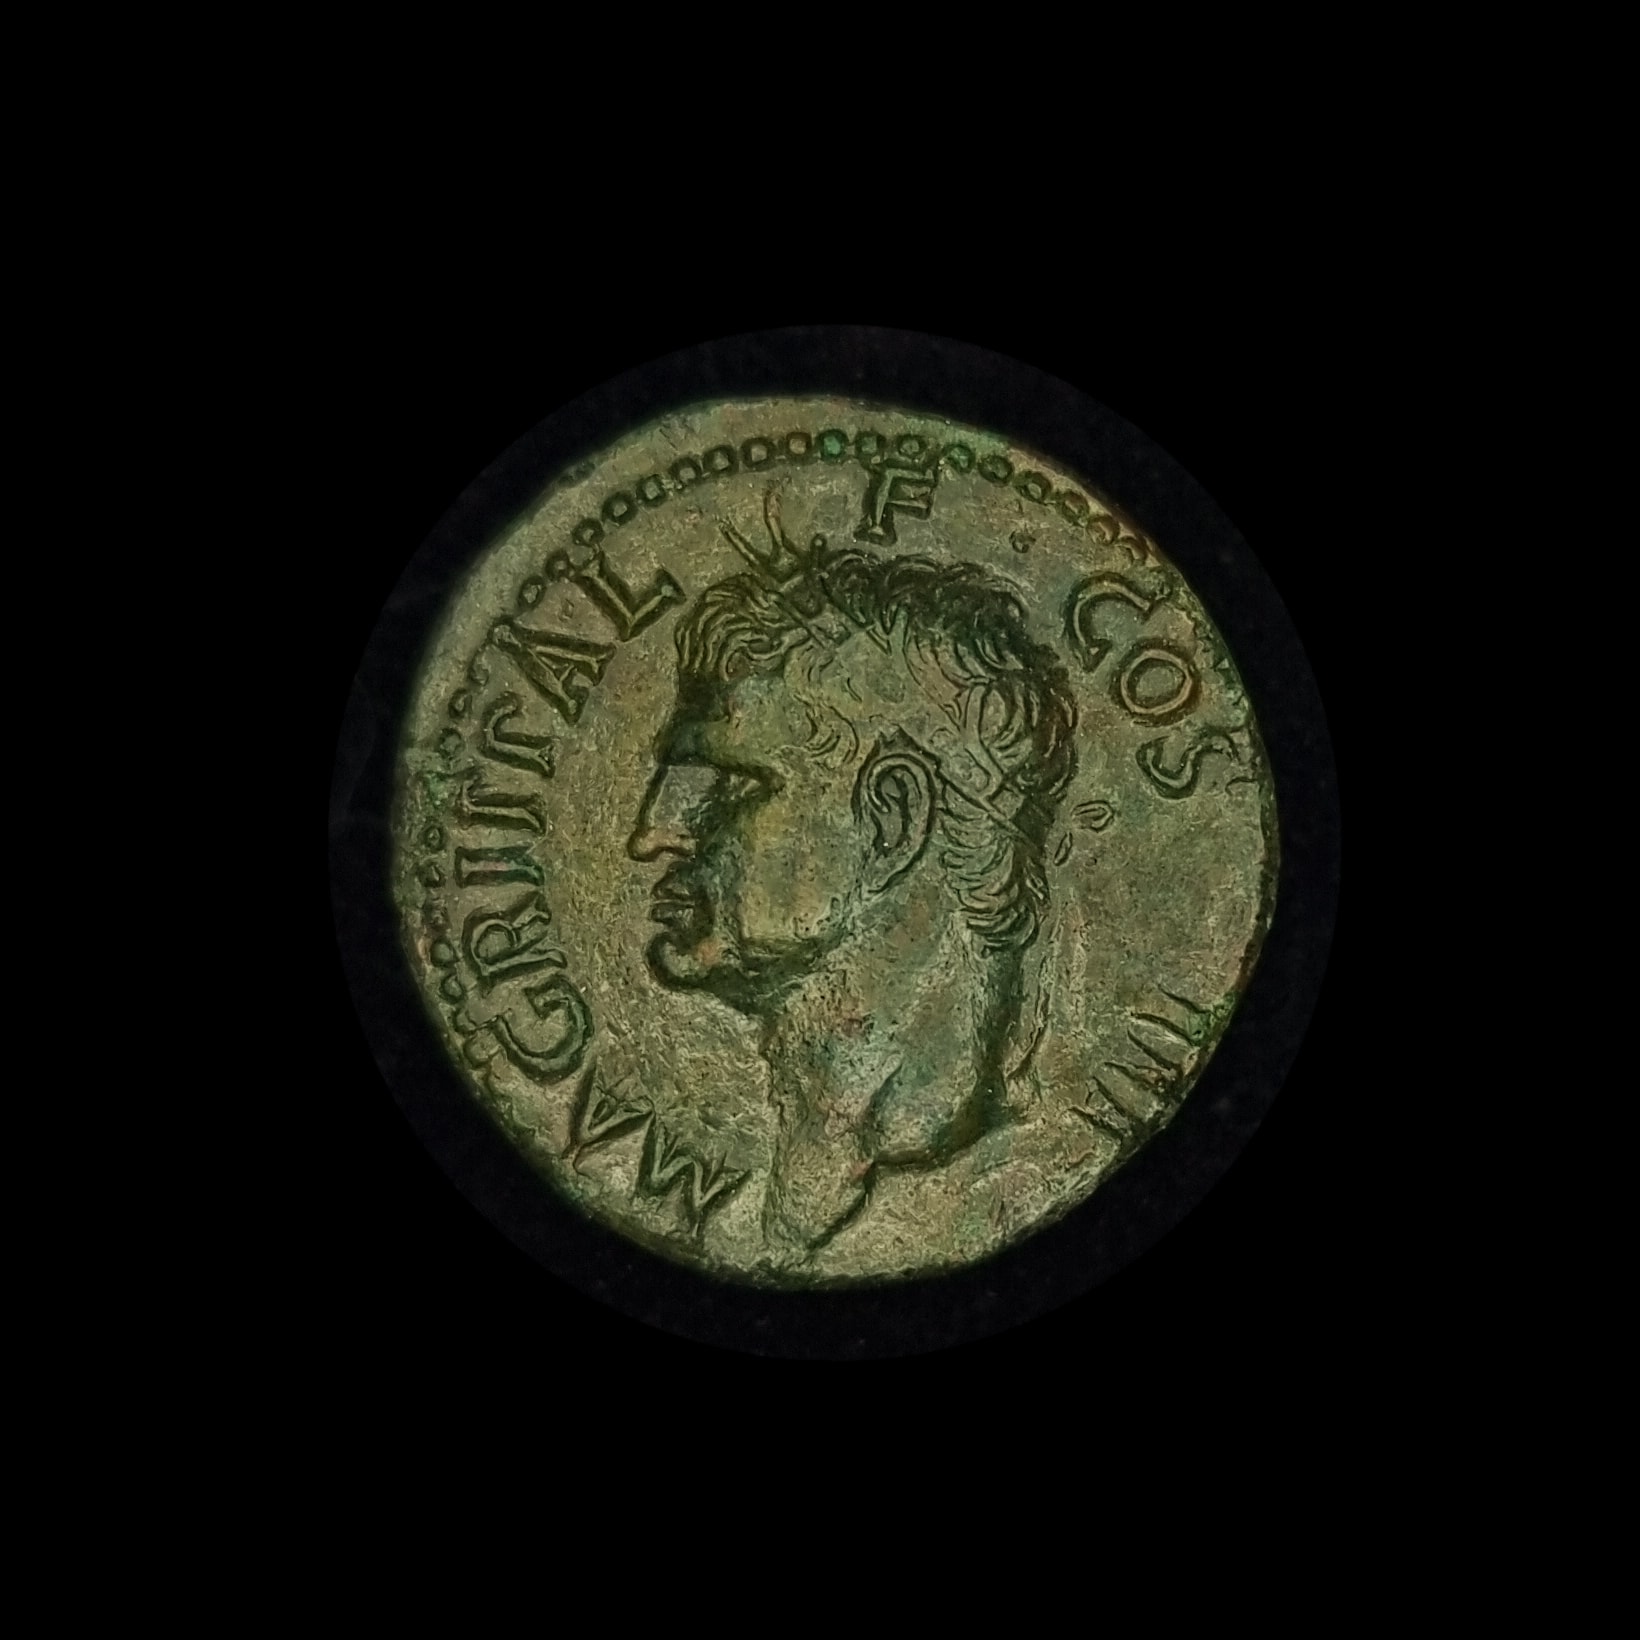
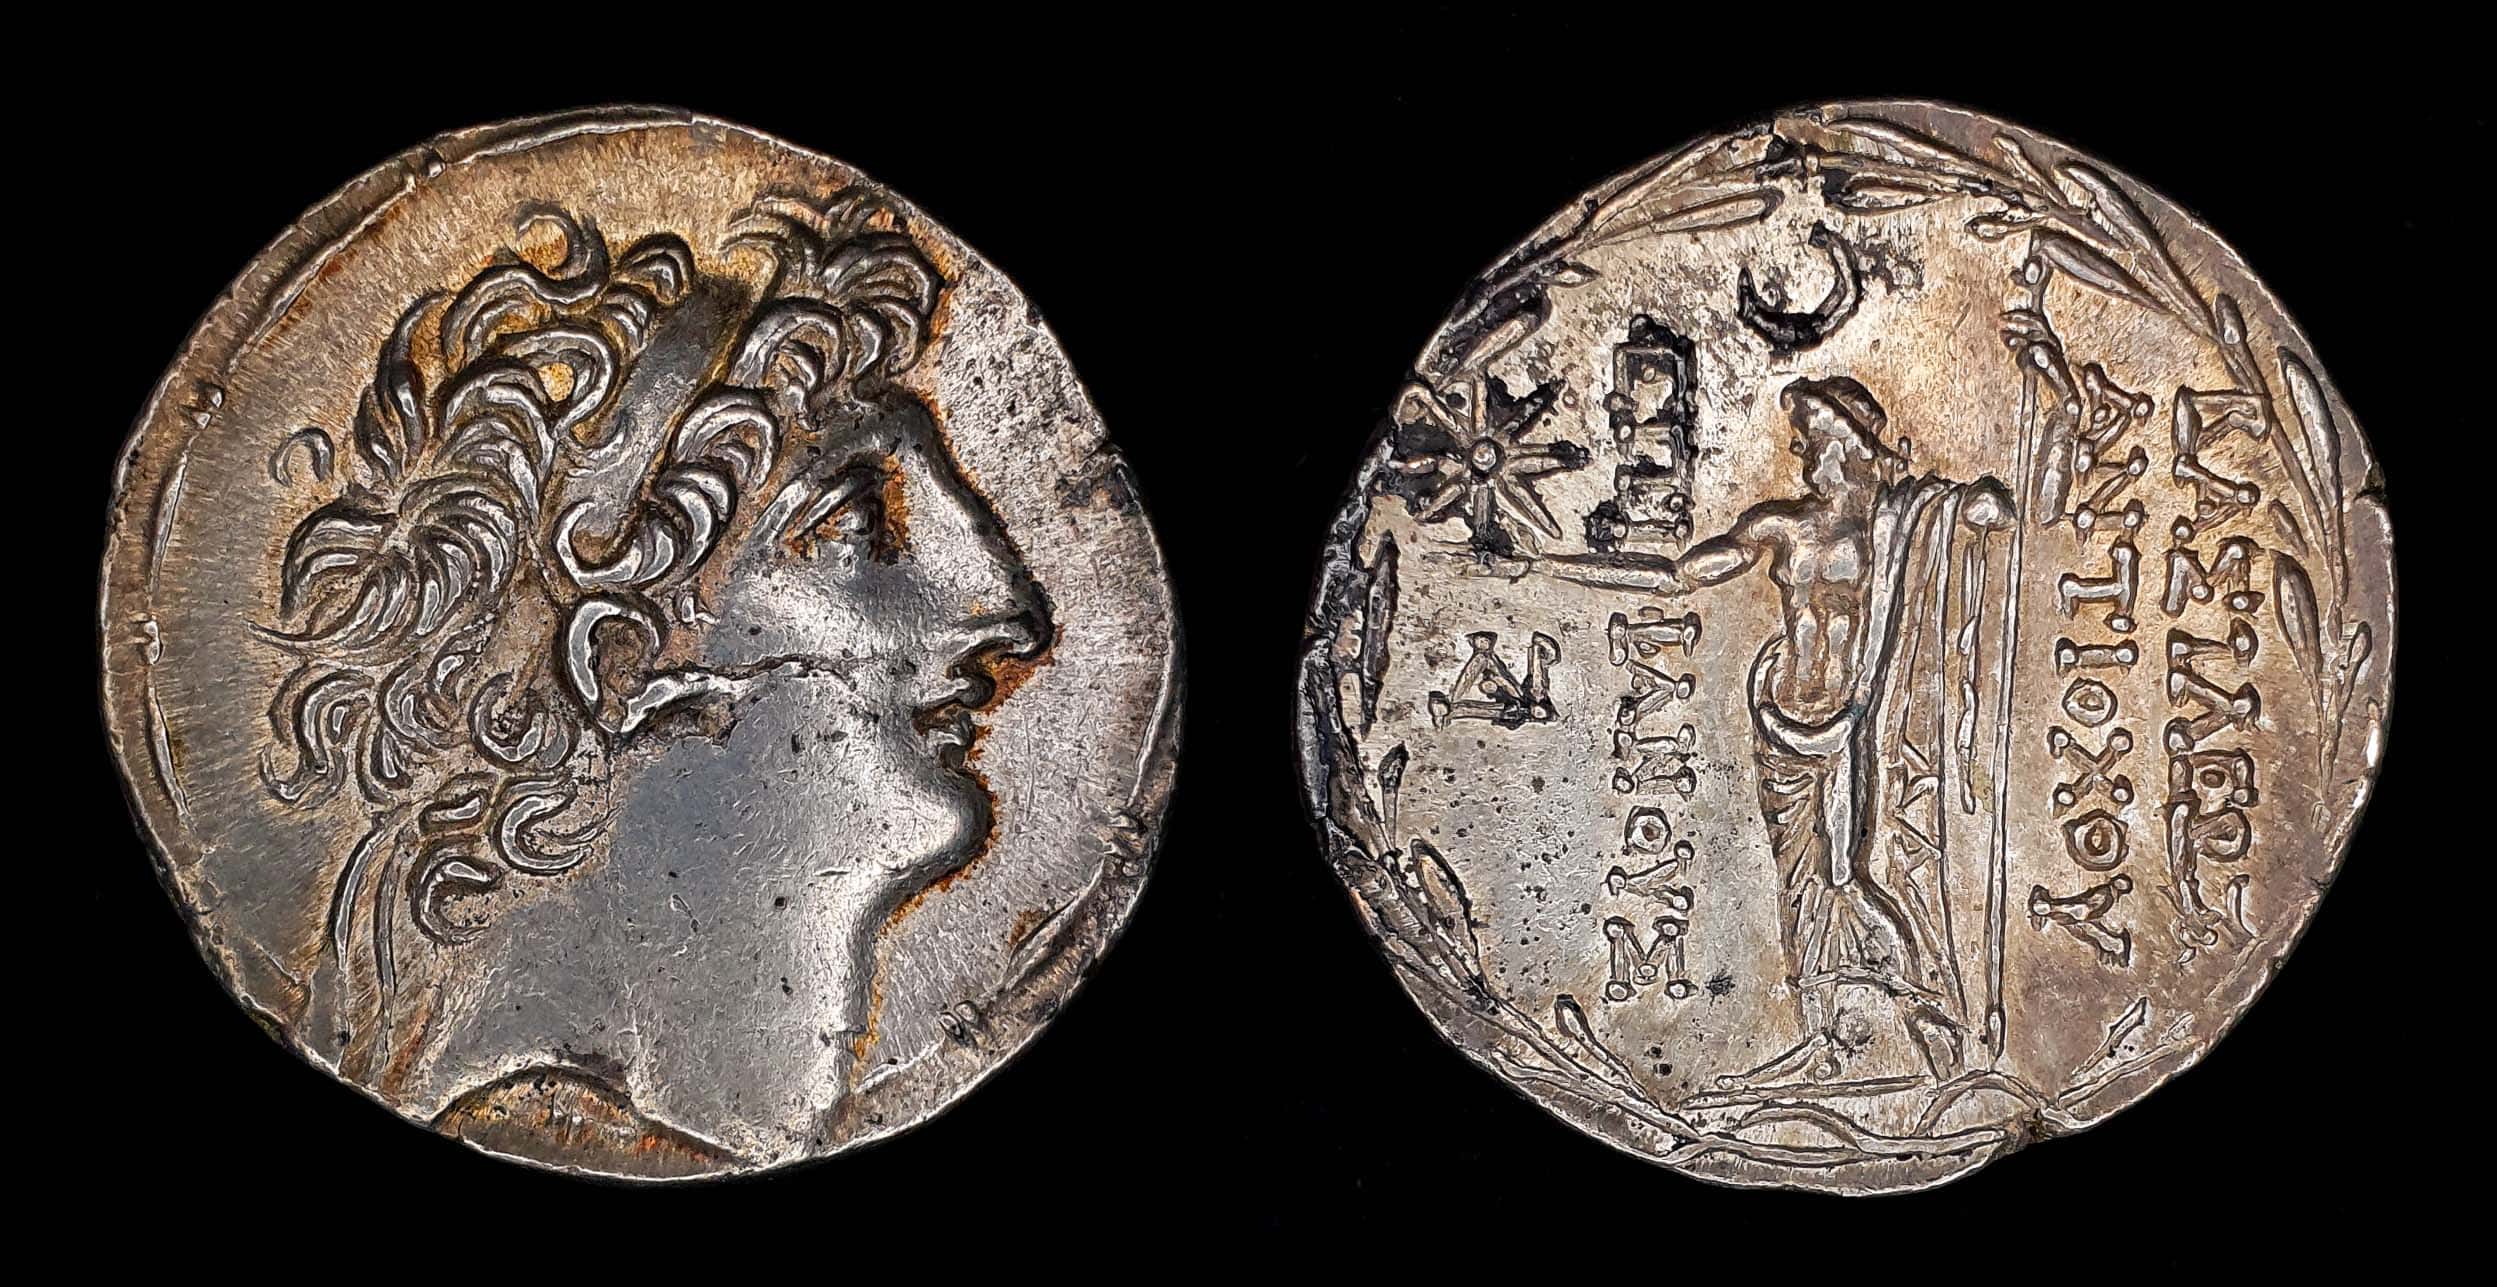
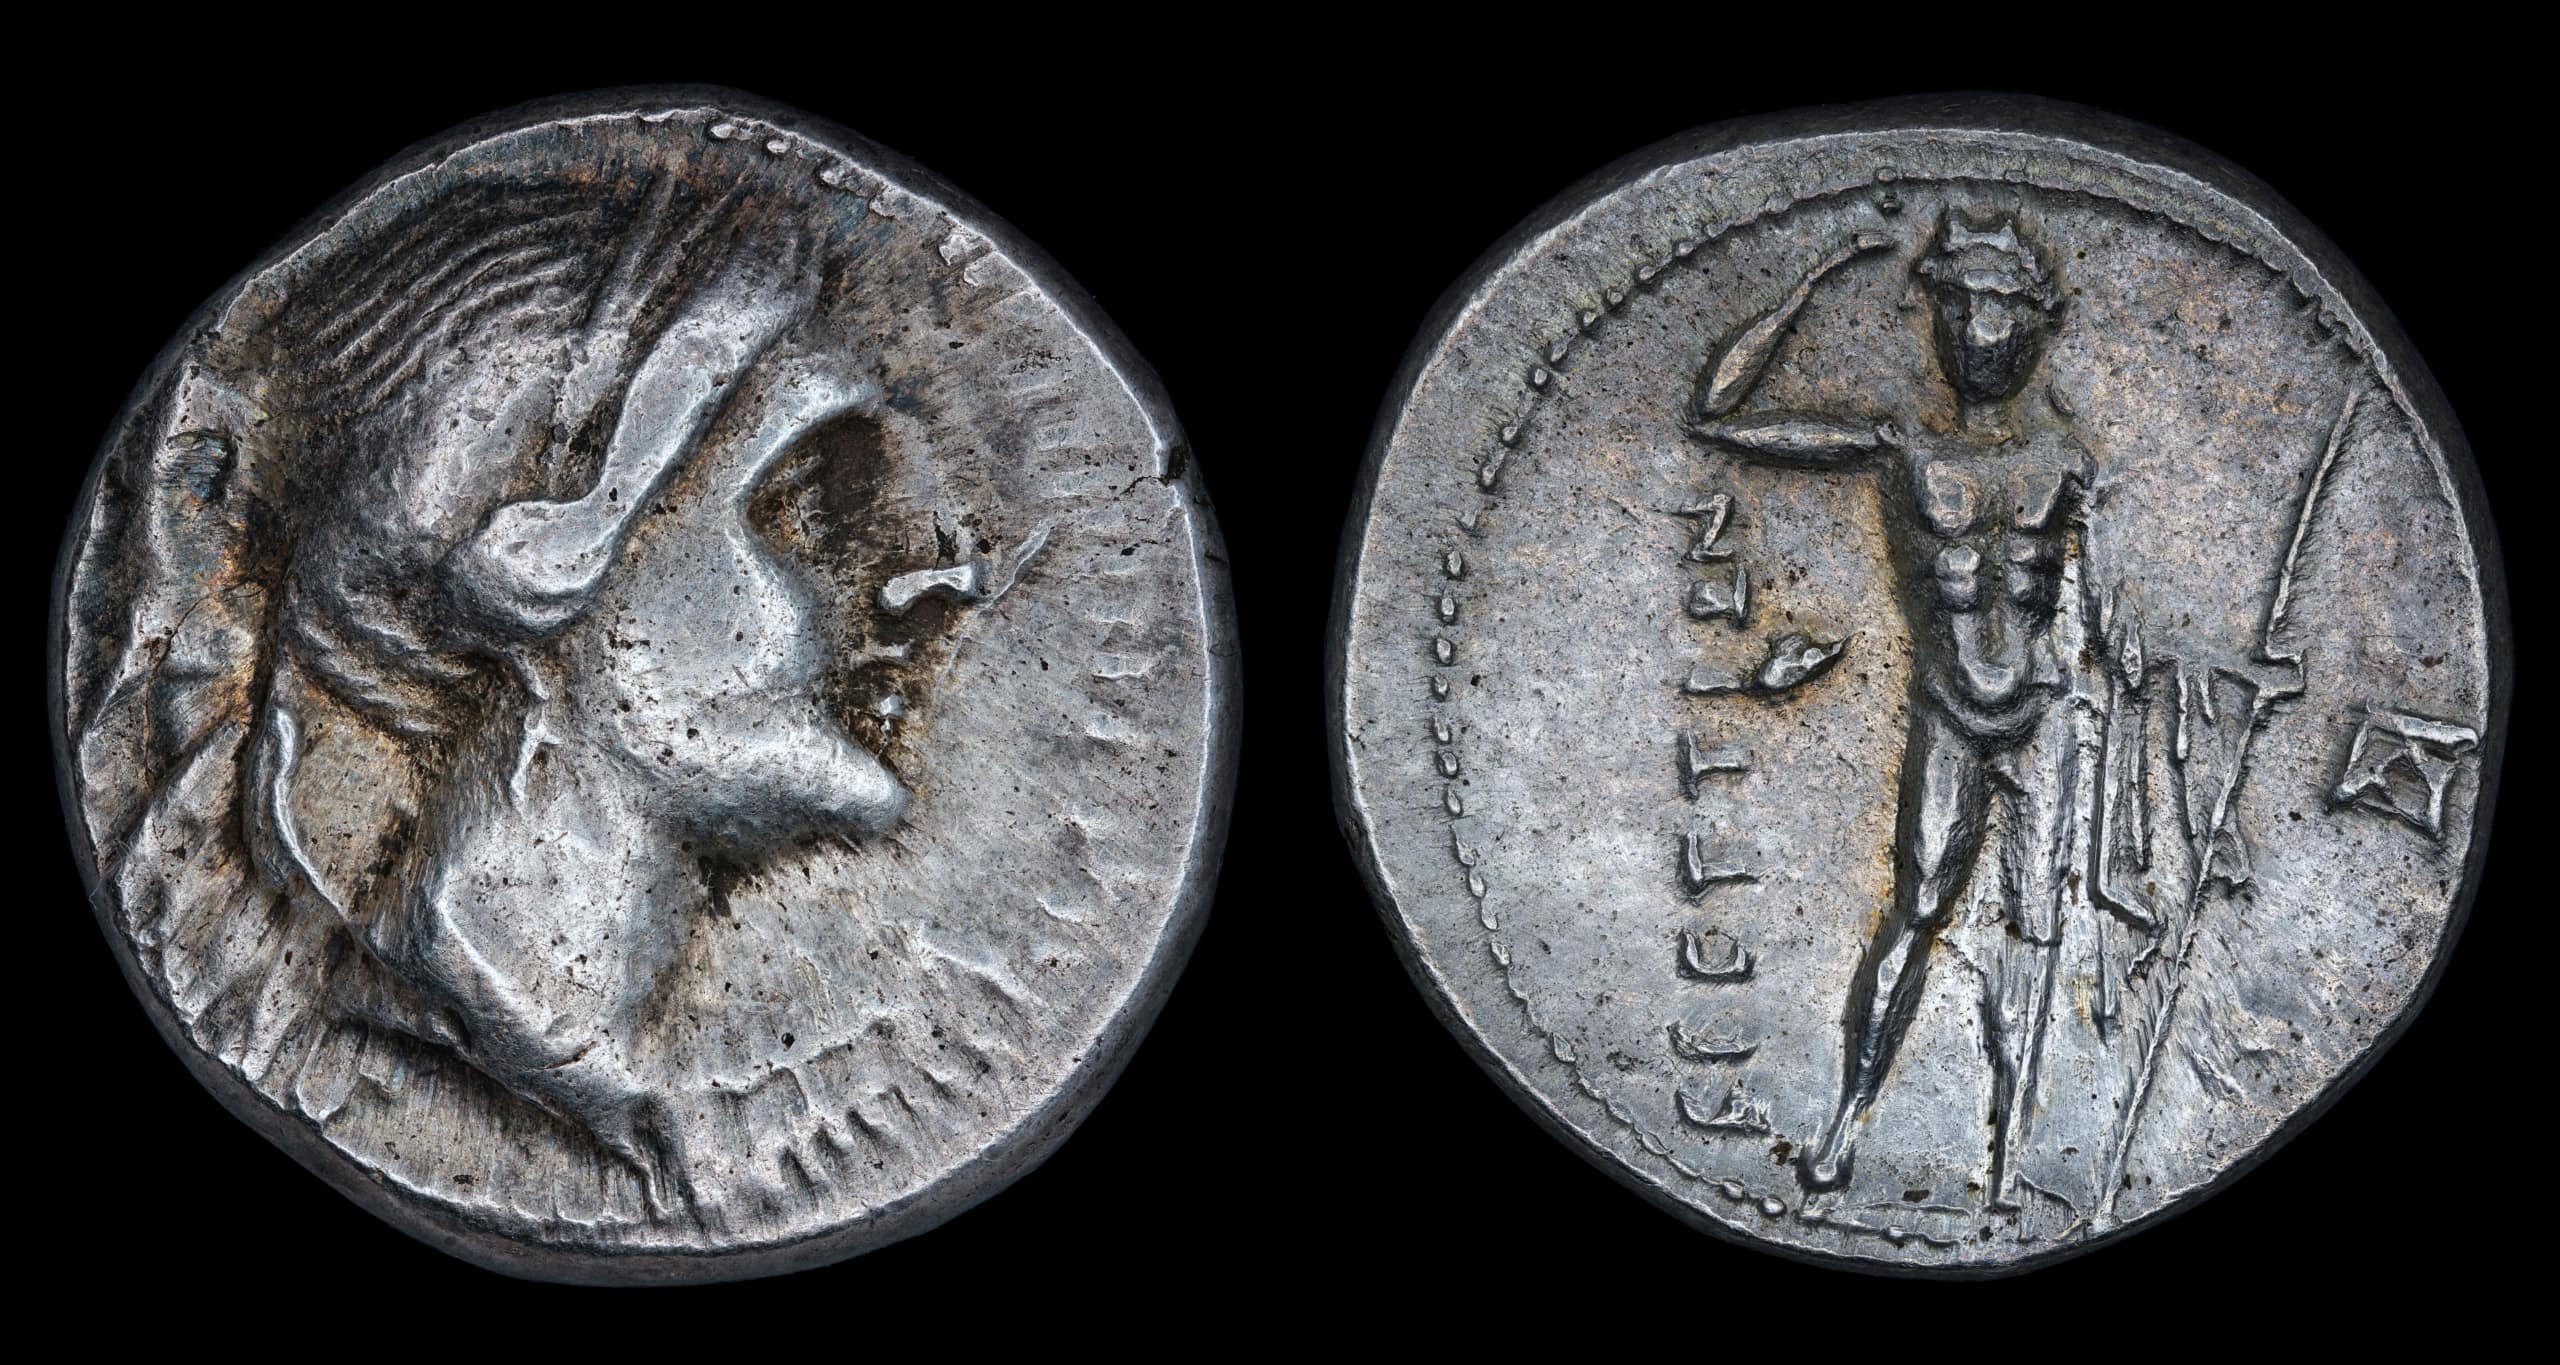
Various coins photographed according to this guide
(unedited so the white balance is not perfect)